Still getting the hang of our GF, had it about 2 weeks. Yesterday I cut a small shape out of leather, today I tried to cut the same leather with the same file and it won’t cut all the way through. Is there something I should check that could have changed?
If all else is the same, then a likely culprit is that your leather is not perfectly flat to the bed today. If you aren’t already, try holding it down with magnets or tape.
1 Like
Proofgrade leather or other? The reason I ask is because PG sets everything up. With non-PG you have to enter the focus height, power and speed. Also making sure everything is flat to the crumb tray, lens and window cleanliness etc.
1 Like
I am using non proof grade leather, veg tan but the only setting I changed yesterday was the focus height as my leather is a bit thinner than the PG setting for thick leather.
The piece is 5/6 oz Vegtan with 582U tacky paper applied, speed 500, Power 100 # of passes 1, Focus Height 0.08
Yesterday and today I used the Honeycomb “T’s” to hold the leather flat and in place.
To cut successfully, there are three important things to check. First, your material must lie flat. This requires a clean, properly installed crumb tray and flat materials. Second, there must be no obstructions, dirt, or damage preventing the laser light from reaching your material. Third, your design must be set up properly - for example, with lines that are fully on the material and that are set to cut. It’s hard to know which issue might be affecting your print, so please thoroughly inspect your unit and design according to the suggestions in our troubleshooter.
I’m sure your file is fine, since it worked prior to today, but it’s worth re-checking the first two. Best of luck!
I’m not familiar with leather weights so this may not apply, but if you are using the T pins around the edges to hold it down, is it possible that there is some buckling that just pinning it on the edges isn’t addressing? If I have already cut voids from the interior of a piece of material, I like to put magnets around those holes to address any warping that has been released/caused by those cuts.
1 Like
Unfortunately there is no buckling. It’s completely flat. We’ve taken the crumb tray out and made sure it’s in it’s proper place. We’ve cleaned the lens.
ETA: Hmm, we tried making another of the honey comb pin and it came out great so it must be something in the settings for the leather item but no idea why it’s different from yesterday to today.
Veg tan thickness can vary greatly, even with pieces cut from the same hide. If that threw the focus height off enough, it could affect the cut. At least, this has happened to me before.
The honeycomb pins look cool, but I have not tried them yet. FWIW, I’ve had good success holding my leather down using magnets.
2 Likes
All right gang, we tried again and it was the speed. No idea how it changed but it should have been set to lower, 168. Thanks for helping us poke at it till we figured it out! Like I said, still getting the hang of it!
5 Likes
Yay! Glad you figured it out. Sometimes I just chalk stuff up to “maybe my fault, maybe beta software.” 
1 Like
After seeing your speed 500 comment above, I was scrolling down to point out that PG thick uses a much slower speed, but then you figured that out already, so this post is superfluous so I really aught to click cancel, but…
I had an issue where my brand spanking new GF failed to cut a sheet of proof grade 1/8" maple ply after just a few uses. It missed cutting through by the thickness of the single outer maple ply layer.
Since I had not changed any parameters and was using proof grade materials I figured it might be a dirty lens so I went about cleaning the lenses. The “input” lens, the one on the side of the cutting head that directs the beam into the cutting head had a slight amount of smoky residue, but was mostly clean. The main output lens appeared to be totally clean. However, I discovered that the main lens had become unseated and was resting about midway down the housing. Using the blue lens tool I re-seated the lens. (That means I shoved it back up into the hole all the way until the magnet grabbed it). All good after that.
This makes sense since the beam was probably about a half inch out of focus, if not more.
After unboxing, assembling, and prior to operating my GF for the first time I did not check to verify that the main lens was seated properly/completely in the cutting head. Methinks that this would be a good tip for future users to make sure that the main lens is seated properly in the cutting head before installation on the rail, and as anybody who as ever opened a box of cookies knows, some settling may occur during shipping.
I had no reason the think that the lens would be out of position. However, going forward, if my GF fails to cut through proof grade materials, I will check to make sure that the main lens is seated properly FIRST before checking anything else.
Happy new owner,
Dave S.
2 Likes
The lens is designed to be moved up and down by a small motor inside the head. It does this in order to focus on the material at the proper height. It is not unusual to see the lens in a position other than seated all the way up in the housing.
If the lens does become detached from the magnet inside (it’s a pretty strong magnet, so not too likely), it would fall out of the head onto the bed.
You can get a better idea by looking at a cross section of the head assembly:
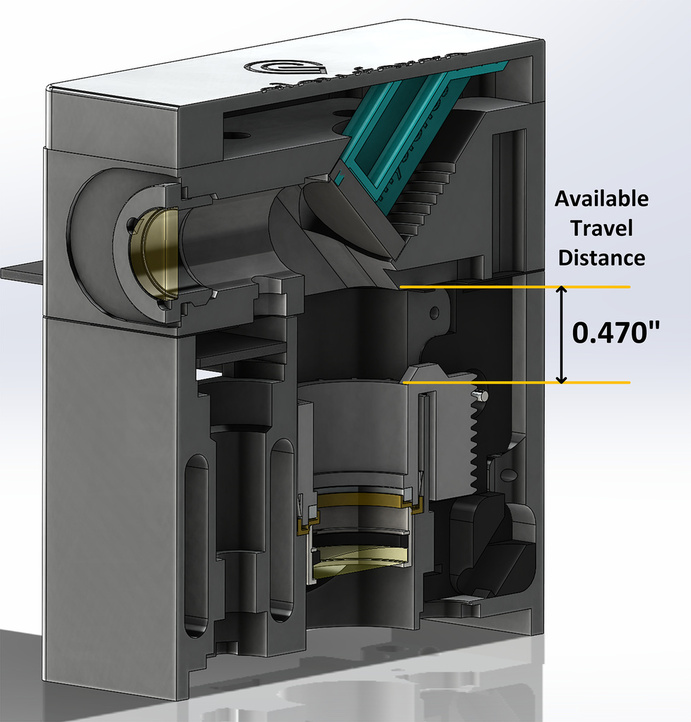
5 Likes
I’ve had my forge for about 6 weeks now and have been cutting lots of leather (not proof grade).
Like you, I’ve found sometimes it cuts through perfectly and sometimes less perfectly. I’m cutting from veg tanned sides - and it seems that the best cuts come from the sections farthest from the belly. The areas near the belly are more dense and even if they have the same thickness the cuts are not as clean.
Before picking up my pieces from the crumb tray I check to see that it’s cut through and if not I run another pass. I’m using magnets to keep things flat.
For 2-3oz I’m using 230 speed and 90 power - a slight bump up from the proof grade settings for medium natural leather.
2 Likes
Thanks for the above! I’m thinking of tweaking with the settings to see if I get a bit less char that sheds off on the edges. I like the consistent edge but I’m concerned it will “bleed” or move into the surface when I apply finishing products (like Leather Balm or Eco Flo).
Would love to hear how it goes!
It does bleed and it’s hard to clean off without changing the softness of the leather. It doesn’t seem to be a problem for black or a dark color end product, but I haven’t figured what to do for light colors.
I tried applying a water-based finish before cutting, but it seems to be smokier during the cutting so I’m not sure I will continue to do that…
Still experimenting!
Thanks, nice to know about the focusing mechanism.
Dave
@miriamdema, I’m glad you’ve solved it.
I’m going to close this thread - if the problem reoccurs, go ahead and post a new topic.
1 Like