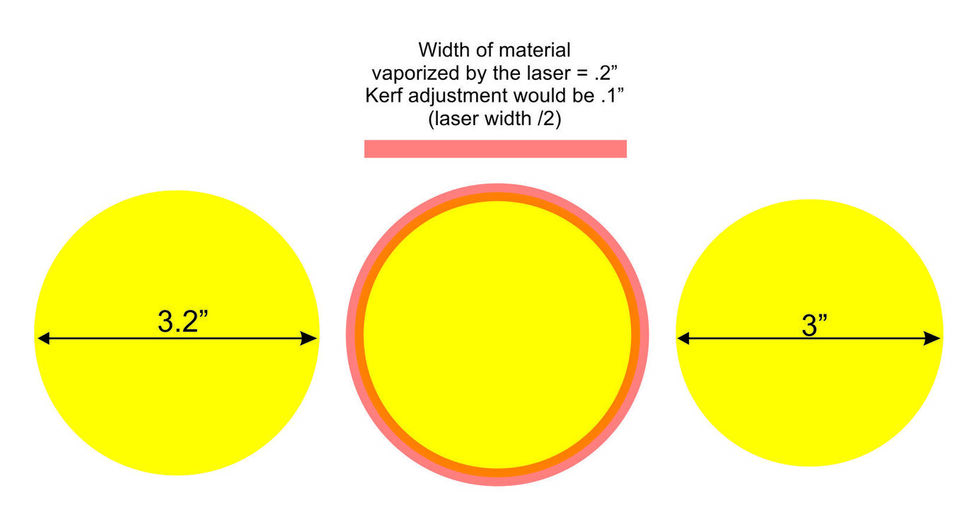
Kerf is basically how much material is vaporized by the laser beam.
In the first example below, if you want a 3" circle, then you would adjust the size of your shape larger using the known kerf width to compensate. (.2" is NOT a normal kerf size but I used here to demonstrate so its easy to see)
This would be an example where auto kerf adjustment in the Glowforge would work.
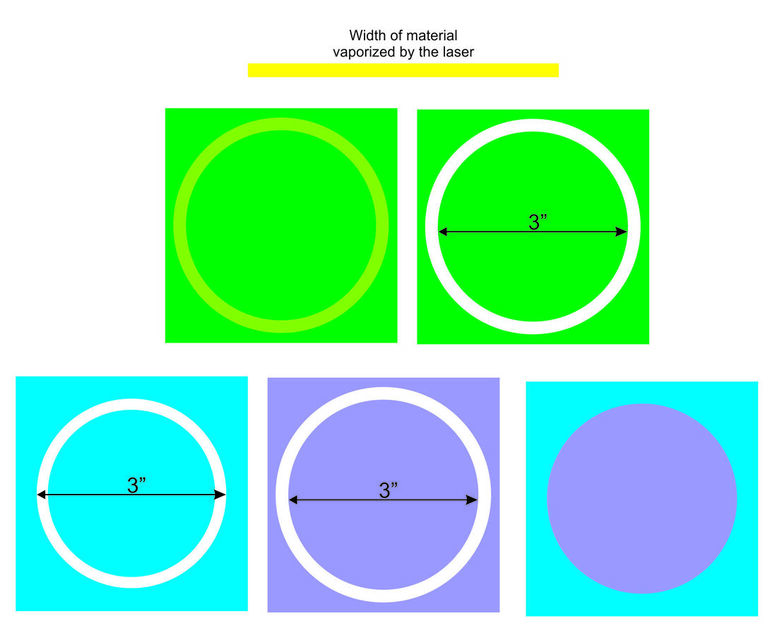
Example 2 is when you wish to cut a tight fitting puzzle or inlay.
Using one piece of material, represented in the green, shows the gap made by the laser cut.
The procedure below it shows the correct way.
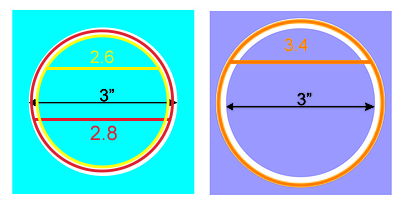
If the kerf was .2", the blue material would have a circle cut line at 2.8" in diameter. And the plum material would have a circle cut line of 3.2".
Here’s an example where auto kerf adjustment would not work.
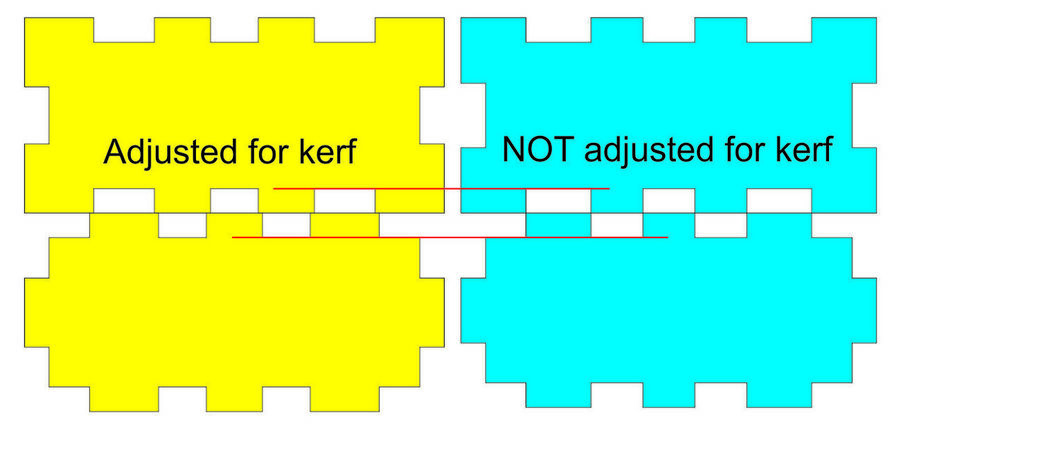
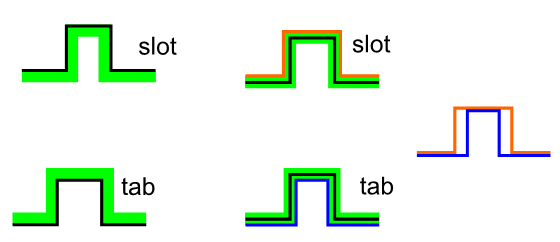
When cutting slots for a box.
The widths of the slots in the yellow material are adjusted however the depth of both are the same as shown with the red line.
Here is a close up. As the laser cuts away the material of the yellow/orange set, the slots fit nice and snug. However the blue/plum material will not.
I dont see how auto adjust would work in this case since only the vertical lines move. The yellow slots are thinner and the orange tabs are wider.
One point to keep in mind when talking about adjustment for kerf is the type of fit you want to achieve. In materials with some flex you can get away with what is called a line-to-line fit where the dimensions of the slot and tab are exactly the same. If you are working with a brittle material or want a joint that is temporary or movable you will need more clearance between the parts. For wood, I use a line to line fit or a clearance of about 0.002 inches for permanent joints with or without glue. For glued joints, I usually allow 0.001 inches to 0.003 inches as the glue will swell the wood.
For hard materials such as acrylic I usually use a clearance of about 0.001 inches between faces. I make a lot of precision joints so I rely on the joint to keep everything in place.
Great point. All the more reason why it’s sometimes best to design the kerf adjustments in the software and not rely on an automatic kerf adjustment at the cut.
Seems like it’s half a dozen one way, six the other.
Actually, it seems like it would be easier to tell the Glowforge software “cut an extra half-thousandth off” than to offset your original files by “1 kerf radius plus 0.0005”.
Okay, I’m kind of daft and I’m not sure if I’m following the explanation.
Is this right?
How does the auto adjust work? Do you essentially tell it to adjust inside or outside the cutline (like, you tell it you want a hole exactly 3") and it moves everything .2", or is there something more to it? Because that doesn’t seem very auto. Or is the auto part of it that glowforge knows exactly how wide the kerf is going to be?
Is the kerf adjustment just an automatic offset to compensate for vaporized material? If you can override the automatic kerf thing and tell the glowforge the kerf is, like, .25", that would solve the entire discussion about whether or not glowforge will have an offset feature, no?
I’m with you. I am interested in how the Glowforge is going to automate this process. I can’t see it working for everything, but there will be some scenarios that will be automatic. Probably having something to do with a sharpie and doing inlays and cutouts.
I assume you woukd draw a 3" diameter circle and the Glowforge would auto add the kerf adjustment on known material (.2") and cut it with a centerline at 3.2" That would leave the inner circle at 3"
Forgive me if I’m remembering this wrong, but doesn’t the GF adjust for Kerf by letting you choose to cut inside, on, or outside the vector?
So, in the image above, the green is the laser beam width. On the right is cutting “on the line” and creates a gap in the final product, as indicated by the orange and blue lines. On the left is cutting “outside” the line and those pieces will fit together perfectly.
I never really thought about GF kerf being different for the different materials, but it certainly makes sense that a soft, airy wood would burn away more than a dense, hard wood, resulting in a larger kerf. So, even if we can tell GF to cut “outside” the line, there will be some trial and error with non-proofgrade materials.
I believe the cutting inside/outside choice thing is related to scans made by the lid cam (and possibly other scans) and not vector files made in CAD software.