3D engrave -- still needs some work but wow

So of course the first thing I did this morning was take the depth map from my favorite test STL and engrave it. Then I had a bright idea and traced it in inkscape so I could put a cutline around it. No adjustment of curves other than white at the front of the model and black at the back.

That’s 7/32 scrap acrylic (I lied to the machine and said it was proofgrade thick) running at [redacted]new speed. (I made a test cut at high speed, measured the depth, adjusted more or less linearly.) The random-line thing is happening fairly seriously, probably would be better with a little defocus or more passes. But still, for 25 minutes start to finish, that’s pretty cool.

I am thinking it’s seriously time to get/build a 3D scanner. (Also, suddenly building things up in quater-inch slices becomes much more interesting if the edge of each slice can have a 3D profile.)

46 Likes

Oh wow! Unbelievable! :grinning:

2 Likes

That is REALLY something.
So the random lines thing wasn’t part of the original image, eh? It adds a quality to it though, for sure! Makes it look like an ice sculpture.

4 Likes

Wow! :sunglasses:

2 Likes

I couldn’t pinpoint what it reminded me of…an ice sculpture! That’s it. Very cool effect.

1 Like

That looks great, but I’d love to see how that looks with some defocus, indeed!

Me too. Also with some way of cleaning out the acrylic snow between passes.

Amazing!

Please remove the non-PG settings or move the topic to Beyond the Manual - thanks!

1 Like

Done.

Btw, My impression from this is that the random lines are related to cut depth. The heat from a full-thickness cut gets material hot enough to change properties for at least a quarter of a millimeter on either side.

I think wood might be a better medium. Downloaded a Green Man from thingiverse and converted to depth map:

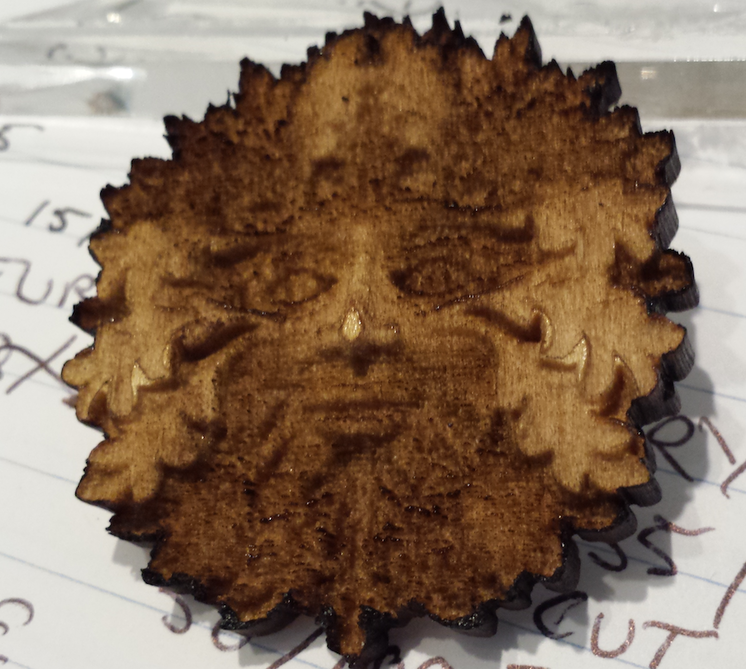
You can see the goop that accumulates downwind. Used two slower passes for depth, then one fast pass to clean off the char. Then a cut that was just a bitmap trace outline, outset by an approximation of kerf.

8 Likes

Love the Green man :smiley: Reminds me of the song by type o negative

How did you handle the conversion to a depth map?

I used the tutorial (search for “depth map”) to get a map using Meshlab (There’s a Render Menu, and an item called “shaders” and one of the choices is depth map.) You have to play a little, then you save a snapshot as a jpeg/png/whatever. Then I took an extra step and reset the b/w gamut so that the darkest point on the map was black and the lightest was white. I’m on a mac, so I used Preview, but GIMP or one of the photoshops or pretty much anything else should do. (In theory, you can do this by getting your Zmin and Zmax exactly right in Meshlab, but fat chance.)

Then I took a moment in Inkscape to get a vector line around the depth map for a cut.

Here are some things on my to-try list:

  • make a filled-vector outline of the depth map and use that for a uniform fast engrave to zap off the char
  • make a wide deep engrave around the edge of the depth map so that the condensed smoke and other gup doesn’t accumulate at the downwind edge
  • or: figure out how to hold the to-be-engraved part down and do the cut first, lifting everything else away.
4 Likes

Sharing what settings were used is standard operating procedure for any report of a maker type project. Why restrict that in the made on glowforge forum section @dan. Knowing something about how a project was done is half the fun.

Thanks!

There’s a warning on the “Beyond the Glowforge” Category that protects them from lawsuits if a customer tries something stupid with their machine and decides to sue.

So anything that goes “Beyond the Manual” and Proofgrade settings, we have to discuss in there.

3 Likes

I see. Thank you for the answer.