Acrylic for Stained Glass Look Experiment

Not posted projects in awhile since a lot of it is for sales.
Had some time for playing around lately and so ordered some different color translucents to play around with.
Initial trials were dove/cross. Wife finally mentioned there has to be something else I could make (LOL) so switched over to the flower/butterfly.

Short learning curve for first few, but it all came together with these last ones.
It is a slippery slope with a side of rabbit hole. Once you got it all locked in you can pump one out in a half hour or less. Takes anywhere from one hour to five or six to get to that point though. (sigh).

I really like the overall look.
Next phase (once I find a design that talks to me) is to make a huge one instead of these 6-8 inch ones.

Pictures for your inspirational needs.

40 Likes

Please keep posting your progress on this. I am hoping to do this down the road and this is great inspiration. :slight_smile:

1 Like

Very pretty! :slightly_smiling_face:

1 Like

Found some scrap mirror acrylics large enough, so decided to check it out.

For a bookshelf item it is great.

For me, the light translucent leave something to desire (not enough color). They look ok sitting in a room but on a window the colors wash out. I will use a more solid colored acrylic in the future.

Some words on the wood used.

Started with thin wood planks I had. They want to spit on the grain if forced, and it was a problem initially because I was making tiny serrations for a grip (to avoid glue).

Then moved to Plywood, but it wants to chip a bit when slices are thin.

Finally worked out a foolproof kerf method (eliminated the serrations for grip which caused strain) and went with MDF for base. May not look as swell as grained wood but is perfect for this. Can always paint it black, brown, silver etc, in need I suppose.

29 Likes

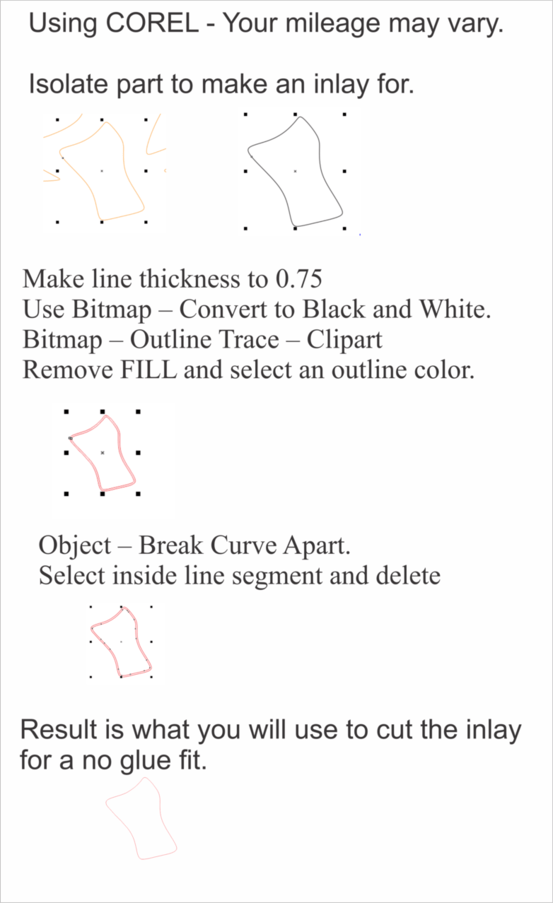
And before you ask. Here is the kerf method I have been using.
It is COREL → so you may have to find the equivalent options in the program you are using.

14 Likes

I like this idea a lot. We wanted a stained glass effect window at the top of our stairs and making it up from smaller panels like you have made would be ideal. Thank you for sharing and providing the inspiration.

1 Like

These are beautiful. Thank you for Sharing your knowledge with us.

1 Like

Gorgeous! And thanks for the kerf advice.

1 Like

NICE WORK! Came out REALLY nice!

One thing you might want to look into is some sort of stained glass acrylic sheets. You know, something that has the slight rippled effect you see in much stained glass. Sadly, I did a quick search and couldn’t find much. (@dan, there’s something unique for the Shop!) I did find this and that’s very cool. Anyway, food for thought!

1 Like

That is absolutely gorgeous. You have that mastered. :grin:

3 Likes

Beautiful work! I always wanted to try stained glass … Have managed to talk myself out of getting into yet another craft. You have opened the door to enjoy it with what I have. Thank you!

1 Like

Very cool, thanks for sharing.

Ok, so I have abused a lot of plastic with nice results.

Birthday present coming so decided to put it all together.
As an additional tool for inspiration, I really have become fond of this stained glass inlay look.

You can get a one layer item like shown out of draftboard, that does not look anything like a low dollar chunk of draftboard.

10 Likes

Excellent design!
So’s that a single piece of drafboard then? For the “frame” AND the engrave?

1 Like

Ayup.
The forge UI kept wanting to do the outer ring and picture as one item so had to break them into separate designs.
Three part process. Do the 3D outer ring.
Then load in the picture and inlay cutout design.
Then cut some acrylic for the cutout inlays.

If I make another I think I will pull it out after the outer ring 3D engrave and clean it up, then replace it in the hole and move on to the picture part.

Keeping that picture pristine during the engrave cleanup was a PITA.
That is a vigorous process and the Orange Gel scrubbing and alcohol wipes/washes kept wanting to lift the picture covering.

BUILD NOTE: If design items are placed in the proper places on a 12x20 design sheet, then they will be in the same places in the forge UI.
The camera is a lie and will show the design off the mark for a second design.
Trust in the 12x20 coordinate system and vapor that puppy.

3 Likes

VERY cool.

Beautiful