Broken Glowforge Rollers - A trip to the hardware store

OK, you can McGuyver a wheel on your 3D printer BUT there are some real challenges with that.

  1. The dimensions required to function well with the others need to be +/- .001" or better, especially for the bearing press fit.
  2. 3D printers do not produce circles, but a regular polygon shape that probably deviates from the circle by several thousandths. That wheel will drive really bumpy on the track, which will wobble the head and if nothing else create poor cuts & scores
  3. It is not the knife edge that actually splits the roller, but the wedging forces of the vee. The wheel makes flank contact with faces of the rail and the splitting force is significant. I agree that printed part with the bore perpendicular to the bed of the printer would be very challenged with regard to layer adhesion. If you print the part with support in the on edge orientation the out of round will be significant.

This wheel is a precision part and must be replaced with a precision part. Buy the one from Glowforge. I have the tools and equipment to machine one, but it’s not worth the time unless you are really stuck.

1 Like

I print nylon all the time on my Robox hobby level machines. I find that I really only need about 60 C bed temperatures and about 235-250 hot end temperatures, depending on the formulation. The Robox doesn’t have a direct drive extruder; it is a Bowden style.

My Prusa machines also handle nylon without an issue. It really isn’t that hard to print in my experience, and I have a lot of it.

Nylon is only tricky to work with if you don’t know what you are doing. It warps, so a heated bed is required and an enclosed bed is preferred. If not, a good adhesive surface like GeckoTek or DymaFix usually handles it without much issue, especially on something as small as a wheel like this. You also have to keep it dry, or it will fall apart under load. But with the proper precautions and a little knowledge you should be able to print nylon on any quality hobby level 3D printer.

2 Likes

So I printed these parts, and they are actually very strong, even in PLA, and even printed in the flat orientation shown. Printing a set of 4 wheels took about 20 minutes on my printer.

Since the original wheels on my Glowforge have not failed, I am not keen to destroy them just to get the bearings out to test this temporary replacement. I have other bearings around, but at least two dimensions are critical: the inner bore of the bearing must be 6mm to match the post, and the width of the bearing must be about 6mm to avoid vertical slop. The outer diameter of the bearing used is 10mm, but this part could be modified slightly to accommodate a very slightly different diameter. I did some searching to find an identical replacement, but haven’t found one with all dimensions exact. (Possibly this one would work, if you stacked two of them in each wheel: https://www.amazon.com/10-Pack-MR106-ZZ-Ball-Bearing/dp/B00GGQ594E )

I did a quick knife-edge test. Using a very sharp kitchen knife, I put the blade into the groove, put some downward pressure, and rolled the wheel back and forth rapidly on a smooth counter. The wheel split within a second of this.

I then tested one with the other side of the blade, which is about 1mm thick, square edge. The part did not separate at all.

The wheels are very smooth. (Knowing that these are rotary contact surfaces, I had exported the original model with a relatively high angular resolution.) They roll like marbles.

If I had a way to mount these on my Glowforge, I would already be cutting with these to see how they hold up in real life. But since I have taken this as far as I can for now, I will offer this:

Anyone who needs a set of replacement wheels, and who is not able to print their own, send me a PM and I will print a set for you to try. Be warned that these are not tested, and may fail again in short order. I cannot speak to whether trying these might affect your warranty, but I know the company is trying to resolve this issue for us, and hopefully you will not need to use these for very long.

You will need to extract the bearings from your original (presumably damaged) wheels, and press-fit them into these parts. I haven’t been able to test this, but I expect the fit will be very tight, so you would need to press them carefully and evenly, and might need to run a 10mm drill through the opening to enlarge it slightly, or perhaps heat the part with a hair dryer/heat gun.

All I ask in return is that you share your results back here so I can make any necessary improvements to the design.

6 Likes

I’m actually interested to see how well these work. They might be a good stop-gap measure for those who are too desperate to wait for the Glowforge replacement.

Necessary word of warning…

And I hate to have to bring this up, but you all need to be aware of it. This quite likely does qualify as a modification of the machine and as such, if you have a problem with the machine while using it, the repair costs will not be covered under warranty. So if the wheel breaks and the laser arm gets stuck and starts a fire in your machine, it’s going to cost you thousands of dollars to replace. It will not be covered.

So make your own call on using them, but be aware of the danger and never take your eyes off of it while it’s working if you try this. You might be able to stop the print and save your machine if you see it happen. You might burn the machine up if you don’t. (And there are plenty of pictures in the forum on laser fires. It doesn’t take long.)

Good luck, and let us know the results.

5 Likes

Ok, after getting a halfway decent print of this part on my DLP printer I was able to compare it more closely to my original wheel. I ended up making the groove just a bit deeper.

Here is the latest (version 3) .STL file of the wheel, in case anybody wants to try printing some of these. As others have warned, please do not run your Glowforge unattended if you install these parts. You assume any responsibility for your decision to use this replacement part, but please let me know how they work out for you.

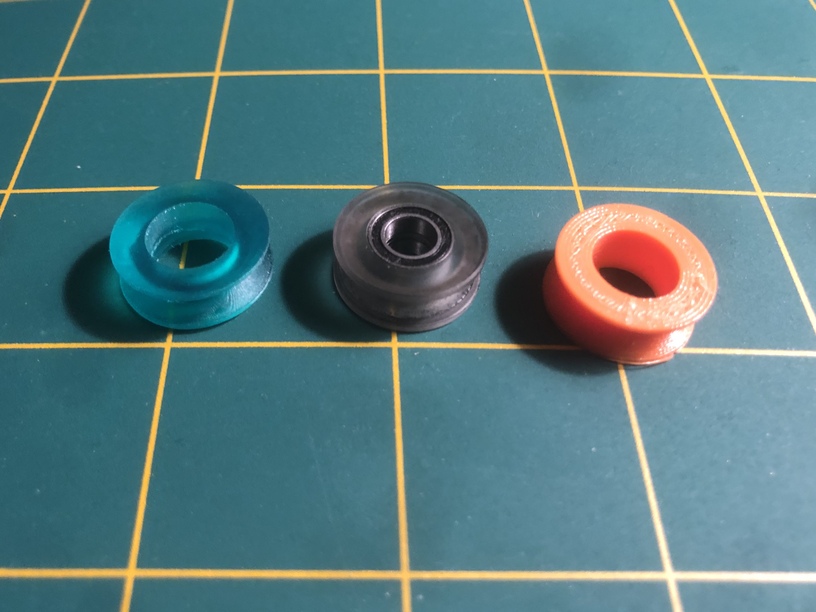
ReplacementGantryWheel_v3.stl (396.0 KB)

7 Likes

Hey, are they working! I am very interested in ordering some/

My printer was never broken, and nobody else has reported back one way or another whether these fit. So I can’t say whether they work because (to my knowledge) nobody has tested them. I would have to destroy my good Glowforge wheels in order to extract the parts to fit these back on.

I’d be happy to send you a set off of my 3D printer if you want to be the first to try them out. But please know that I am not affiliated with Glowforge (except as a customer) and I can’t take responsibility for any damage they might cause.

3 Likes

I’m willing to try! I will shoot you a private message.

1 Like

Hi All,

I am shocked at the level of interest in this topic. when i posted originally, I didn’t imagine how our little community would pitch in to help out. I had to leave town unexpectedly but I am back now and going to give it a shot. In the meantime, with a 1-day turnaround the folks at GF sent me a replacement carriage (not stopping me from running the print however). DrVegetable- thank you so much for working on this for all of us!

6 Likes

It sounds like the good folks at Glowforge are on top of this. Definitely use the parts they give you instead of anything I’ve designed. Sometimes it is hard to tell from the outside what they are doing to resolve customer issues, but I haven’t seen them disappoint anybody yet.

I’m happy to hear they were able to take care of you so quickly, even in the middle of a global pandemic.

4 Likes

Thought I’d add my $0.02.

My brother bought a GF and I’ve been helping with it when he runs into trouble (I used to play with a nice pretty Trotec at a place I worked at a few years ago). He ran into this exact problem. I found @drvegetable 's stl (thanks tons for that dude!) and printed a replica on my own resin 3D printer. Looking forward to seeing how well it may help till GF sends him the replacement part.

2 Likes

Excellent! I am happy to hear that they may help.

I found that the bearings are a tight fit, so be careful when pressing them into the wheels. I was able to assemble them by press-fitting them in a vise, although a c-clamp will also work in a pinch. You may need to open the bore slightly with a drill, or perhaps soften it with a solvent or heat gun.

Please let me know how they work out, good or bad.

3 Likes

Does anybody have a 3D file/design for the roller that holds the belt??? My right side one looks super smooth compared to the left side on the carriage

It is supposed to be smooth. It is an idler, the left side is the toothed drive wheel attached to the motor.

Ok that is a relief… is it suppose to look like this? (notice is not 100% smooth)

That’s just gunk “printed” onto it from the belt running over it.

Run your finger over it, it will wipe off and the wheel is perfectly smooth.

2 Likes

Hi. Has anyone tried these yet? Do they work? I’m in need of these v wheels and GF is out of stock.

I haven’t had the need, but I’m pretty sure you can find them on amazon. Just make sure they are the same size. Check outer and inner diameters before ordering.

Yes, I tried amazon and couldn’t find the correct size. Our machine has been down longer than expected so we thought we would give these a shot.