I couldnt rely on only 2D either. I still use AutoCAD every day at work and use a mix of 2D and 3D to figure out geometry for designing steel fittings and fabric patterning. Too complicated for strictly 2D drafting, yet fully 3D modeled is way overkill for the speed we need to work at.
Glad I renewed my Geomagic subscription then! It’s $2400 for a seat purchase, then $400/yr renewal which keeps you current on the latest version. Pretty capable modeler and the price is kept lower by making the more complex features like finite element analysis, dynamic motion/interference checking, etc treated as add-on purchases.
I dropped annual maintenance on Geomagic Design this year because the company has done so little in the past few years to maintain and improve the program. It’s been over a year since the last major update and there are many longstanding bugs that never seem to get fixed.
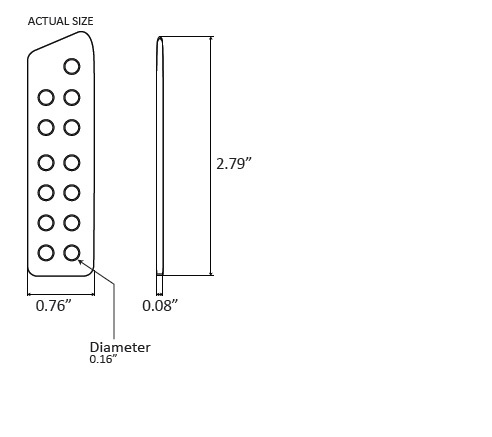
Hi, I was reading this post has help for transforming a 3D model to a laserable design. I have the piece but considering it would need a flip, I would like to know how to specify it in 123D make or other splicing program. I can send the object 3d file for reference if needed.
Thanks, that’s what I did but How to you overlap those cut to engrave and then flip to engrave then cut? The object I have in mind has a fillet and so can’t be cut in on pass.
there is! the 3d engrave function will do that. Your mileage will vary depending on the material you use, but thats not something I think 123dmake will support either.
The other option is to use a router to smooth the edges. I dont have access to 3d modeling software at the moment. Can you post a photo of the model so I can get an idea of what youre trying to do?
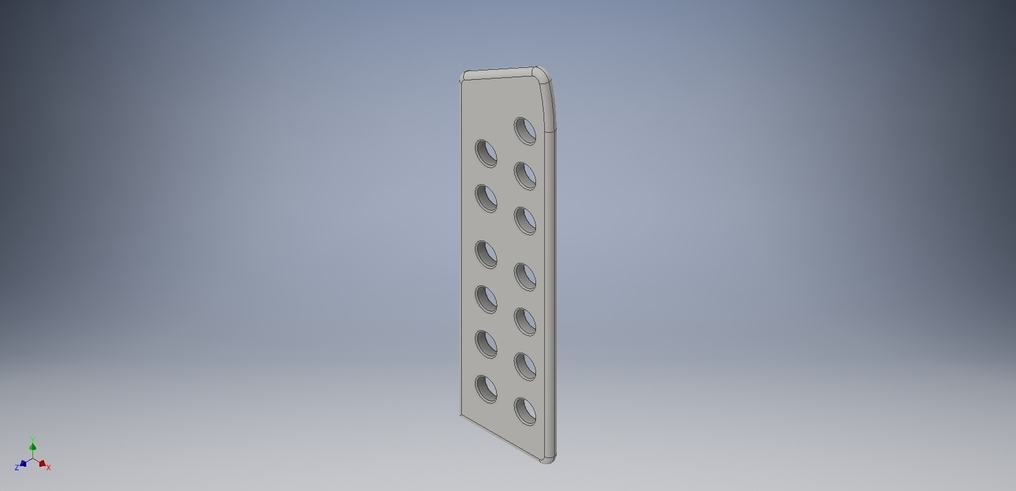
also heres something that is all curves that I made using my laser and 123dmake. It might answer some of your questions:
Thank you for the answer. I searched for Free cam software to work from my Autodesk inventor Parts and I found Autodesk invertor HSM Express which seems to be able to provide 3d engraving option. I don’t know if it can manage laser cutting yet, but it is free so I will see about it son enough.
I would say that if you want to use a laser in this process I would only use it to cut the holes. I’d then use a drill/drill press to chamfer the edges of the holes and a router table to round the edges.
If you have access to a CNC machine this would work on that, but might be overkill.
As with what@rpegg said, a3d laser engrave could work, but wouldn’t be as accurate if you’re using wood and would take forever.
You can run these bad boys through a router table pretty quickly
Since I will need to weave them together afterward, I have time. I was planning to do it in acrylic/ plastics. I don’t have access to a router table, a cnc machine or a press drill, which is why i was planning to use the laser cutter. The original piece from where the idea is coming from was an injection molded process, but I don’’ t have that either… (Seems I am quite poor in my tools diversity department, since the glowforge is my first “big tool”)
I have to say the best way to really accomplish this is to make 1 perfect master, then make a mold of it and cast copies with resin. You can even make multiple molds from the master to make your copies more quickly. It will take a fraction of the time.
Another option in this process is to get one 3D printed from shapeways. They do incredible high res 3D printing. Use that to make a mold. This is definitely optional though as the piece you have shown isn’t overly complicated.
I feel like 3D print -> smoothing/finishing -> mold is the best route here
Considering I know what plastic I want to use (that are in panel form) and have even less knowledge in mold making then I have in laser cutting, I would not even know where to start to choose my resin/ plastic. But thanks for the suggestion. I think I will start with something simpler to start with… A box