Dust collection hose?

Has anybody used a clear dust collector hose with their Glowforge? I have a few days off and I’m thinking of redoing my ventilation setup yet again. I can’t figure out where the leak is, and I’m starting to mistrust the semi-rigid dryer duct – it seemed like a good idea at the time to reduce the number of accordion folds to maximize airflow, but it doesn’t have any kind of airtight liner, so I think maybe smoke is getting out through tiny gaps between the aluminum rings that it’s made of.

Anyway, thinking about using the clear stuff. It might be fun at first to see the exhaust going through it but I’m wondering if it’ll get really ugly over time, like a smoker’s lungs.

5 Likes

If it’s anything like the inside of my Glowforge’s lid, it will get smoky and ugly.
The hose that came with mine works fine - no leaks. I put a large tie-wrap around it and glued a couple of magnets to the end of the tie wrap and they hold the hose to the metal roll away cabinet when my GF is not being used.

I have a long run of standard 4" vent ducting, and used clear silicone to seal all the joints, especially the elbows that are leaky by nature. A 4’ section of flex duct that came with the machine connects to the vent run.
It is gratifying to see all the smoke generated in a cut or heavy engrave swept out and never smell anything.

1 Like

And a clear duct might allow you to find leaks better. There would probably be additional gunk buildup at the site of a leak.

Here’s what I did:

After reading a lot of great advice about how to vent Hiakari, my issue was that I wanted to be able to fully winterize when I’m not using the forge for a while. IT COULD HAPPEN…

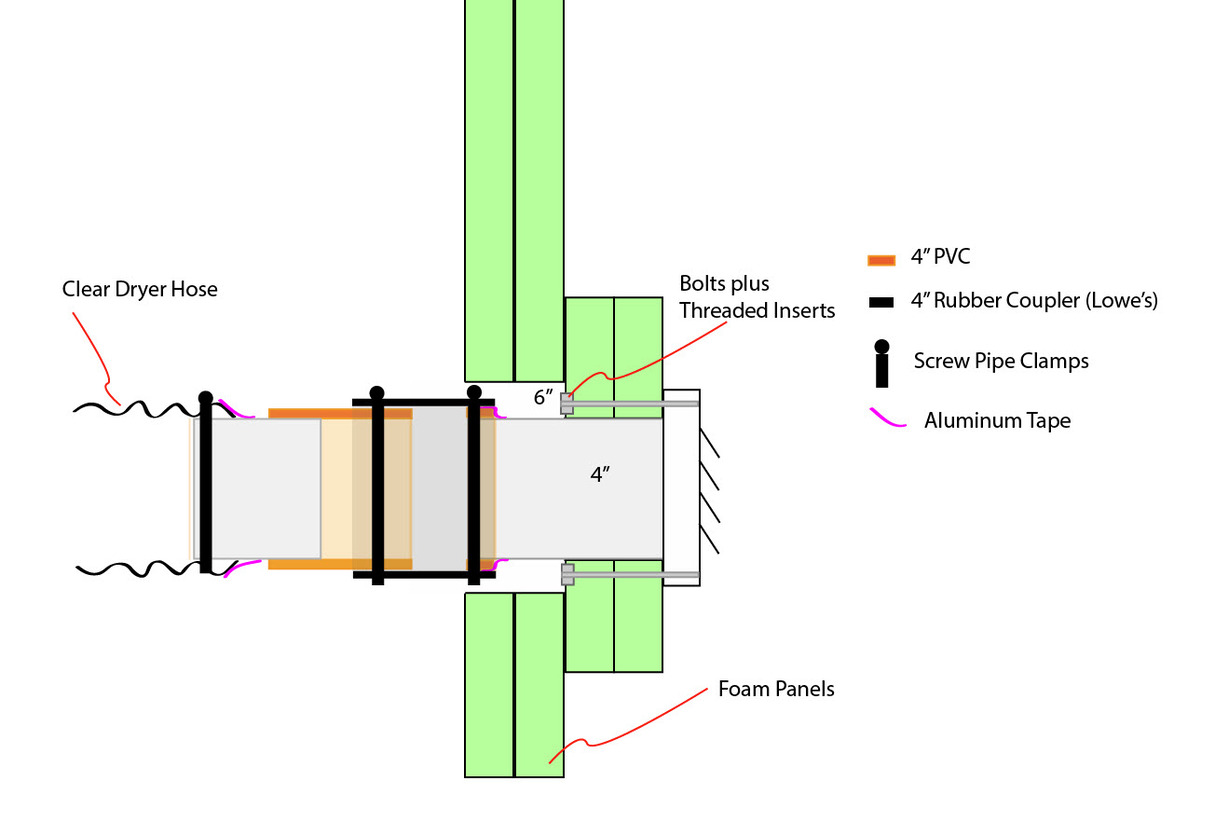
I have double hung windows and I’m not ready to cut holes through my wall yet. So I went with the idea of using foam sheets cut to fit below my outer window and double-layered and foil taped to seal. Then I cut a 6” hole in those foam sheets. I added two more squares of foam panel to cover the 6” hole with some margin. The exterior foam has a 4” hole with the louvered dryer vent and a 4” diameter aluminum tube that I cut off even with the interior sliding window. With this arrangement, I can still close and seal the interior window for weather and security.

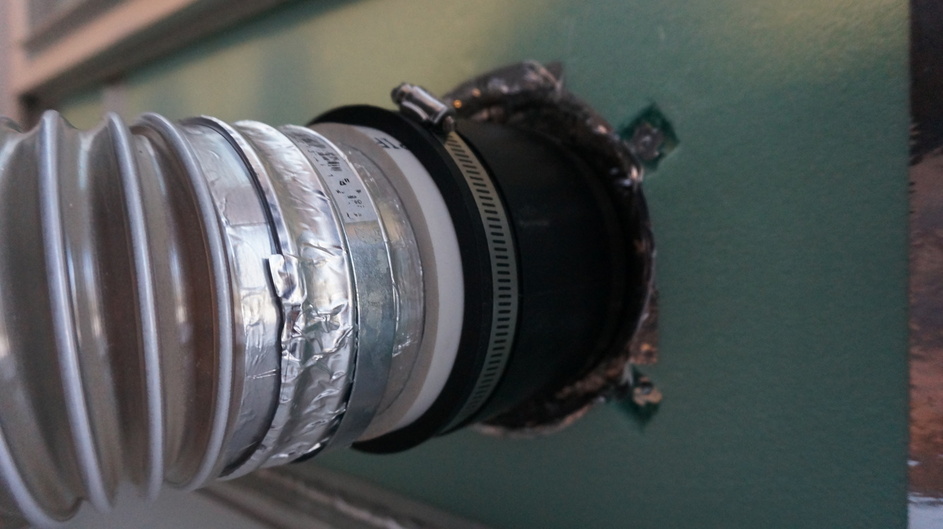
On the inside, I put a short section of PVC pipe with ID 4” and taped it over the aluminum pipe to the vent. This makes the diameter proper for my internal connection. I got a 4" rubber seal with screw pipe clamps at Lowe’s. This is the part that I unscrew to remove from the window and shut the window.

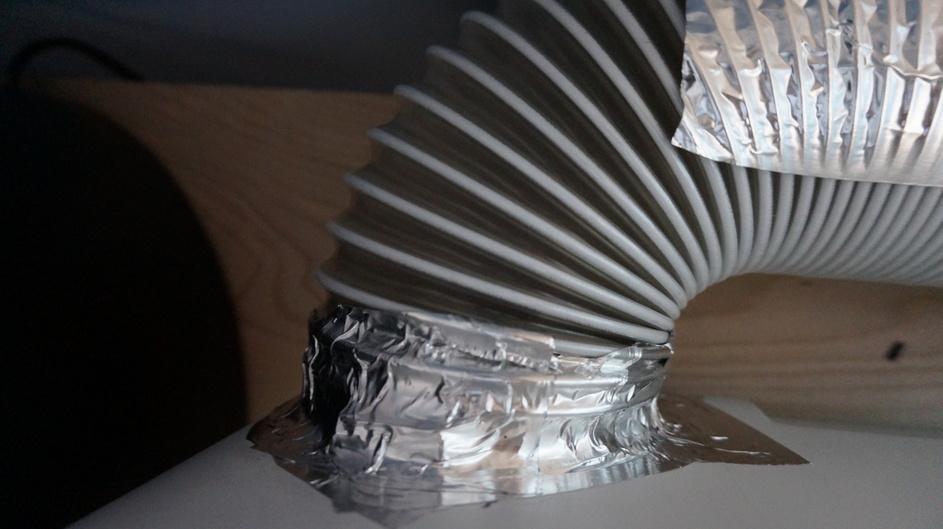
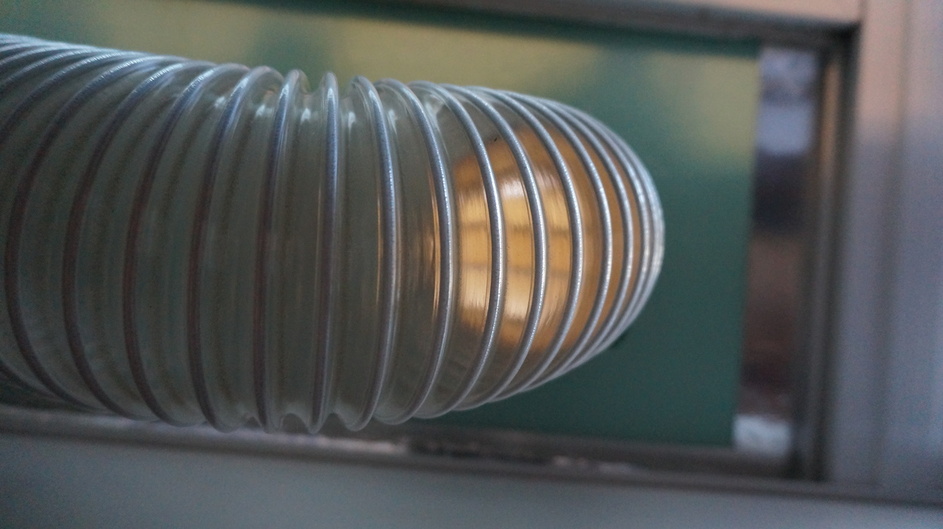
In the end of the hose, I have another short length of aluminum tube pipe clamped and taped and then the tube inserted in another 4" PVC pipe. The aluminum tube to PVC connection is so tight, I didn’t tape it, but I might.

The 4" PVC pipe sections are to adapt the aluminum tubing to the rubber coupler ID.

Works great for me and no leaks. With this setup, I can see that the louvers open and I can see contaminant buildup.

Vent Hose

12 Likes

I was planning on going with rigid and flex hose from Rockler or simular when I redo so let us know how it goes if you do it.

1 Like

I’m using rubber dust collection hose from Rockler… I started with metal dryer vent hose from HD. But had an extra piece of dust collection hose and switched. Much better seal on both ends. I did add blast gate to stop cold air from returning to the GF when not in use. The hose is great… the blast gate might leak a little. I’ll add some photos later.

2 Likes

The thing I’m really interested in is whether the hose gets all brown and gross right away.

The inside of the laser, (all glass, metal and plastic parts) gets brown and sticky very quickly. The stock vent tube gets brown and sticky. No reason to think the clear tube wouldn’t do the same.

2 Likes

Well, I did it. It looks pretty, but I’m still getting a mystery smoke leak. I just can’t figure out where it’s coming from. I’m giving up for now, cause I’d like to make stuff instead of chasing ventilation problems.

1 Like

I have noticed more of a leak over time as I’ve used the GF, so I had recently switched to the clear hose, but it hasn’t seemed to have helped. I’m still trying to find the source, and it’s making it more difficult to do anything with acrylic.

1 Like

I don’t know why, but I do know that I had to snug up my connection to the GF exhaust a couple weeks ago. Might be creep somewhere in the system.

Why did GF not ship with the plastic dust collection hose?

It may provide a better seal…

But then again, the plastic might also be a fire / flame hazard?

This would be my guess. I only tried using it because it’s what I use for dust collection in my garage.

The hose it comes with has a plastic liner. It should be airtight.

Like @jbpa, my leak seems to be getting worse over time and I can’t find it. I’ve even used it as an excuse to purchase more fancy gadgetry to look for disturbances in the air flow but I got nothing.

3 Likes

Have you used that device around the front door edges when the air assist is blowing right at them? @takitus put some soft foam weather strip on the edge flanges thinking smoke could be forced out there, and from the velocity of smoke hitting the front when the gantry is toward the front, I’m inclined to believe him.
As the fan grill on the PRU I was face loading, those were the first places I noticed leakage.

2 Likes

@chris1 - @PrintToLaser is correct. There is some room in the front door, especially on the left, for exhaust to escape.

I leave my material roller stowed right in front of my Glowforge, and not long ago I noticed the amount of debris it had collected on the roller. I took some thin craft foam and rubber cemented it in the gaps on either side of the door to prevent this leakage.

I also realized a large reason this leakage had gotten so bad is because my exhaust port was very blocked up. Taking a long hard-bristled pipe cleaner through the grate helped clean it out well.

I recommend both of these actions if you are smelling things.


door exhaust accumulation

image
better view, this is after I wiped it off. there was a LOT


simple stripping from craft foam


stripping with door closed. completely fills the gap

7 Likes

I understand air getting pushed out through those cracks when the exhaust is blocked, but in my case the exhaust is clear (I cleaned it when I installed the new hose, though it didn’t seem to need it). I’m certainly willing to try anything, but as far as I can tell, there is a net negative pressure inside the machine when operating correctly, so air gets pulled in rather than forced out. I’ll give it another go with the smoke pencil. I did try putting some tape over all the seams at one point, to see if that would help. It didn’t.

1 Like

There is a negative pressure inside, but seeing the velocity of the smoke blowing at the front door, it wouldn’t surprise me if that can momentarily overwhelm the air being pulled in when close enough to the front and blowing at the door edge.

This is super helpful.

I can literally see into my machine from the left side - and evidence that particles are exhausting out of it is concrete (beyond what I know I smell).

Great work.

1 Like