Brilliant, I will try this too.
I was doing that. And then I found my plastic scraper works REALLY well with minimal effort. I did dozens of acrylic items for all of our nieces and nephews. I started with tape, then tried water (which really helped), then I tried my plastic scraper and that worked GREAT.
3 Likes
I have noted that if I go for a deeper engrave and totally vaporize the masking, I don’t have the issue of melted glue gumming up the works. But then you have the issue of scraping off the masking and that can contribute to gumming up. But then engraving with no masking, especially if you get a deeper or slower engrave, can build up residue from the acrylic. In any case, getting the balance among these things is a personal choice.
But that jelly fish, that certainly would be a trial to remove masking after processing. It looks super.
4 Likes
Absolutely gorgeous jellyfish!
Toothpaste works to get things off. I recommend it for acrylic.
Great job!
2 Likes
Thank you. 
Yes, I have the same pucks and they work fine.
Love this piece!
1 Like
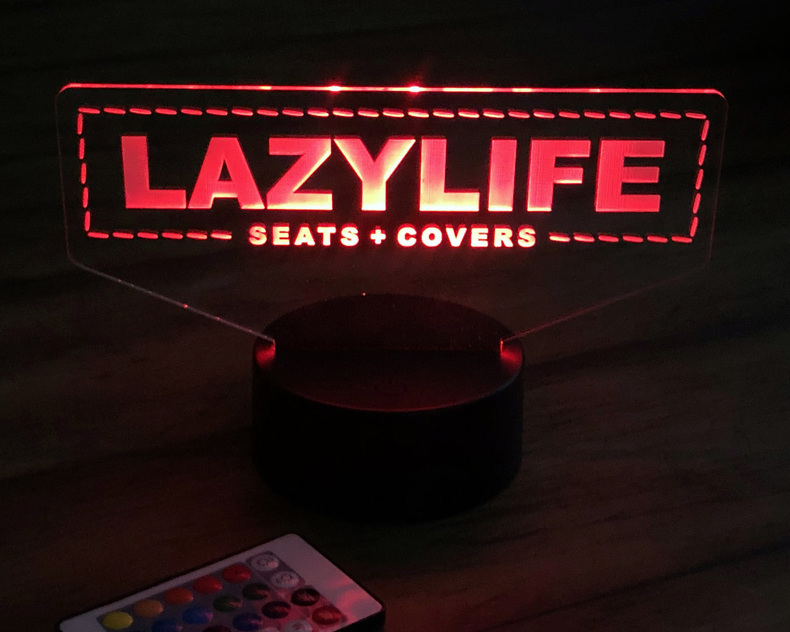
Thanks for sharing your build…especially the link to the LED bases. Ordered a few sets and jumped into making my first acrylic pieces. First one was my company’s logo. Once I saw how good it looked, I made a couple gifts for friends.
4 Likes
Awesome. I am happy to have been an inspiration.
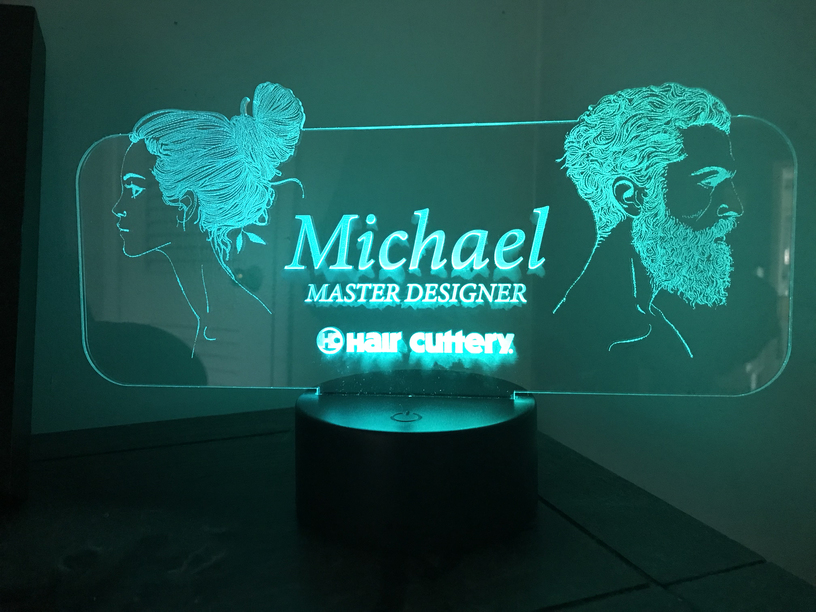
I created another edge-lit piece. This time for the man who every year cuts my hair and gives me the cleanest, straightest mohawk I have ever had.
Originally the people were vector, but the GF software was working for nearly 30 minutes and wasn’t even finished analyzing the image. So, I converted the vector to raster and it figured it out quickly. As before, I removed the paper from the front before engraving. This time however, the laser left some ghosting around the letters. I used toothpaste to clean most of it off but some still remained. In the future I will lower the engraving power so the etching isn’t so deep. Edge-lit etching doesn’t have to be deep, just slightly etched to refract the light. Note: the raster wasn’t as crisp as the vector.
Michael was surprised and honored to receive this gift. I made it for him because for his 21 year Hair Cuttery anniversary the company gave hime a pin the size of a dime, lame.
Update: I was actually impressed at how far out (left and right) the light continued to glow.
11 Likes
How does your image come out with such detail? I am not tech savvy. This is my first laser and since having it I’ve been doing research. Some one told me to invert my image and another told me to make the image black and white. I have also just tried to etch the original photo with color but all have failed. My only question is how to get that detail because my whole sketch is all white with no detail unless held up against a white background.
Love the jellyfish! Great job! Now I need to make one!
1 Like
Hi miasiacorinne.
The photo will have to be black & white. You can set the GF to etch everything that is black and ignore the white. Do you mind uploading your photo here so I can see what you’re working with and better help you?
Thanks.
—Dimitry
Thank you. You should do it. It’s exciting when you turn on the LEDs and the etching glows. It’s got serious “wow factor.”
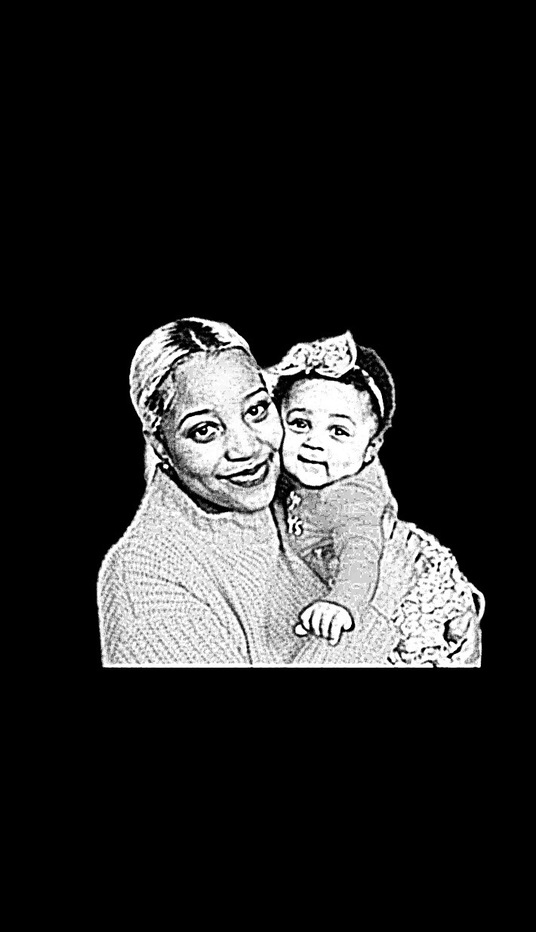
I have changed it to a black and white etched photo here. Thank you so much for responding. Maybe you can give some pointers on what I can do next.
The GF will etch everything that is a color in your photo. So, in order to have the laser etch the parts that will be light/reflecting light the photo will need to be inverted. This way the shadows of the photo are not etched and the plastic will not shine when the LEDs are turned on giving the illusion that it’s dark.
The jellyfish is not my art, I pulled it from the web and modified it to work on the laser.
I’m in Silver Spring Spring.
If you were to engrave this photo on wood it would turn out like it is above, the shadows would be burned into the wood and it would look normal.
However, in order for it to look correct on edge lit acrylic the photo will need to be inverted so that the Glowforge etches the light/highlight portions of the faces and not the shadows (the GF doesn’t read white as a color). Ideally you want the shadows to be untouched plastic so that it doesn’t reflect the LED light in the those places.
You may want to play around with inverting and not inverting the photo. If you didn’t invert the photo the result would look similar to a 35mm film negative from back in the day.
I am happy to know of someone close by who uses the Glowforge! Thanks for the explanation - it really helped. I am still pretty new at all of this. I am amazed how much detail shows on the jellyfish.
1 Like
Thank you so much I am going to play around with inverting the photo.
My pleasure. I apologize for the slow response, I’m not in here as much recently.
Hi. How did it go with etching?