They make it look so simple at the NBM shows - pre-loaded designs in software, place substrate and “print”. Interesting read though (Good to know). Price-point was always a bit high for my usage though . (Still curious on the Dremels release of the Muse now that they bought it from FS).
@chris1 thank you for sharing your experience, always interesting.
I’m curious: if you spend ~20’000$ on a piece of equipment, shouldn’t they help you install it? didn’t you have the option to call them up and let them break their head to get it to run on your pc?
Interesting question. I haven’t tried to interact with their support. I guess I’m conditioned to expect so little that I don’t even try.
2 Likes
that’s a fair question, and one would hope some level of support on installation is there.
fwiw, we have a support contract with the people who we purchased from for our universal. but i’m also sure we pay additional for the level we get it.
I checked, it’s a 40 watt machine. Here it is doing a test engrave this morning:

3 Likes
And now tonight I’m going home and hugging my GF while simultaneously screaming “ENGRAVE FASTER!!!” even louder than I normally do.
3 Likes
The total head weight for that thing is a fraction of the weight ours has. I get 341 grams for the GF head weight, I think you just can’t yank that mass around that fast.
1 Like
Engraves are so slow on the Glowforge, I avoid using them. It’s sad…
4 Likes
No kidding. My wife comes up with all these new product ideas for us and I’m constantly saying “Nope - can’t make money engraving this slowly”. It sucks because I KNOW I’ll need a 2nd laser in the future and engrave speed is the only reason it’ll be something other than another GF.
Just continuing to blog about my experience here.
We got the Epilog set up and more or less understand how to make it go enough to start training other people. There are some really unfortunate aspects to the software that make it many times harder than necessary. I’m really glad I’ve had this experience, because it puts the Glowforge into perspective. To listen to some of the “pros” on other forums where they hang out on the front porch and talk snot about Glowforge, you’d think everything works perfectly, but I’m fairly certain I’m going to have a lot more trouble explaining to people how to use this thing (and answering support questions) than I would if it were a GF.
Now, to try to be fair, we are pretty much constrained to have to do everything with Inkscape on a Windows machine because reasons. I’d barely ever used Inkscape before. At home I invested in Illustrator from the beginning and I think I’ve saved enough in time and frustration to make it worth it. And it’s obvious from the documentation and community that most people use Corel Draw with this machine. So maybe that would cut out a large portion of the problems I’m having. Then again, maybe not. Our users are not going to have Corel Draw, so the point is moot. It’s Inkscape and the horrible Windows print driver supplied by Epilog.
Some of the things I can remember off the top of my head that make this painful:
You can’t just print from Inkscape. It’s hard to tell where the blame lies, but for whatever reason, the whole thing gets rasterized when you go through the print command. This is what has eaten up the majority of our time. I’ve been through every forum post and search result I can find (surprisingly few) and all of the answers are some variation on “give up”. Save as PDF and print from Adobe Reader, they say. Well, not on our machine. Maybe that used to work, but we have a brand new installation with the latest versions of everything, and I think this whole print driver approach is horribly sensitive to the tiniest details, because Adobe Reader pops up one of those useless “The file could not be printed” dialogs. We tried other things like printing from Chrome, but that also produces raster output that somehow looks like it came from a Commodore 64. Others suggest Visicut, which is a Java program with a UI from 1973. It’s possible that might work, but it requires a network connection that isn’t available in our lab, so no go.
The workaround for this is to use a barely supported and buggy extension to print vectors from Inkscape. This has a number of downsides. My favorite is that it can’t do circles. Literally, if your design has a circle in it, it will be missing from the output. So one more thing to remember: you need to “object to path” on everything. The other part about “win32 vector print” is that it’s literally just that. Vectors only. So now what do you do if you have a combined engrave and cut? That’s right, two separate print jobs. The best I can come up with, and try explaining this, is to separate all of your raster engraves from your vector cuts on different layers so that you can hide all the vectors first, use the print button with those, but make sure to go into the print preferences and tweak the knobs just so, then hide the rasters, show the vectors, use extensions - export - win32 vector print, tweak the knobs another way, and you should (as long as you turned off send to laser and turned on send to manager) be able to find your two separate jobs in the job manager program – more on that later. Now you have to run one job after another without moving anything, which for reasons I’ll hopefully remember to explain, is not so trivial.
Now the print driver itself is a piece of work. You can look at tutorials people have made to get an idea of how it’s usually treated. There are a maze of switches and sliders, most of which either don’t apply, shouldn’t be used, or don’t do what you assume they do at first glance. Again, we’re not running an industrial production facility here with expert laser operators who oversee carefully tuned jobs every day. People using this will have attended a single one-hour orientation class, and they might wait 6 months or a year before they even try to use the laser, at which point they’ll have forgotten everything. I would like to tell them to click a button, select their material, and go. As many little gotchas and glitches there are in the GFUI, it’s nothing like this thing. Just take a guess, for example, at where you go to select a material preset (if you believe me that it even has them). It’s in the job manager, which is not the print preferences. So you need to print with random incorrect settings (not directly to the laser or it will use those settings), open up another program, change to the jobs tab, select the job, click the icon that looks like a download symbol, open the materials settings, choose the material, twiddle open the section for the thickness you have, and finally choose the presets for the DPI you want.
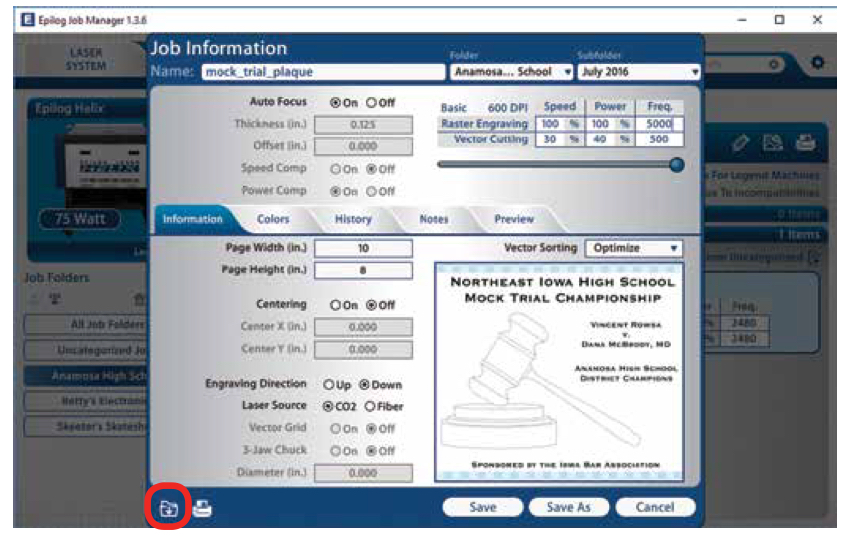
DPI of course is only used for raster engraves, but the settings are still organized by DPI when you’re just doing a cut. While I’m talking about confusing settings, there’s also “frequency”, which is a thing that you can set to a number between 1 and 5000. There’s also a checkbox for “Frequency Automatic”. What does that do? I will quote the manual verbatim: “When this is enabled the laser will automatically adjust the pulsing of the laser to a value of 5000.”
Speaking of auto, a quick note about auto focus, which I mentioned in a previous post uses a reliable probe system rather than Glowforge’s overengineered laser-at-an-angle plus camera plus lots of math in the cloud. If you’re reading this far, you may be the type of person who clicked on my link earlier to TechShop’s instructions and noticed that they said never to use auto focus. Why? Funny story: the auto focus probe is exactly the right size to fit into the crumb tray honeycomb. So if you probe outside of your material or, for example, there’s a hole where the probe lands, it will get stuck in the crumb tray and break off when the gantry moves. Then you need to buy a new one.
I’m kind of running out of steam here so I just want to cover something I promised earlier. Let’s say you have to split your engrave and cut into two jobs because that’s the only way you can get it out of Inkscape. Now you have to ensure that your job is aligned properly on your material, which is something we all know the Glowforge stinks at and every other laser does perfectly. Epilog being no exception, they have a UI in the job manager, if you can find it, with a pencil icon you can click on, if you can find it, that lets you reposition things with respect to the home position. But you probably don’t want to do that, because you’re moving one job at a time and they can get out of alignment. So you can instead adjust the home position of the machine with the most low-tech method possible. Turn off the stepper motors, open the lid, grab the carriage, and drag it over where you want it. There is a handy red-dot laser to help see where the new zero is. If you have a weirdly shaped object, that doesn’t necessarily help you to see where it’s going to end up, so you can turn on the red dot and run your job with the laser disabled to see where it’s going to hit. The way you do this is by opening the lid and relying on the safety interlock, which allows everything to run but disables the laser from firing. I’m not a fan of this approach, as you may be able to tell from my derisive tone.
Anyway, after all that and many hours of experimentation, I was able to make a fidget spinner that’s mostly the same as the ones I’ve been doing with my Glowforge. I have to say again, the hardware is fairly impressive in terms of speed and flexibility. But I could buy three Glowforge Pros for the same price. In terms of capabilities, the Epilog accommodates thicker material and is compatible with an optional rotary attachment, but the GF Pro has a passthrough slot and doesn’t require an external exhaust blower or air assist compressor, so it’s not a simple comparison. Software-wise, I will take Glowforge’s upload-an-SVG-to-the-cloud approach over that print driver from hell any day.
19 Likes
You are a hero for putting up with all that. Thanks for the write up, that sounds like a bear.
this is how the universal does it as well. i haven’t really used that feature. ![]()
but i do use the focus beam from the universal control panel (where the print file goes to when you set the job up). if you click on the focus tool in the UCP, you can click anywhere on your job preview and it will put the red focus laser spot on that exact location on the bed. i use that quite a bit to make sure my job is aligned where i think it is. i start with the math, then use the focus beam to confirm.
as i’ve mentioned before, i think a good mashup of features from the GFUI (and bed camera) along with some of the absolute positioning and other UI features in the universal UCP would make a hell of a control system. both have big drawbacks. but both have useful features. and both frustrate the hell out of me sometimes.
2 Likes
Too bad. The last time I used on it was with Corel (I go way back with Corel ![]() ) and it wasn’t quite as awful as you’ve laid it out for Inkscape. Not stunningly simple but not nearly as sketchy. Although it’s still challenging enough that if you’re away for 6 months, it’s going to be a treat trying to remember it all again
) and it wasn’t quite as awful as you’ve laid it out for Inkscape. Not stunningly simple but not nearly as sketchy. Although it’s still challenging enough that if you’re away for 6 months, it’s going to be a treat trying to remember it all again ![]()
But that’s why having used other lasers, I take all the “GF software is crap” with a boulder of salt. I’ve seen some of the others who have had years and piles of money to do all the “simple” things that the pundits claim should have been done by now and would only take their kid a weekend tops to do.
3 Likes
That would be incredibly useful. AFAICT Epilog doesn’t have that. You can choose whether to align to a corner, center, or edge center, but if you’re trying to figure out whether a complex shape will fit, you have to run the whole job with the pointer on and watch it.
Having done a tiny bit more research, it seems that the controller for this thing uses PCL, and that’s why things like Visicut and a CUPS driver exist. It may be worth it for me to figure out how to get it on the network, even if that means a second NIC and direct connection.
2 Likes
I’ve used an Epilog every day for the last 6 years. It’s way more intuitive than you’re making it out to be, and much more user friendly than the Glowforge.
You can open Illustrator, draw a shape and send the file directly to the laser, and hit go. Whereas with the GF, you would need to create a file, save it, open it in the GFUI, wait for it to do its stupid calibration before every single print, and then hit go.
Try the print driver from Illustrator instead of using Inkscape. You’ll understand how much quicker and easier it is to use.
And I’ll take the little red dot over the poor GF camera any day.
2 Likes
I think using something every day for 6 years makes it difficult to judge what’s intuitive.
The thing is, these are opinions and I’m telling the story of my experience, as I am experiencing it. Your experience does not invalidate mine, or vice-versa.
Not an option for us.
7 Likes
Both glowforge machines I have used only calibrate when it’s turned on. Occasionally mine will repeat calibration once more across a day of use.
3 Likes
I’m talking about the material scanning the glowforge does before each print. Many on here have asked to have that removed. It makes running the same file over and over much slower.
2 Likes
Sooo, you have to use illustrator to make it more intuitive…? Doesn’t seem user friendly
You can use Illustrator or Corel. Or probably even other programs. It replaces the print driver. It’s not exclusive to Illustrator.
And Illustrator is the design industry standard. I’ve never seen anyone use Inkscape professionally.