Fine Art Illustration with Lasers and Ink

Last night I stumbled across the work of Jason Thielke on the [Beautiful/Decay] (http://beautifuldecay.com/2015/04/23/jason-thielkes-laser-cut-figures-contain-dissecting-lines-like-blueprints-body/) site.

I haven’t seen anything like this on the forum, and I absolutely love it.

He uses laser-etching, inks, paint, and aerosols.

I had to share.

15 Likes

These are beautiful, I love how he uses intricate designs to make dynamic figures. I’ve been playing with scoring wood and painting it, but still have a lot of fine tuning to do, the watercolor paint is still running past the scores. Maybe I should try it in acrylic next time… might wick along wood a little less. Awesome find, thanks for sharing!

3 Likes

One thing I’ve done (for sign lettering, not fine art, I’m afraid) is to cover the piece (in this case wood) with painter’s tape. Then I etched it deeply, through the tape and into the wood. Then I carefully painted (brush with acrylic paint) the exposed parts and, when dried, I removed the tape. The effect is a sort of shallow lacquer.

You could also cover it with tape again and re-etch a different pattern to be filled with a different color.

There are rumors that you can fill the etched part with powder coating powder and re-etch it to melt the powder but I haven’t really gotten good results from that yet (mainly, I think, because I haven’t seriously tried).

1 Like

I attempted something like this with the water colors and the Glowforge, but I had way too much confidence in the protective mask that we have and the watercolor leaked all into the edges of the wood:

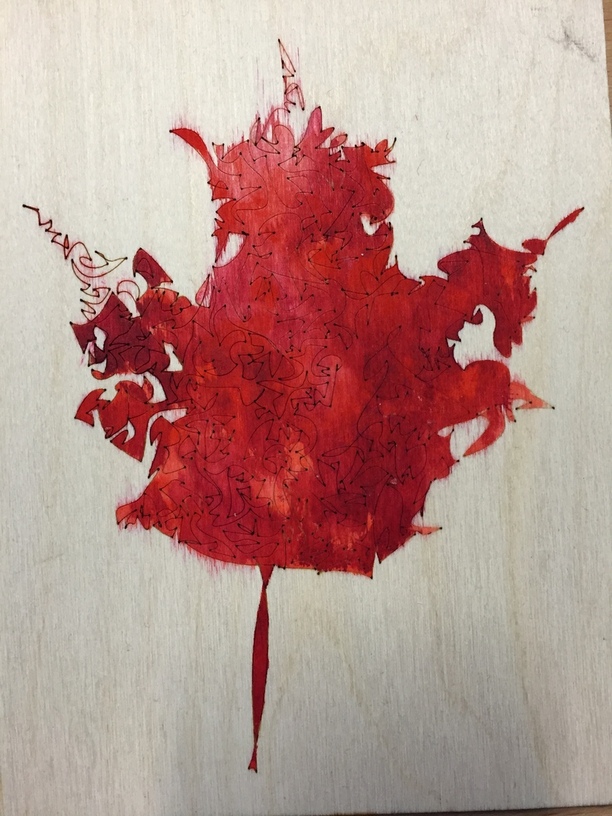
(It might be cool to not peel away any of the mask and intentionally bleed some colors in, like the left point.)
Do you find that problem with the acrylic?

It sounds like I might want to score the wood a little more deeply too. (by the by, this image was created with the TSP stippling technique that @dwardio shared here)

Edit: Haha… this looks awful in comparison to the fine art shown above.

3 Likes

I agree, it’s not as nice as the original pic, but being from Canada, there’s something about it that makes me feel very patriotic.

5 Likes

These are amazing!

The second Jason Thielke piece, in particular, makes an interesting case for using contact paper artistically. I hadn’t considered trying something like that but you could theoretically get some precise two-color designs without needing to paint or stain.

1 Like

That is cool stuff indeed. I particularly want to experiment with things like this on paper, that is, printed design work that combines with laser etching and full cut throughs (with a little bit of foiling to top it all off). Can’t wait to get the GF and start experimenting the heck out of stuff!

@Kusmeroglu remember that wood is basically designed to wick water (Xylem Tissue is how trees drink! I looked it up), and watercolor paint is mostly… well, water.:yum:
Acrylic would certainly work better, or enamel, or oil. See if you have a local OneShot! (Sign-Painters Paint) distributer, that stuff is great. The real key to avoid wicking with routed letters (for me, as a sign guy) is to seal the wood first, with something that will be compatible with the paint you want to use. I can only imagine the same is true for laser-etched designs. Clear polyurethane or de-waxed shellac flakes in de-natured alcohol are some go-to pre-paint sealers, or latex house paint and & primer is another great way to deal with wood.

[quote=“Kusmeroglu, post:4, topic:1048”]
It might be cool to not peel away any of the mask and intentionally bleed some colors in
[/quote]Think you could definitely be onto something there!
Taking advantage of the bleed instead of fighting it is hella kung-fu.

3 Likes

The challenge with acrylic paint is that it tends to bridge between the substrate and the mask, so when you remove the mask, it can peel the paint off the substrate too. We’ll have to work on this, because I know there’s a way to make it work - but we haven’t quite sorted it yet.

Barring paint adhesion issues, maybe a light sanding with a brillo pad would be enough to do the trick without roughing up the mask too much?

Maybe try removing the mask when the paint is still wet?

You could also try gouache. It’s like the love child of acrylic and water color paint. Less bleedy and blendy than watercolor and less flexible and stretchy than acrylic. Those are all very technical terms.

Spray paint is another good option, but only a very light coat. Otherwise you’ll have the same peeling problem when removing the mask.

3 Likes

My guess is that @erin has solved the problem!

OOOOH, spray paint. Genius!

Removing your mask (or stencil) before the paint is fully dry is a great tip. When using spray paint, letting a fine mist of one color fall onto a field of another not-quite-dry color can lead to some fun results.

Here’s Bob with a speckled blue background:

And this red/black mist on an orange background:

Of course, spray paint comes in a range of flavors. Cheap- and mid-range spraypaint (like store brands, rustoleum, or krylon) are generally going to be enamels, and are pretty low in pigment content (the actual little bits of color mixed in with the propellant and solvents). Stepping up to “fine-art” spray paint will give you a much higher pigment-content, and options like low-pressure & variable pressure caps, acrylic spray, oil-based spray, water-based spray, chalk spray, phosphor, and much more. You will also get better adhesion, quicker dry times, and less drips. My personal favorites are from MTN and Molotow.

5 Likes

Amazing technique @jbv. And thanks for your discretion, as you’re right this is a family friendly board. ; )

Do you have a video of your process? I love what you created.

1 Like

Thanks, I appreciate that! No videos of the process at the moment, but if it is of interest I would be happy to make one. Will probably have to be after the holidays.

2 Likes

I would love to see it too!

Gee, if only you had something that could… I dunno… cut the connecting paint along the edges of the mask…

/wink

If you have the mask saved as a design in your glowforge (easily done with a quick place and pic before painting), register the material so it places back on properly (ie - align to a corner). Let the paint dry, put it back in the forge on a pretty low setting so that you only cut through the paint…

yes yes yes… assuming the paint is laser safe!