After two or three practice projects, I also had an issue with cut-through. The solution that worked for me was a thorough cleaning of the unit, including cleaning all optical elements (btw, don’t drop that lens), removing and thoroughly cleaning the crumb tray, and even gently vacuuming the inside of the GF that, in the process, revealed a tiny piece of clear acrylic that may have found it’s way under the right side of the crumb tray which might have led to a non-level surface. After all that, all Proofgrade materials have cut, engraved, etc., perfectly. Hope this helps!
3 Likes
Those of you who put tape on your machines to stop the smell…could you post a picture?  I’ve bought the foil tape but I don’t want to mess it up!
The foil tape is a buffer to transition leaks. That said → you would not want it on the glowforge exhaust ring to tube section because it is not easily removed.
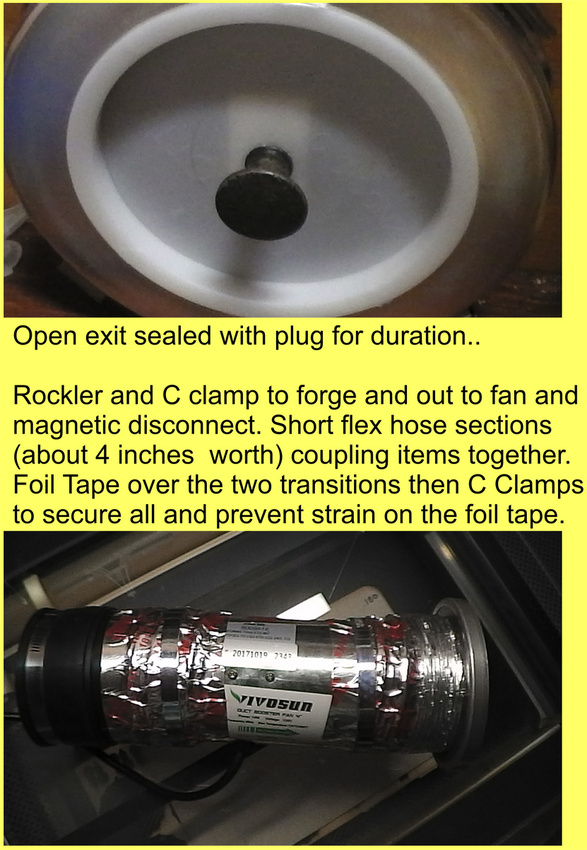
I have a bit of overkill going on, since I have less than 2 feet to work with and one would think that is a straight shot out the hole.
But, I want to be able to block the exit when not in use (hot and humid), and also be able to remove the tube from the machine for easy cleaning. Additionally, I had such a terrible resin infused waste build up on my grate once that I felt a booster fan was needed to get that sort of waste further towards the exit before it slows down and starts sticking around.
So Magnetic Disconnect to Booster Fan to Easy Disconnect, all in less than 2 feet.
Where the foil tape comes in is over the short flex tube sections used for coupling the 3 items together. Once secured and permanent, it forms another leak barrier to whatever you used to secure the transitions (band clamps for mine).
https://www.amazon.com/gp/product/B01C82SYZ0/ref=oh_aui_detailpage_o03_s00?ie=UTF8&psc=1
https://www.amazon.com/Rockler-Dust-Right-Ports-2-Pack/dp/B0025AC6MI/ref=sr_1_6?s=hi&ie=UTF8&qid=1515005988&sr=1-6&keywords=rockler+dust
2 clamps come in Rockler Clamp order.
And my rig in all it’s glory (no one can see it unless I am cleaning it so pretty was not an option)…
3 Likes
How do you seal leaks between the glowforge and the hose then? I had a pretty major leak right at that connection. Did I just hook up the clamps to loosely?
Had that ‘rubber like’ Rockler fitting. Nice and snug to the glowforge and easy to loosen//tighten with a socket.
That now goes into the booster fan instead of straight to the wall, but it still has a small flex tube piece acting as a buffer for initial air tight fit between Rockler and Booster Fan.
1 Like
I’m not sure how I missed the second half of your post 
Doesn’t the GF have a 200+ CFM fan in it already?
Won’t you get Backdraft if you stick a 100CFM fan in the way?
Can watch the exit flap.
Forge pushes it about 1/2 to 3/4 open.
Booster alone goes 1/4 to 1/3 open.
With booster + forge it is jammed at the stop.
Indications are they add to each other.
2 Likes
That might be the case if the fans were very close together but if separated sufficiently a second fan sucking should help the first fan.
A 200 cfm fan blowing into a long duct will not move 200 cfm of air. The longer the duct, the slower the air will flow because the pressure increases due to the viscosity of air. As pressure increases a fan’s flow rate reduces.
2 Likes
I really liked your setup and have been wanting to improve the link between the hose and the back of my Glowforge, so I went ahead and ordered that Rockler coupling set you use. It just came in and it doesn’t fit the Glowforge vent exit at all. The Rockler part is at least 1/4" too big and no amount of tightening of the hose clamp will make it fit. Did I get the wrong part? Do you have something else in between the two? Or is Glowforge making different size vent exits?
I just measured the OD of my Glowforge vent and it is 3.82", the Rockler fitting is 4" ID.
I had the same issue with the vent hose I used on mine…try making a gasket out of high density weather stripping tape:
(It comes in different thicknesses.)
2 Likes
Heh. Great minds think alike and all that. I remembered that rubber material I bought to make the rubber curtains for hubby’s polishing box, so I cut a strip of that and stuck it on with carpet tape. Seems pretty tight now but I won’t get a chance to test it for a little while.
1 Like
My gut wild guess is that the rockler coupler is supposed to fit around the outside of the hose, to be used for joining two hoses together in the middle. It probably isnt designed to fit the same place the hose would as a sort of extension. That would explain some of the difference at least.
But that’s all wild speculation without having done any research! 
1 Like
Just like the picture shows.
As far as a machine change, @staff would best respond to that.
My exit port on the machine is the same though → 3.83ish with a 4" rocket. (just checked).
The rocket extension is very rubbery. I keep tightening the socket until the extension won’t wiggle anymore.
note: just noticed I said C Clamp in picture - meant band strap

1 Like
Thanks for the follow up!
The strip of rubber I put in between seems to be doing the job, so I’m happy now. 