That’s great! I was inspired by others here to start working with leather, so it’s nice to hear that I could have the same effect on somebody else. There are a few videos that I watched to help get me started, this video is a good starting point, because it specifically talks about designing a wallet with the intention of using a Glowforge to cut the leather: https://www.youtube.com/watch?v=uCSNmQDgWT8&t
He’s got a handful of really good videos, so the next one I would recommend is this one where he goes over some tools that are helpful to have: https://youtu.be/71ZEFw2tbKk
I didn’t get a maul, but I did get a dead blow plastic hammer, bit cheaper, and since I’m not using a punch to make holes, I only ever really use the hammer to tamp down the edges after gluing (only have done this a couple of times, will use clamps if they’re being really fussy), or to flatten out the stitching. Other than the maul, the skive knife, glue, and other tools he mentions are good to have, but you’ll find that some things you use more often than others, or that you may not need some tools at all, like the hole punches or wing divider.
Another place that I don’t follow him is the stitching thread. If you want to get a good idea on what thread will look like after being stitched, this video has a really good demonstration: https://www.youtube.com/watch?v=mS8Vb6bkIjI
What’s important to pay attention to here is the spacing of the holes, and the thread itself. I like a decent sized thread so I go with the Ritza Tiger Thread .8mm, but others may feel that stitching doesn’t need to stand out much, like the Little King Goods channel. The spacing goes back to the first video in designing the wallet, where he mentions the “gap” when creating the eventual holes, since again, we’re not using tools to create holes, but you may go that route, so it’s nice to know either way.
Speaking of stitching, this is a place that I would have hiccups. I finally figured out what I was doing, but it takes a feel for getting a consistent stitch line. This video does a nice explanation on how to do a saddle stitch: https://www.youtube.com/watch?v=EIGT_RXi8ZM
Where I found my problem is that the loops I created would alternate. What I mean by that is I would go from one side to the other, that didn’t change, face to back, back to face, but what would change is whether one thread was always on top of the other or if I would swap top and bottom once while stitching. In the video he pushes the face thread through, then pulls down and back on the thread, making it the bottom thread every time from the perspective of the back. When he pushes the back needle through, it goes in front of the face thread since he’s pulling down and back on it. I made a little example:
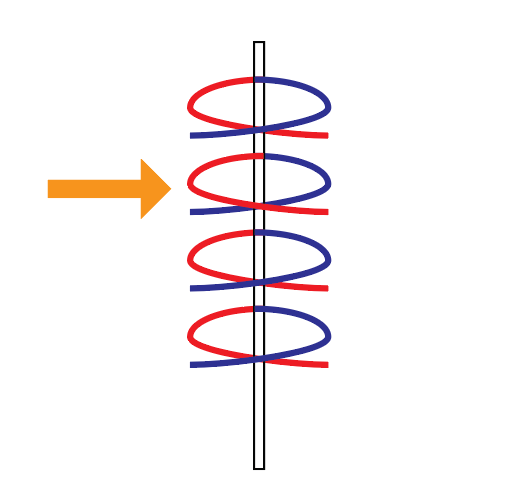
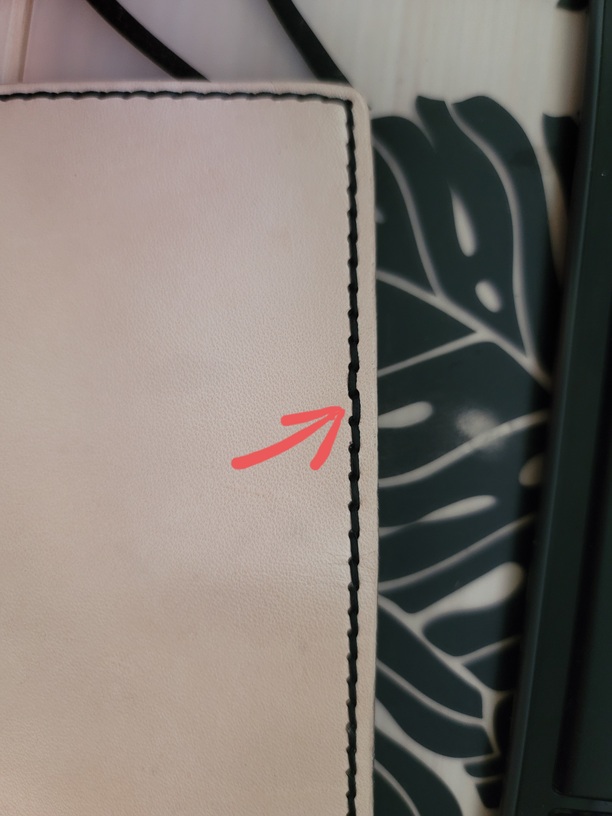
The first, third, and fourth loops are the same, but the second one, when pulled tight, will make a noticeable difference, in fact I have a wallet here where I noticed far too late to go back and fix without needing to undo a lot of stitching:
For skiving the edge, the same channel has a great video on that: https://www.youtube.com/watch?v=ZKwoGWddOro
And picking leather weights, they also have this video: https://www.youtube.com/watch?v=bXTG5EhoJkE
I use anywhere between 2-3oz leather, for wallets like this one, or 4-5oz for the simpler wallets. I’ve been purchasing most of my supplies from Tandy leather, and highly suggest going into a location if possible to get a good feel for the leather’s color, and feel. Bit intimidating at first, so you could even grab hobby sheets from Amazon or Weaver leather supply to get started, or there are scrap bins that @JimmyWayneWestie can definitely point you in the direction of.
Here is a disclaimer, there are generally two types of finished leather; veg-tanned, or chrome-tanned. There are reports of chrome-tanned leather giving off harmful inhalants, and I would recommend that you do your own research on this topic. I only use veg-tanned as there are less risks by using it, and my ventilation often goes directly into the neighbor’s yard, or even right back into my workspace, so for the safety of mind for my family and those around me, I prefer the universally “more” safe stuff. That said, with proper ventilation and precautions, chrome-tanned can apparently be safe, though I have zero experience or knowledge on this.
Veg-tanned often will not come in colors that you may want to use, so I personally use the eco-flo waterstain leather dyes, which I’ve got from Tandy. Weaver has a video on dyeing leather: https://youtu.be/7qvHizUTvCo
They’re using alcohol based dye, which is a bit different from the water based, they have a video on this, as well: https://youtu.be/tbOFSIQzVXc
Hmmm, that’s about as much as I can think of so far; it really is a trial and error type of deal when getting into leatherworking. I’ve been doing this for 3 months and feel really comfortable working with it now, and after every wallet I’ve made, my confidence got better and better. Guess that’s how most crafting niches are ![]() Anyway, I’d recommend everybody to at least try leather a handful of times, it really is fun to work with, and there are so many helpful youtube tutorials that they make it really simple to pick up if you’re willing to do the research and work.
Anyway, I’d recommend everybody to at least try leather a handful of times, it really is fun to work with, and there are so many helpful youtube tutorials that they make it really simple to pick up if you’re willing to do the research and work.