Genaille-Lucas Rulers

I use boxes.py with burn set to 0.08 for 3mm material, and coax stuff together with a rubber mallet. Friction fit with some 2-P10 makes solid little boxes!

1 Like

I’ll look into that. Did you get the lid design there too, or did you come up with that yourself?
Also, 2-P10 looks amazing! I can’t believe I haven’t heard about this till now!

It’s one of the options, “L-Slot for sliding lid” I believe.
I also learned about that glue here on the forum!

1 Like

What are the overall dimensions for the rulers?

Each individual ruler is 3/4" wide and about 8.8" long. The whole set is 9" × 8.8" (229 × 224mm).

1 Like

I really loved the look of these so I had to make a set
Rulers out of thick cherry ply and sliding lid box out of thin cherry ply
took a couple ideas from other posts -

15 Likes

bdm1:

Going to give it a shot. Thank you for designing this. I collect slide rules as a hobby, and this will make a nice addition.

Made a set last night. They turned out great! Thank you for sharing the files.

7 Likes

Wow, my wife and I watched this video the other day, and she immediately wanted some! (SHe’s a math teacher) We didn’t see any reason to spend the money to buy them as they’re more of a cool toy or demonstration tool, than something that will come in handy often, but she did print the paper version off. I cannot believe it didn’t occur to me that I could make them :sweat_smile:

Thanks for the share, will definitely post mine up when I’ve got my own set .

2 Likes

Wow! It’s really great to see so many people running with my design. I love that “Math Sticks” box, @maxdesigns!

1 Like

Thanks

It would be great to add a box to this post and move it to free designs.

I will post my box if someone wants it
But my rulers came out a bit longer than 8”
Mine came out 10.7499 in tall so the box fits these ! I included my files in this zip file. The Purple layer (side Math Stick Engrave) is ignored the first pass then flip the sides and engrave them.

Rulers and Box SVG.zip (92.1 KB)

6 Likes

I wanted to have a set of these that had Multiplication on one side and Division on the other. I also wanted the numbers on the top to be the same on both sides of each ruler. I ended up taking bdm1’s original svg and rearranging one of the sides so when the workpiece is flipped left to right. It lines up as expected.

To manage the flip registration, I exploited the idea of using a 20x11.5 SVG art board in Adobe Illustrator. With this size artboard when an SVG file is loaded into the GF software all elements appear in the GF software at a known/predetermined location.

Some of these steps will require some trial an error. The holes I used fit my toothpicks perfectly with an interference fit. My picks have a cylindrical body with a conical point, I don’t recommend doing this with square or wedge shaped toothpicks. I bought my up at our local Cracker Barrel, lot of 300 for $1.50.

My workflow:

  1. cut out the large frame and small holes into the workpiece. This can be done at any arbitrary location on the work piece, providing the holes and frame are not moved relative to each other.

  2. Insert round toothpicks into the holes far enough that the points and a little of the body stick out the back side. Three should poking out the top surface, and three should be poking out the bottom surface. I choose the upper and lower 2 on the left and the middle 1 on the right, then flipped it over and repeated this pattern. These pokey bits should stick up no more than 0.5" or it’ll interfere with the GF head.

  3. cut off the handle (aka long end) of the toothpicks flush with the surface. This will leave just the little pokey end sticking out.

From this point forward do not move any of the elements in the GF software. Instead you’ll need to move the work piece you cut out above

  1. if you moved the registration holes in above steps, then reload the job from SVG file.

  2. place a piece of heavy card stock (or Bristol Paper) at a known location, for me this was the bottom right corner of the GF tray. Hold down with magnets and recut just the six little holes into the paper.

At this point you should have a work piece just slightly larger than the final product. This should have 6 holes in which you have 6 tooth picks. The cardstock should be cut with reference holes that will align with three of the toothpicks.
Ensure the waffle pattern on the tray does not overlap with the registration holes you plan on using. If it does then you either identify other holes you should use or rearrange the file.

  1. Place the workpiece into the GF so that three of the picks fall into their associated holes

  2. Load Multiplication side and cut

  3. Flip the work piece, left to right. Ensure the corresponding picks fall into their holes

  4. Load Division side and cut

  5. now cut rulers out. You can do this in one step from a single side, but I found it looks nicer if you cut half way through from both sides. This will require some trial and error to identify the proper settings for your material. If you cut from both sides you can use the flip registration as you did before.

Here are my original Illustrator files and the SVG files I used in the GF. I ended up converting all “ink” jobs to an engrave function and this took a painful 1.5 hours per side at 225 lpi @ 1000 speed. Although this took longer to run, I liked that the division side didn’t get all chewed up by the multiple converging lines.

Genaille-Lucas.zip (2.0 MB)

3 Likes

That’s exactly how I cut mine. Load the “combined” svg file from my original post into the GFUI and set it up to engrave, score, and cut the multiplication side only (ignoring the division engrave and division score). Without closing the GFUI, open the Glowforge and flip each ruler in place, leaving the rest of the sheet in place. I usually use magnets to make sure the sheet doesn’t move during the flipping step. Then go back into the GFUI and turn off the multiplication steps and turn on the division ones. Engrave and score the division side. You will end up with multiplication on one side and division on the other, all perfectly aligned.

4 Likes

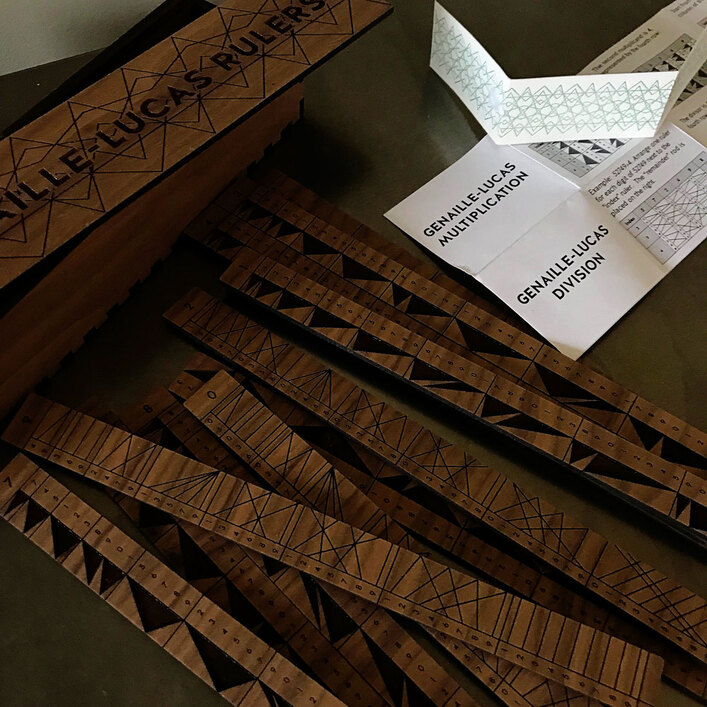
I finally finished my set…and after three false starts, ended up right back where I started with the Medium Walnut ply. :roll_eyes:

I made a separate post because I wanted talk a little bit about some other elaborate stuff I did, but I also wanted to come here and say thanks again for the file – all the problems were with materials, none with the SVG!

[You Rule, Valentine Rulers]

5 Likes

Wow this is very interesting, I was worried doing it by hand like this wouldn’t be accurate enough. I’ll have to try this approach the next time I run the job.

The only time I’ve had this approach go awry is when the laser didn’t quite cut through and I had to jostle the sheet too much to free the part. Otherwise, it should be accurate to within a kerf’s width.

When I watched the video, this was exactly what I wanted to do as well, but I was in the airport waiting to travel for work, so I have not yet!

super cool!