I assume the fall-offs during the engrave are the overshoot?
What’s the resolution/polling period on a setup like this?
I like charts 
I assume the fall-offs during the engrave are the overshoot?
What’s the resolution/polling period on a setup like this?
I like charts
I don’t have much. I was wondering if this was the right path.
Also I was going to make an external dashboard, maybe using an e-paper badge I have.
But I can tell you how I added a custom icon.
@marmak3261 Basically follow these directions…
create this folder
/config/www/icons/
add this file
/config/www/icons/glowforge_icons.js
const ICON = {
	'logo':
		'M26.792,19.649c2.821-4.885,2.017-11.05-1.981-15.049c-2.351-2.351-5.481-3.645-8.815-3.645 c-3.334,0-6.464,1.295-8.815,3.645s-3.645,5.481-3.645,8.815c0,3.334,1.295,6.464,3.645,8.815l8.815,8.815 c0.519-0.519,7.245-7.245,8.633-8.633c0.004-0.004,0.007-0.008,0.01-0.011c-0.361-0.361-6.365-6.365-6.365-6.365l-0.264-0.263l0,0 l-0.525-0.525c0,0-2.505-2.505-3.063-3.063c-0.612,0.777-0.558,1.924,0.156,2.637l7.107,7.107c0.128,0.128,0.199,0.297,0.199,0.476 c0,0.172-0.069,0.34-0.19,0.461c-0.062,0.062-1.459,1.459-1.563,1.563c-0.155,0.155-0.319,0.187-0.429,0.187 c-0.115,0-0.288-0.036-0.459-0.207c-1.576-1.576-6.997-6.997-7.166-7.167c-2.085-2.137-2.063-5.589,0.046-7.698 c1.033-1.033,2.408-1.602,3.872-1.602c1.464,0,2.84,0.569,3.872,1.602c1.173,1.173,1.745,2.796,1.569,4.452 c-0.016,0.149-0.02,0.279,0.084,0.383l1.33,1.33c0.862-2.59,0.19-5.473-1.743-7.407c-1.363-1.363-3.179-2.114-5.113-2.114 c-1.934,0-3.75,0.751-5.113,2.114c-1.355,1.356-2.108,3.158-2.118,5.074c-0.01,1.915,0.72,3.723,2.057,5.091 c0.012,0.012,0.565,0.566,7.138,7.138c0.323,0.323,0.261,0.733,0.04,0.954l-0.167,0.167c-0.385,0.385-1.288,1.288-1.361,1.361 c-0.177,0.177-0.36,0.214-0.482,0.214c-0.164,0-0.323-0.068-0.447-0.192l-7.121-7.121c-4.177-4.176-4.177-10.972,0-15.148 c2.02-2.02,4.71-3.133,7.574-3.133c2.864,0,5.554,1.113,7.574,3.133c1.639,1.639,2.682,3.716,3.018,6.009 c0.324,2.209-0.059,4.511-1.076,6.483c-0.002,0.013-0.001,0.032,0.002,0.04L26.792,19.649 z',
	'power':
		'M11.496987,8.10868001 C7.83232901,10.2075674 6,13.1713407 6,17 C6,22.5228475 10.4771525,27 16,27 C21.5228475,27 26,22.5228475 26,17 C26,13.1713379 24.1676683,10.2075631 20.503005,8.10867546 C20.1919118,7.93050037 20,7.59942612 20,7.24092177 L20.0000188,6.10234457 C20.0000188,5.5500702 20.4477256,5.10236336 21,5.10236336 C21.1405065,5.10236336 21.2794359,5.13197347 21.4077322,5.18926358 C26.4692441,7.4494588 29,11.3863709 29,17 C29,24.1797017 23.1797017,30 16,30 C8.82029825,30 3,24.1797017 3,17 C3,11.432078 5.4897121,7.51367986 10.4691363,5.24480564 L10.4691262,5.24478356 C11.0129939,4.99697031 11.6547781,5.23696983 11.9025913,5.78083748 C11.9667829,5.92171654 12,6.07472877 12,6.22954306 L11.999984,7.24094049 C11.999984,7.59943906 11.8080754,7.93050801 11.496987,8.10868001 Z M15,2 L17,2 C17.5522847,2 18,2.44771525 18,3 L18,17 C18,17.5522847 17.5522847,18 17,18 L15,18 C14.4477153,18 14,17.5522847 14,17 L14,3 C14,2.44771525 14.4477153,2 15,2 Z',
	'lid-closed':
		'M29,23 L29,20.25 C29,20.1119288 28.8880712,20 28.75,20 L3.25,20 C3.11192881,20 3,20.1119288 3,20.25 L3,23 L2,23 C1.44771525,23 1,22.5522847 1,22 L1,10 C1,9.44771525 1.44771525,9 2,9 L30,9 C30.5522847,9 31,9.44771525 31,10 L31,22 C31,22.5522847 30.5522847,23 30,23 L29,23 Z M4.25,21 L27.75,21 C27.8880712,21 28,21.1119288 28,21.25 L28,23.75 C28,23.8880712 27.8880712,24 27.75,24 L4.25,24 C4.11192881,24 4,23.8880712 4,23.75 L4,21.25 C4,21.1119288 4.11192881,21 4.25,21 Z M8.25,13 C8.11192881,13 8,13.1119288 8,13.25 L8,13.75 C8,13.8880712 8.11192881,14 8.25,14 L23.75,14 C23.8880712,14 24,13.8880712 24,13.75 L24,13.25 C24,13.1119288 23.8880712,13 23.75,13 L8.25,13 Z'
};

async function getIcon(name) {
	return {
		path: ICON[name],
		viewBox: "0 0 32 32"
	};
}

window.customIconsets = window.customIconsets || {};
window.customIconsets['glowforge'] = getIcon;
Go to Configuration > Lovelace Dashboards > Resources
Thanks so much. This is very clear and doable.
I think an about blast gate will be a good project and that in-line fan.
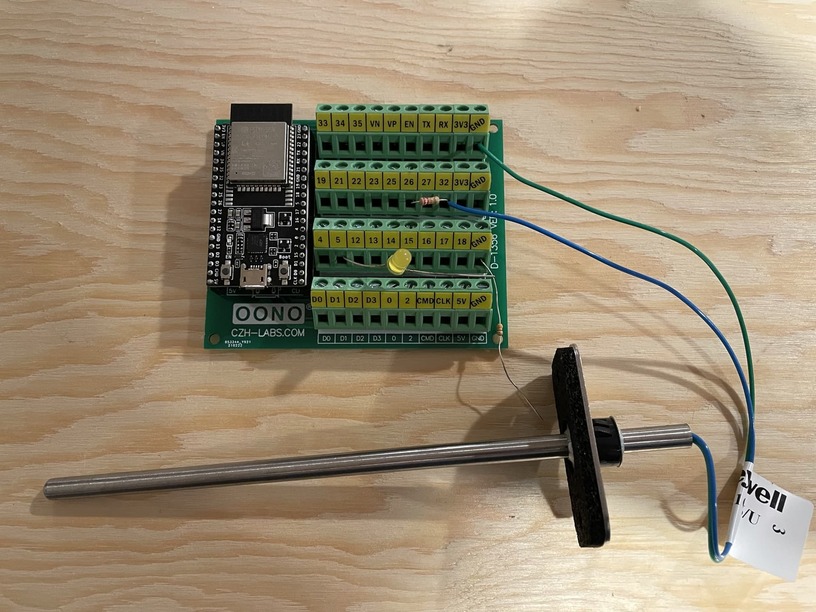
I like using these kinds of breakout boards for experimenting, where everything is nicely labeled and easy to connect to.
P.S. That might look somewhat rude but I assure you it is an air conditioning duct thermistor.
Oh that’s a cool design, I’d not seen that type before. I’ve never even seen angled screw terminals like that before.
Must… resist… buying random components!
Hahaha oh you’re serious
Yeah my rule now is “no components that you don’t know what you’re going to use them for, but when you do know buy at least 3x what you need”.
That’s a nice breakout board.
If you could for the good of the order edit that file content box and put in the top lines that didn’t get included, as far as I can tell:
const ICON = {
It wasn’t working and the program looked like it was missing something so I checked out the Zeus instructions and noted the code missing.
Also, got tripped up on the vertical line at the end of /local/icons/glowforge_icons.js.
That seemed unfamiliar for a url, but I couldn’t quite tell if that was something special for home assitant. Realized it was just a cursor. Now I have the icons and have an easy spot for all my customized icons. Thank you so much!
I love the idea of having sensor data from inside my Glowforge.
Currently, I am monitoring energy usage with a Zooz Zen 15 z-wave switch. I also have my exhaust fan connected to a Zen 15 switch, as well. I have a little rule that turns the fan on automatically when the energy use on the GF goes above a certain level (100W seems to work well for most prints) and turns it off after the power drops and a short delay to clear the fumes.
It was broken in the markup. I just updated the entry.
I will add more icons soonish. Maybe I don’t need to, looks like MDI has a bunch.
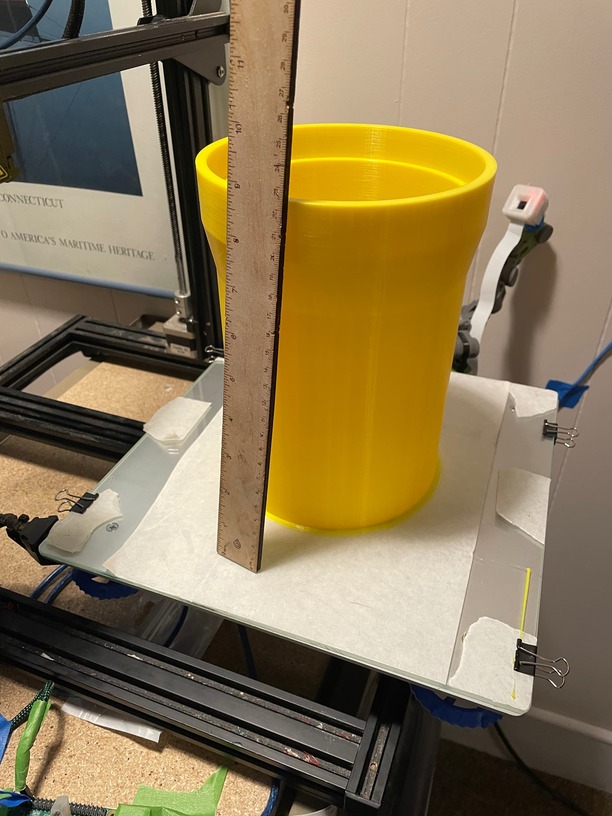
Exhaust pipe section to fit onto my new Infinity Cloudline 6” exhaust. 26 hour print. I did two sections. Having both my printers set up now. Tonight printing the gates and tomorrow getting the window opening ready. Got the smart plug ready to control it. Then it will be easier to use the laser. Right now I have to mess with windows opening and closing.
Question for folks: do you have any automation trigger for running an external exhaust fan, turning it on when a job starts? I’m figuring that I could get it to trigger when the power goes above a certain level, but since it needs to ramp up and the burning has already started, that’s not really the best solution.
I don’t want it to run all the time, say when I turn the Glowforge on. Then I want it to run for a bit after the job stops. That’s easy enough. Just the starting routine.
Would be nice to access an API!
I’m finishing up the exhaust blast gate and should be able to show it off tomorrow. Right now I am running the fan just with the exhaust tubes and it is so much quieter or at least the noise isn’t so high pitched.
I don’t use the gf power switch; the switch is always on. When i open the blastgate it turns on the power to the gf and the fan. When I close it, it turns them off.
So the fan is running as long as the Glowforge is powered up?
Yes, I like it that way, so the scraps that I Leave in the gf are vented out. Significantly Reduces the odor released by opening the lid.
My blast gate and my switch are right next to my GF. I open the blast gate, turn on the fan, and then start my GF. When I’m done for the day, I shut the GF off, let the fan run for a couple more minutes, then turn it off and close the blast gate.
This topic was automatically closed 32 days after the last reply. New replies are no longer allowed.