There are two very different ideas about containing images in a computer file. One (a Raster) is a huge stack of tiny squares that each can be assigned a different color. This can have great subtlety but while your eye can see lines the computer does not, and there is a definite scale, that keeping the squares constant doubling the size of the image expands the number of squares four times.
The other system is a list of points with distances and angles (Vectors) this can be way smaller and lacks subtlety, but it is very easy for a computer to step from one point to the next.
An Svg can contain both Rasters and Vectors but while vectors can be cut scored or engraved, rasters can only be engraved. Rasters work well for inkjet-type printing so a great deal of what you normally see is rasters, and there are many apps that can trace rasters to create vectors, most photo apps stay with rasters which is apparently your issue. Deciding where a line is in a raster is not a simple thing so there is some variety in how different apps do it and the quality of the result. I use Gimp as there are a lot of controls but there is some learning to use it as every sort of control needs a widget to accomplish it so more control means more confusing widgets.
There are three things that set how much power goes to engraving. You can add more power is obvious, but more LPI (lines per inch) adds more power also, but going slower and thus spending more time over any point also increases the power delivered just as high speed delivers less. Folks often get that part backward.
Cutting or scoring have only speed and power so they are much easier to figure.
There are a couple of things to resolve in your post. First, manual cut settings for 1/8" mdf should be similar to the Proofgrade settings for medium draftboard as a starting point and modified as needed. (183/full) Your setting of 225 250 are not cut settings at all since the maximum power is 100/full. Your settings are to engrave which is why the file was going to take 10 hours.
In order to cut or score a design element, it must be a vector path, not a filled shape/raster. If you traced an item or created it as a raster, it will only engrave and not cut/score.
I urge you to work through the Glowforge tutorials to gain a little experience with the interface. It is not a design program, it is more of a print driver.
I do use an iPad Pro to send jobs to my lasers (Glowforge Pro and Aura). If you would care to upload here a representative file that is supposed to cut, I’ll be happy to troubleshoot and see if we can figure out where things are going wrong. Better zip it as the forum software does wonky things to some file types.
I usually use Illustrator for iPad to generate vector files. Have you tried that? It does have a vectorize feature for bitmaps.
So a couple things to check - an SVG file doesn’t automatically mean it’s vector data.
There’s been a lot of talk about engraving - are you trying to cut or engrave?
You mentioned you have access to Adobe Illustrator - check your SVG with that. Go to outline mode (Ctrl/cmd+y). Vectors will show up as paths, rasters will show up a box with an X.
Three if you are talking about basic engraving when you are just figuring out how rasters and vectors are different. Also as deep as I can go when making things for the catalog.
OK. I’ve just glanced at your posts. Give me a while to digest.
Let me restate what the situation is as what I wrote before didn’t seem very clear when I reread it. I am using a iPad Pro with the latest update and running Safari. I have had a Glowforge Pro for about three months but haven’t done much of anything besides monograms and engraving glass. I sometimes do stained glass and one of the uses I originally had in mind for the laser was to draw my patterns by hand the way I am fastest and most comfortable, digitize them, then scribe one for a cartoon and cut another for the pattern.
After discovering that GF had a Trace function I thought my work was over. I think all I found is I am going to have to do things the way I started but had hoped I could avoid.
I’ll work through all your suggestions tonight and report back sometime tomorrow. The one thing I would like explained some more if possible is how to tell if you are dealing with an svg that will only engrave and how you can change that.
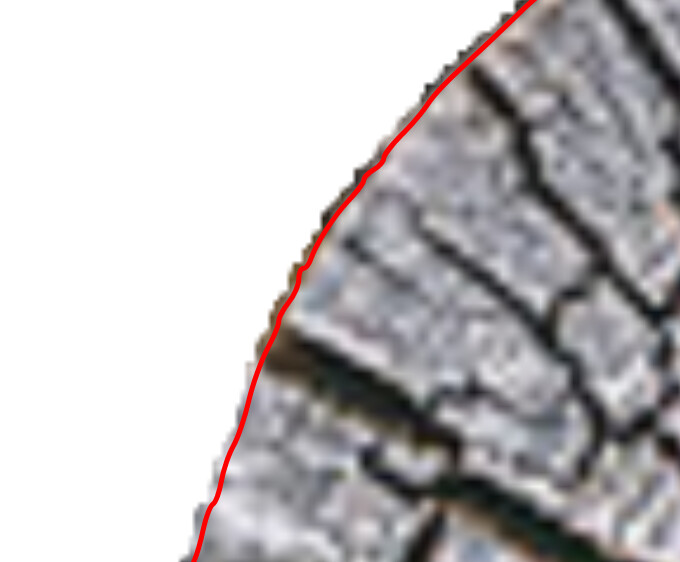
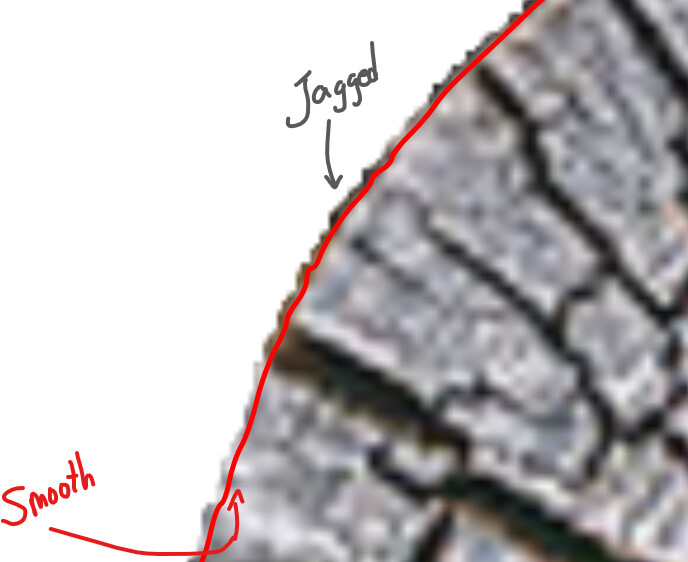
The easiest way is to zoom way in on it - if you can see pixels, it will only engrave - if it stays smooth no matter how close you get, it’ll cut/score/engrave.
This is opening an .svg in my browser and zooming in 500%.
Eg.
Ok. I looked at the line I was trying to cut and you were right that it was pixelated, both the one I was using for Shaper Origin and the one I captured with Trace which must mean that both Trace are just poor quality raster scans. Maybe they are trying to interpret it as a vector but my setting was wrong too.
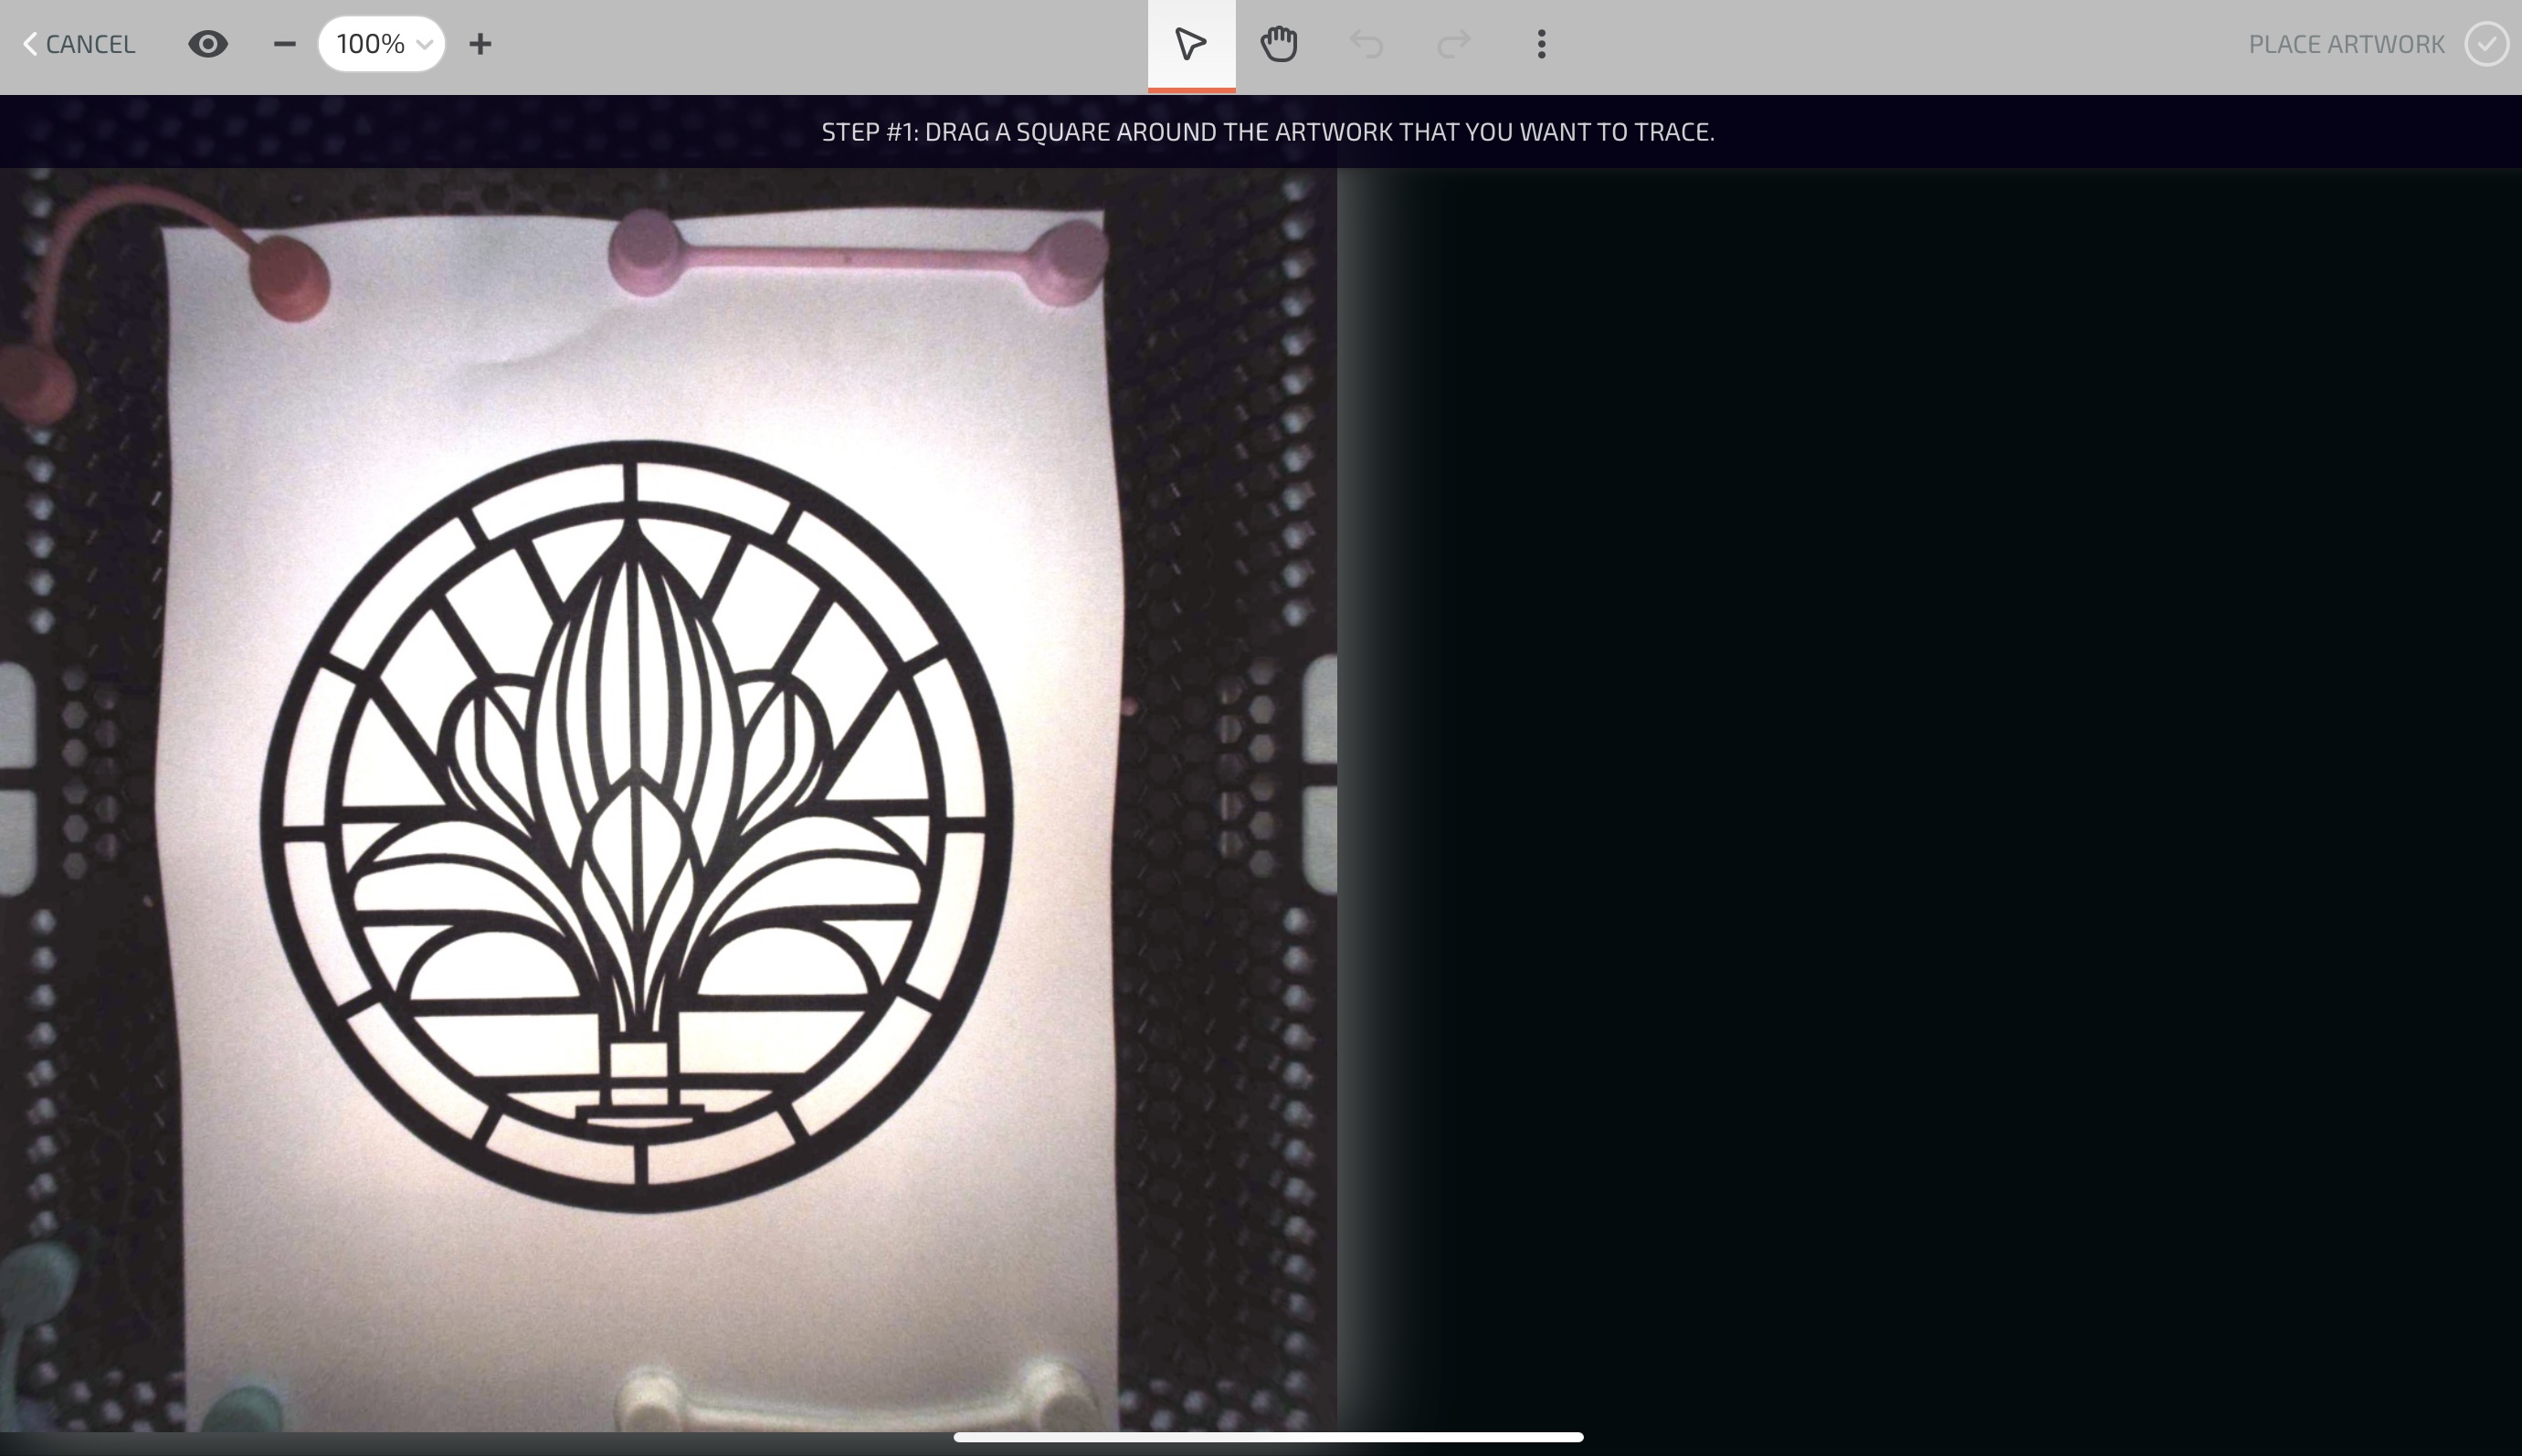
Trace will generate a vector as well as an engrave, but it’s tricky. You have to click just outside the image. If the image has no holes (discontinuous areas), you will get a vector that will default to cut (the outline), and an engrave (anything inside the outline). If you keep clicking in the same area, what you get changes and is less useful. If you’d like to upload a representative image, I could try the Trace option for you to show you what I mean.
There are a lot of different tablets and power-pens that you could sketch with and have your sketching go directly into vectors. You can even use the basic ones on the screen of your I-pad. I must have lost a dozen of those around here somewhere.
Are you talking about using the digital pen that came with the iPad? Well, I think I had to buy it extra but I lost it long ago and didn’t know I had the need to replace it. I had a cintiq with a windows 8 computer that I traded to an iMac about 7 years ago when I switched everything to Apple. I was never comfortable with my hand doing one thing on one screen and having to watch another for the results. Maybe I just need more practice but I don’t have that long to live.
I’ll try. Archive.zip (407.1 KB)
The hummingbird I cancelled when I saw how long it was taking. I simplified the lines and traced another. I know I had the cut settings wrong for 1/8” mdf. I had those settings written down for something but it certainly didn’t work for cutting.
What you kave there is certainly a mess. If you went over your lines with a black felt tip pen using a straight edge where the line is straight the resulting file would be far simpler. Still if I were doing it I would need the free program Gimp to clean it up and turn it into reasonable vectors.
Tablet ramblings
Back in the day I had a Kurta Tablet and woukd routinely turn my architect boss’s skedtches into cad drawings very quickly in part by using a 4" snap, every point was on that grid and some multiple of 4" from every other point. I had the hottest machine in the office with two megabytes of ram!
Today Wacom seems to be what Kurta was then and you could trace out your design in minutes.
The key point about vectors is that every line is a start point and an end point. A rectangle is just four points but most translating software (including what you used) was trying to capture every little twitch and bump along the way.
Step 3: the software tells you to click where you want to it to cut (I.e., generate a vector cut line), so my first click is in the white area just outside the circle. Notice the pink trace line.
You will see two operations. The top one is the engrave, which you will set to Ignore. The bottom one is the cut file which shows all those vector lines.
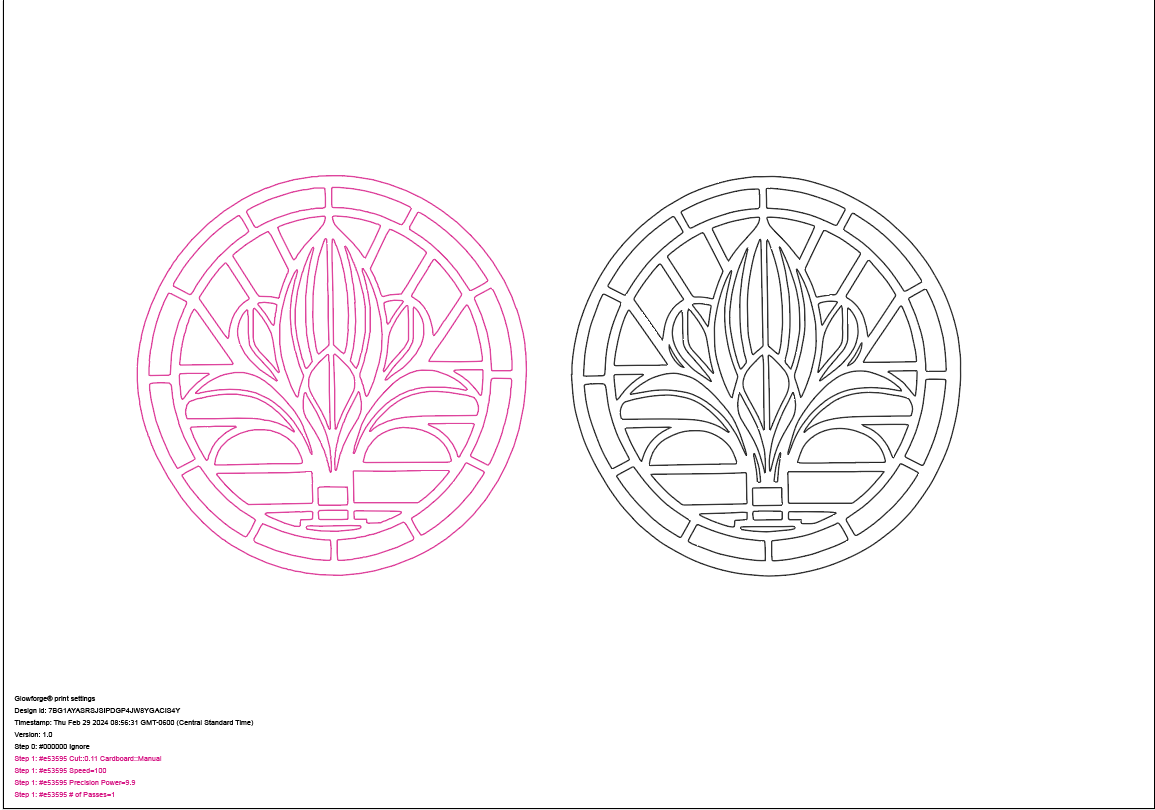
I think it ended up with a pretty good result, although for myself I’d probably still end up doing the whole thing in Illustrator. Please note that to get this good of a result you need a printout that is very clean, and all the lead lines of the pattern are completely filled in with black. Note also that I did this entire thing on my iPad in my Aura (although doing it in the Glowforge Pro works exactly the same).
Update: to compare to Illustrator, I exported the above file from Glowforge and opened it in Illustrator. I dragged the bitmap away from the vector, and had Illustrator do an image trace (using the Black & White Logo preset, ignoring white). Here’s the result (Glowforge traced vector on the left, Illustrator traced vector on the right):
As usual it hasn’t picked up very well in the lower left side IMG_0581.zip (539.2 KB)
I tried adding in the missing pieces. IMG_0582.zip (355.3 KB)
It basically went inverse and I couldn’t get to make any other changes.
I didn’t spend but 10 minutes or so on this and as I said in one of my previous posts, I lost my Pencil long ago so precision selection is not possible.
Thanks for your help. I believe I am going to have to get another pencil to be able to draw and select a little easier. And I may try a notebook.
So, I hate to break it to you but that pattern is just not going to be suitable for Glowforge’s Trace feature. The lines are just too thin. It’s not the fault of the app, it’s just not the right tool for the job. Here is how I would approach it, since you indicated that you had access to Illustrator, and iPad:
I took your photo of the pattern into Photoshop for iPad and corrected the distortion and tone as best I could, and got this:
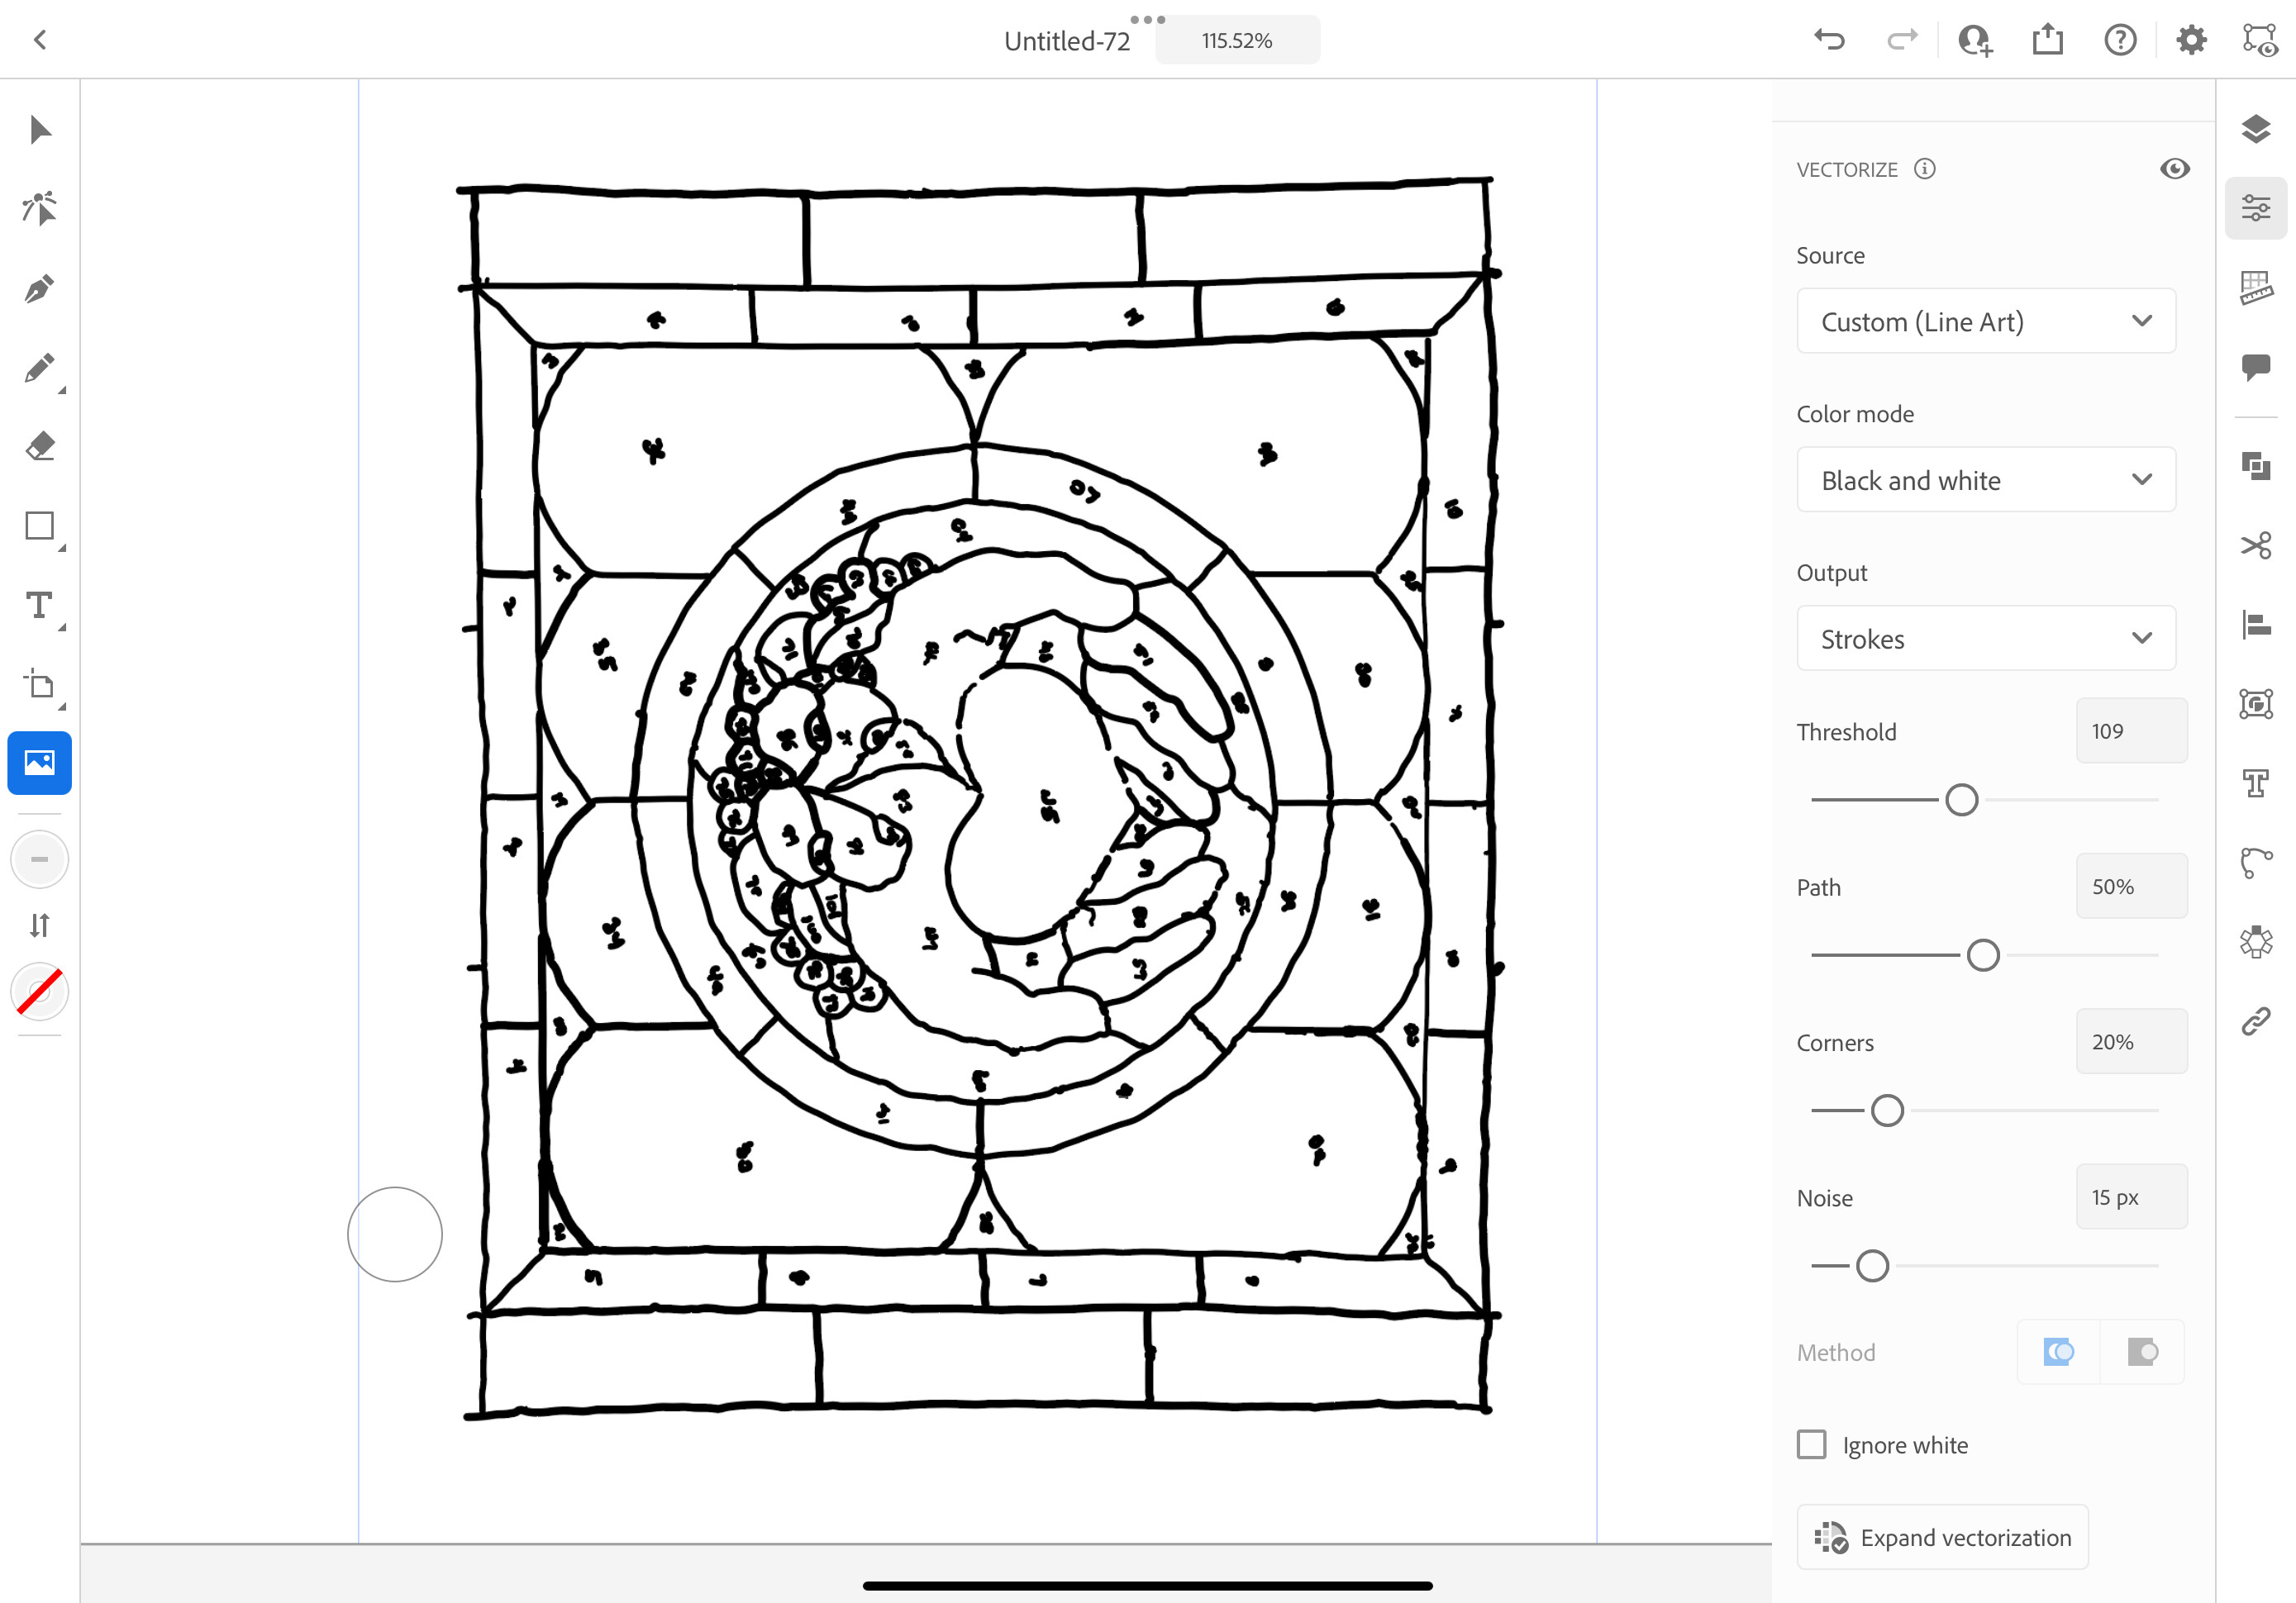
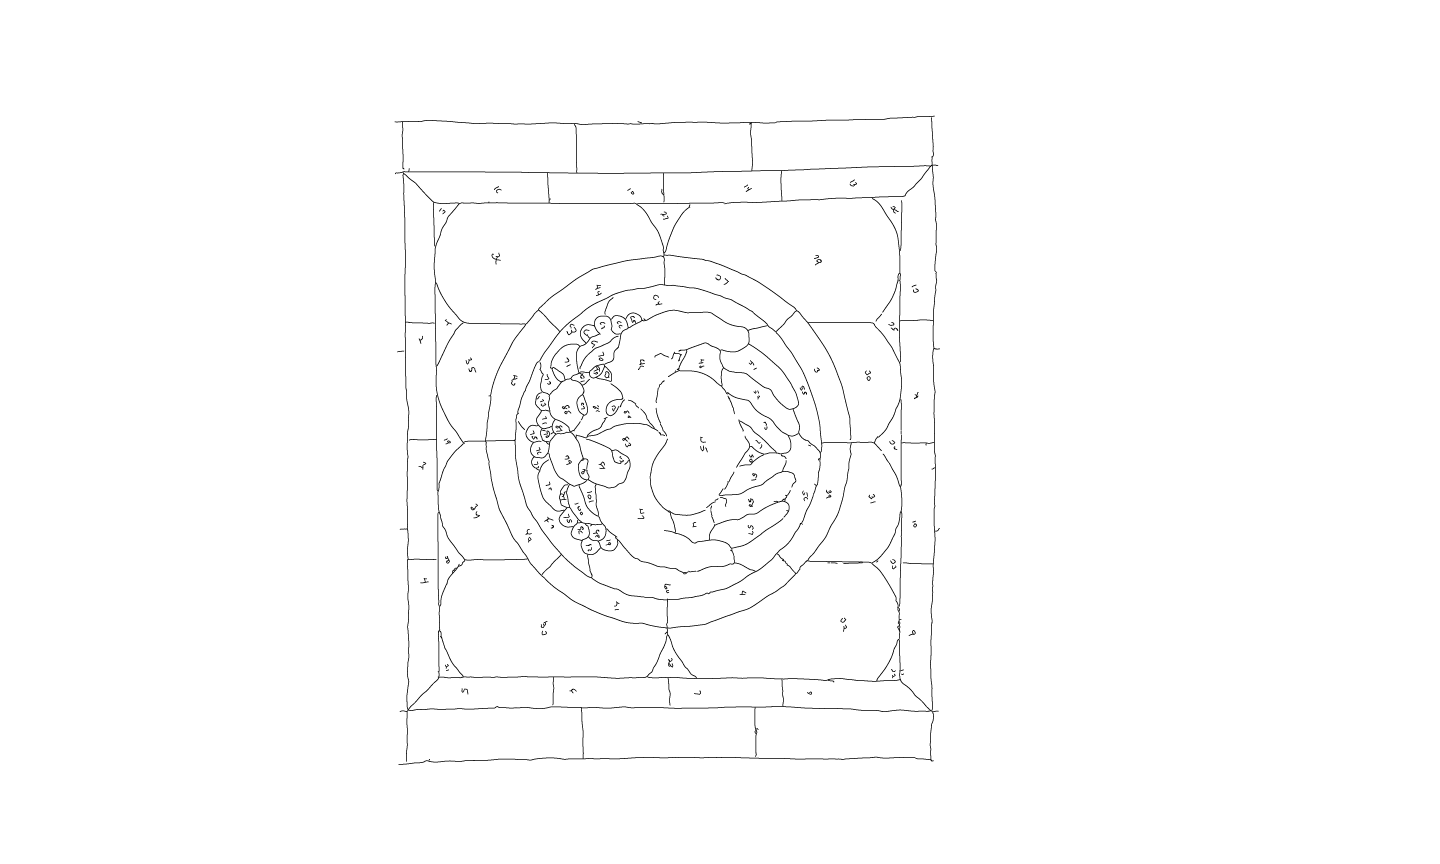
Then I took that bitmap into Illustrator for iPad and did a Vectorize command on it, choosing line art style and the options you see in this screen grab:
The pdf above is editable in Illustrator and is a lot closer to what I think you want. Personally, I would manually trace the easy stuff at least, like the straight lines and circles—you’ll get a better pattern.
All this was done on the iPad. You’d get a better result using the desktop version, especially the Photoshop portion, as there are better options for correcting distortion and tone.
Side note: When I was doing stained glass I used to trace my pattern in Illustrator so I had single lines for all the cuts. Then I made the stroke width for all the lines to be equal to the thickness of double the thickness of the copper tape. Then I did an Outline Stroke, and filled all the outlines with black. Selected all and then Pathfinder…Unite. Then I’d cut the design from vinyl (this was pre-Glowforge days, never cut permanent vinyl in your Glowforge) using my vinyl cutter. The interior pieces of vinyl were the exact size the pieces of glass needed to be cut to, so I’d stick the vinyl pieces to the glass to guide the cuts. I got very precise cuts with minimal grinding needed.
I hope this helps. If you want to talk about this further, we should probably take this discussion to a private message since it doesn’t really fit the title of this thread.