Thank you!
…and two intake fans we will probably never have to worry about.
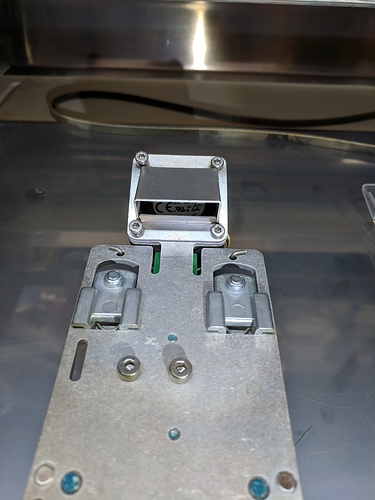
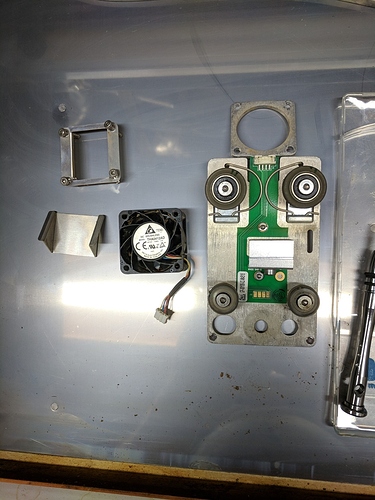
Here is a pic of the carriage where you can see the air assist fan. This view is looking at the bottom of the carriage.
This is a look at the top of the carriage. the bigger rollers are the spring loaded ones that clamp the carriage to the gantry rails.
Thanks for posting that teardown picture, and for calling out that the rear wheels are spring loaded. I just popped the head carriage off the gantry when removing the head for a cleaning, and for the life of me couln’t figure out how it had come off so easily, when it didn’t want to go back on at all. Your pic and explanation gave me the insight I needed to seat it back on: rear wheels first (some feeling around as they’re well out of sight) plus a slight forward tug and the front wheels went right back on. Many thanks.
Since I’m here I will say that while fiddling with the carriage, I noticed extra slack in the front right guide wheel bearing that the left one does not have. The left one is fairly tight, but the right one wobbles maybe 1/16th of an inch on its axle. Does anyone know if that is normal wear in a year of service? Or maybe it wasn’t tightened at the factory? The wheel axles look to have hex heads, maybe for adjustment, but I’m not going to worry about it as long as the unit is doing good work (which it is).
Your Welcome! ![]()
Exactly right. ![]() If you look under there with a mirror you will notice the hole in the gantry for that wheel is slotted for adjustment. I believe that wheel screws through that slot into a movable plate, and tightening the wheel cinches that assembly in position in the slot. I’m pretty sure if that wheel were loose the belt would fall off. Does the belt seem taught?
If you look under there with a mirror you will notice the hole in the gantry for that wheel is slotted for adjustment. I believe that wheel screws through that slot into a movable plate, and tightening the wheel cinches that assembly in position in the slot. I’m pretty sure if that wheel were loose the belt would fall off. Does the belt seem taught?
You can also see a small hole in the plate through the slot, that has tool marks on it. I’m thinking the manufacturer has a tool that mounts there to tension the belt.
Since we don’t have the benefit of that tool, Before you loosen that wheel for belt replacement you should get a feel of the deflection in the middle of the belt across the span in back, where it’s not connected to the head to get an idea of how much tension to put on the belt before you tighten that right wheel.
Regarding removing the head, I’ve found that holding the head with the two middle fingers on each hand on the bottom side edges and my thumbs on the top side edges, allow me to brace my index fingers against the gantry and tip the head toward me, that breaks the rear two magnets loose. Then the head comes off much easier, without having to break the grip of all 4 magnets at the same time.
I didn’t mess with belt tension, the carriage remained attached to the belt at all times, but you’re right there has to be some way to tension the belt.
Regarding your last paragraph, I’ll try that next time I remove the head, trying to make sure the carriage remains on the gantry.
You guys are my new heroes. My daughter was engraving some rocks she found and it looks like at least one was too tall for the gantry. It knocked those back rollers off the tracks. When I was on my knees looking at it, it made sense in my mind that they would ride on the back side of the belt that the laser head is on. It wasn’t until I read about the spring clips that it made sense. The GF is now back together and working like a champ. Thanks guys!
I just recently at the request of Glowforge CS agent due to Air assist errors was sent instructions on removing the carriage unit. It’s actually fairly easy. It’s in with rudimentary spring clamps so in pops in and out with a little force. What I unfortunately discovered was the Air assist fan in the carriage unit had been installed with the label folded so it was acting as a cup trapping all sorts of soot. I removed it and cleaned it out with a q-tip and alcohol. The label acts as a dust cover for the bearing so I had to make a new circular label using duct tape. After I reinstalled it and now it blows all smoke clear of cutting area with ease and cuts fine but now I am noticing smoke coming out of the front inlet vents and my chamber is not clearing properly of smoke? Sounds like I need to work on my exhaust ducting or exhaust fan. It too bad this is not more accessible like the fans on the print head or or carriage units. One additional thing I also noticed was the pulley on the right side had a hair line crack forming. I sealed it with some CA but asked the Glowforge CSR if I could get just a replacement pulley. Still waiting to hear back.
Good plan. How’d you think to check, was it acting up?
Also I think you may be the first to have that label issue. Certainly the first I’ve heard of.
And welcome to the forum! Looking at your profile it looks like you just got your Glowforge but you sound like you’re pretty experienced… is the forum info correct that you’ve only had your machine for a week?
I actually have had my GF since September but only recently joined the boards.Regarding what led me to look at this issue, I was getting the Air Assist Fan Warning which stated Air Assist fan was not running at the proper speed so it did not allow me to print. I removed what I thought was the Air Assist Fan ( due to the AAF instructions on the GF site making is sound as iff the fan was the one in the print head. I cleaned it and then ordered two more replacements to have on hand just incase. After this did not help I contacted GF CS and they not only helped by sending instructions with pics on how to remove carriage plate and clean the actual AA Fan but also mentioned that they themselves had made the same mistake. Only issue now is after cleaning all fans it fixed the smoke build up issue but now I am finding a lot of exhaust smoke coming out front of machine? I will look on other threads so I do not delete this one with that issue. Here is a link to similar instructions that the GF CS sent me… https://support.glowforge.com/hc/en-us/articles/360034142513-Cleaning-Your-Air-Assist-Fan
It’s definitely your exhaust run – your GF should always run under negative pressure, pulling air into the body, never the opposite. The fan and or ducting has enough debris/residue built up to block the airflow. Cleaning the exhaust fan and ductwork should get you back to where you were. Also, make sure nothing is blocking the inlets on the bottom of the GF, right side, near the front (think under the button).
Good luck!

