Memory matching game

My 3 year old daughter lost most of the pieces to a cardboard memory game she had. She still tries to play with it, searching for the 1 or 2 matches that remain. Decided this would be a quick and easy project for the glowforge. Design is available on my website as always. The design has a few differences from the pictures as described on the website and below.

The pictures only show half the set. I decided to go ahead and take pictures while the second set was cutting. The cut time for the file was 2 hours 25 minutes. Since I had to cut it twice it took a total of about 5 hours.

Art work came from the artist Nuno Lezon on the noun project. Link provided on my site. Sorry for not linking here. I’m being lazy and I got a noun project pro account, which is a great deal if you use the website a lot and removes obligation to attribute for lazy folks like me.

The squares are 90mm squares with 10mm rounded corners. The rubber band cutouts are 9mmx3mm. The artwork is sized to a 60mm height. Cards are placed adjacent to each other with overlapping edges that have been deduplicated for the laser. Note: this does result in some burn marks on the sides of the pieces where some additional soot is deposited around the curved corners. This is visible in the stack picture. It doesn’t bother me as I’ve never found sideburns that distasteful. cymbal crash

After taking the pictures and playing with the cards a bit, I decided on some design changes to improve the usage of it. I made 2 changes not pictured, but included in the design files. In the pictures rubber band cutouts are removed from the sides. I added cutouts to the top and bottom as well so that you no longer have to orient the pieces when stacking them during clean up time. Also, the corners on the cutouts were a bit sharp. I rounded the exposed corners to a 1.5mm radius. Please note: due to the material cost of this project and its purpose, I didn’t feel it worth the cost to cut another duplicate copy with the changes made. That said, the file I’m providing has never actually been completely tested. I’d be very grateful if you would post your results here if you choose to make a set for yourself and let me know if there are any issues. I also just want to see what different designs people make :slight_smile:

This design works best on medium plywood so the card stack isn’t too tall once assembled. At $32 material cost and 5 hours of laser time, its not a very cost effective product. But its a really nice set filled with whatever art work you want. At 3 years old, I went with some simple animals because my daughter loves animals. But I’m planning on making several different sets, especially as she continues her learning career. Some ideas I had for more difficult matching:

  • Alphabet set with half letters and half objects which start with that letter. E.g. (S matches with Snake)
  • Number set with numeric digits being matched to representations of those numbers. Different representations of the numbers could be used: Dots like on dominos, polygons with different number of sides, simple set of objects to count such as 3 apples - which could also be combined with the alphabet set to require matching 3 cards (The letter, object and number)
  • Pictures of family members who live far away and who she hasn’t seen in over a year because of COVID.

The download includes both the set pictured and a template for adding your own art with 60mm guide squares. The idea is that if you don’t want to mess around in inkscape, upload the template file to the glowforge UI, set the green lines to ignore and then just use them to aid you in placing and sizing designs. Should be a decent work flow for premium users who have lots of art work in the UI they can add.

34 Likes

One of the first things I made was a memory game for my grandkids. It’s so nice to be able to make whatever we can dream up! I like the cut outs, great idea.

For those of us with Premium, the Noun Project images are included, meaning we can access them from within the GFUI.
:slight_smile:

6 Likes

Good to know! I was wondering about this, but couldn’t easily find the specific icons I used in the GF UI. I still like supporting the noun project with their subscription.

And this is a bit of an aside, but I’ve been a little disappointed with premium. I went to create a very simple design for something that I thought “I don’t even need to open inkscape since I have premium, I can just use the glowforge”. That’s the point right? Well I couldn’t even draw a rectangle in the premium UI. Only a square. Sigh. Sorry, complete tangent. I just haven’t been getting much use out of my premium subscription because its way easier to do stuff elsewhere and its a little disappointing.

You can draw a rectangle. You drop the shape in the UI, and then you open the Rulers box at the bottom. Make sure the little “link” icon is unselected, so that length and width can then be changed separately. Enter your values for each and voila!

3 Likes

Ah, I must’ve missed the link icon. Also I couldn’t figure out a way to just type the size? Am I supposed to try and hit 7.875" on the ruler or is there something else I’m being dumb about?

EDIT: nvm! I’m being dumb. You meant the Ruler icon, not the rulers themselves! I had completely missed this button thinking that it just toggled the rulers on and off :smiley:

Thanks for the tips. Maybe it’ll be more useful for me now.

5 Likes

Oh that’s lovely!
I wonder how much time would be saved if you did the designs with an out of focus score instead of an engrave. Probably quite a bit!

3 Likes

Those are great! I especially love the indentation for the rubber bands…what a good idea! And I think your ideas for more advanced sets are excellent…

1 Like

Oh, that’s an interesting idea. I wonder if Inkscape has a functionality to convert the filled object into a path with a large thickness. That would definitely be worth the trouble if you were planning on making multiple sets! I was just thinking how this would be a hard product for people to make and sell because of the laser time. But with a little bit of design time you could totally cut production time way down! The cut time on the file is only like 4 or 5 minutes. I wonder how you could achieve effects like the point of the Rhino’s horn or the Eagle’s beak.

Wouldn’t it be cool if you could encode the focus height via grayscale or something!

It wouldn’t be done in your design program - you’d do standard skinny lines there - but when you enter the design into the GFUI you’d go into the manual settings and after copying over the PG settings for speed/power you’d adjust the height by 1/2". Let me see if I can find examples:

If you’re a video person:

or if you’re more into text:
image

Do a search on “defocused score” for more examples

6 Likes

I understand what you mean when you say defocus the laser. But my point is that in order to do a score operation in the glowforge UI, you must have a path with a stroke to score. Currently the object has no stroke and only has a fill. so at the very least it would need to be given a stroke in the design file. But if you just give it a stroke, then you end up with an outline of the design, not a single path going where you would want the laser to draw lines. For example, here’s the tiger with no fill and only stroke:

I wouldn’t want the laser to go over the outline, I want it to go through the middle of the object.

Without changing the design, the laser will follow red, and I would want it to do purple.

Ah - I understand. Can you do a centerline trace off something that’s already a vector? If not, saving it as a raster and then doing a centerline trace may be the way to go…or 3rd option, do a defocused score of both the inside and the outside ending with a really thick line.

Oh, and what I was saying about the Eagle beak is that if you set up the laser to run a single line like that, then it’ll be hard to get a hard point when lines converge at interesting angles.

In anycase, I really like your thinking and maybe I’ll spend a Saturday trying to trace things some day or something. :slight_smile:

Ooh - it looks like as a default it isn’t 2 lines, it’s 4 (in Inkscape click View > Display Mode > Outline to see what is being sent to the laser) That will definitely require some breaking up (Ungroup then Stroke to Path > Break Apart) and then delete the duplicates

image

and yes, likely no sharp points…

1 Like

Weird mine only shows 1 line in outline mode. Oh the oddities when dealing with other people’s files when they weren’t necessarily thinking of laser cutting at design time :smiley:.

In any case, I think one could make it work with some time investment. Perhaps you could set up any sharp points as small engrave areas. Thanks again for calling out the technique. I’ll keep it in mind in the future.

1 Like

I really like your choice of Nuno Lezon’s illustrators. They’re really cute.

1 Like

LOTS…
You probably cannot take that image and just score it because it would try to do an outline (minus fill) type action. While this double score may work for you, I saw problems with that approach.

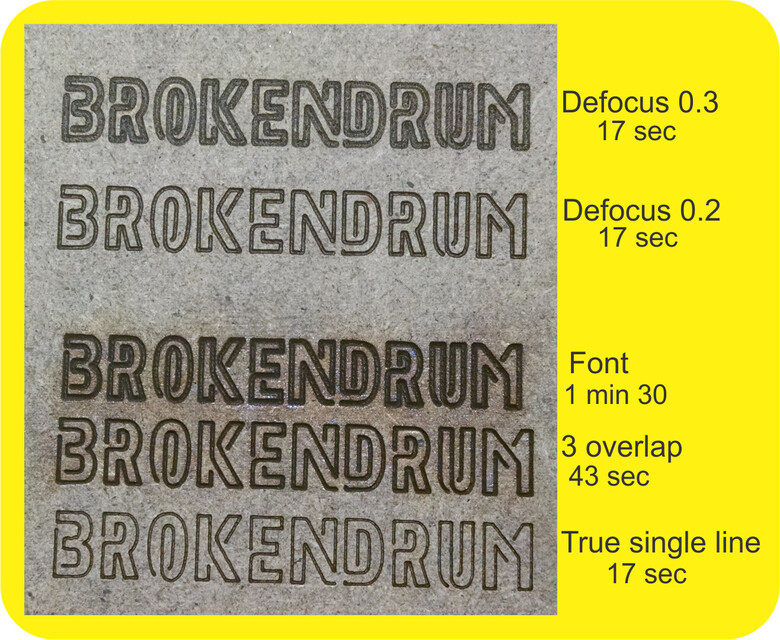
I ran into this when I made a True Single Line font out of the Neoneon font. Just telling it to score did not do what I wanted.
It required I redo the entire font as a true single line.
Then the fun started. I did font engrave, then did scoring tests using TrueSingleLine with slight placement shifts to overlap the single line for thickness (time was multiples of a single pass), then did some defocus scoring (board was 0.12).
I would say it slam ducks if you are just looking at time to laser.
Here is the testing I did (all TrueSingleLine scores except for the Neoneon font). Added plus is no engrave char/smoke except around the engraved font.

10 Likes