I use craft acrylic paint to pre paint most of my stuff before I etch it
7 Likes
Thats opposite of what he’s trying to do…
2 Likes
As @smcgathyfay suggested, acrylic should work well. If you are using prefinished material, like proofgrade plywood, be sure to sand off the finish and then prep the wood with gesso. Otherwise the paint will not apply evenly and will easily peel. (Recent experience here :), though mine was post-cutting. )
1 Like
I think the brayer could be a great solution but if you are thinking about trying it, you might want to cut some guide rails from the same material and put them alongside your piece as support for your roller (assuming your brayer is larger than the surface you’re painting).
I’ve been doing a lot of printing plate experiments the past few days and am finding that without guide rails, unless the engrave is super deep the engraved surface is so uneven that I always hit some part of it with my brayer. Not exactly what you’re dealing with, I know, but it’s still something to keep in mind if you go this route.
2 Likes
I have to wonder if the pigments in some colors of acrylic paint might have bad things like chlorine in them.
edit: check out all the chemicals in Liquitex acrylic paint http://www.liquitex.com/softbodycolorchart/
Example: Cerulean Blue
Complex Silicate of Sodium and Aluminum with Sulfur (PB 29),
Chlorinated Copper Phthalocyanine (PG 7),
Titanium Dioxide (PW 6),
Copper Phthalocyanine (PB 15:3)
1 Like
That’s easy to fix. When you are done painting just do a Object->Transform->Invert. ![]()
6 Likes
I did some using spray paint from the big box DIY store. Still alive and the glowforge seems no worse for wear.
If you are particularly worried about vaporizing paint, you could score the masking of the part you want to paint, peel it off, paint and then place back into the glowforge to engrave. This would require a design of fairly low complexity, a jig and the cut part probably couldn’t be circular.
1 Like
I am not sure but there would be many chloride and especiallly sulfates in any mineral colors. I am only knowing glass chemistry but the rules are very similar and the percentage of chemical is very low some as high as 5% to cobalt blue that is as small as 1 part to 50,000 so even a color with suffer or chloride is not likely to have much of it, not nearly as much as say pvc.
You could just use Azo-colors but those are likely to fade and mineral color will usually no.
1 Like
Thanks guys! I ended up finding a stiff/dense small roller brush that did the trick. Not perfectly and took longer than I had hoped but but not too bad!
11 Likes
That may be true for glass, but for acrylic paint, it appears that it is somewhere in the range of 1/3 to 1/2 pigment (comparing volume of ground dry pigment to liquid acrylic binder volume).
I’m concerned seeing pigments with names like Chlorinated Copper Phthalocyanine (PG 7) in Liquitex paints, which is one of the most common brands.
All of these Liquitex colors have this pigment in them:
660 Bright Aqua Green,
570 Brilliant Blue,
470 Cerulean Blue Hue,
224 Hooker’s Green Hue Permanent,
770 Light Blue Permanent,
275 Manganese Blue Hue,
561 Turquoise Deep,
740 Vivid Lime Green.
In addition, 239 Iridescent Rich Silver has something called Bismuth Oxychloride (PW 14).
1 Like
I would run the famous flame test on the pigment as it is often ground ceramic (or mineral) that is the pigment and not the pure chemical. Cutting Lapiz stone does give off a slight sulfur smell, but it is primarily marble (limestone). Historically it was the mineral that was used, and that was problematic just in the grinding, much less cutting, ( mercury vapors would be bad all around for example) but I don’t think you would find those minerals used today.
Though on edit if the mineral is organic it would be the chemical as it would not survive the heating required for ceramic, and that may make for ceramic color something to look for
3 Likes
Thats why I suggested craft paint. Non toxic kind
2 Likes
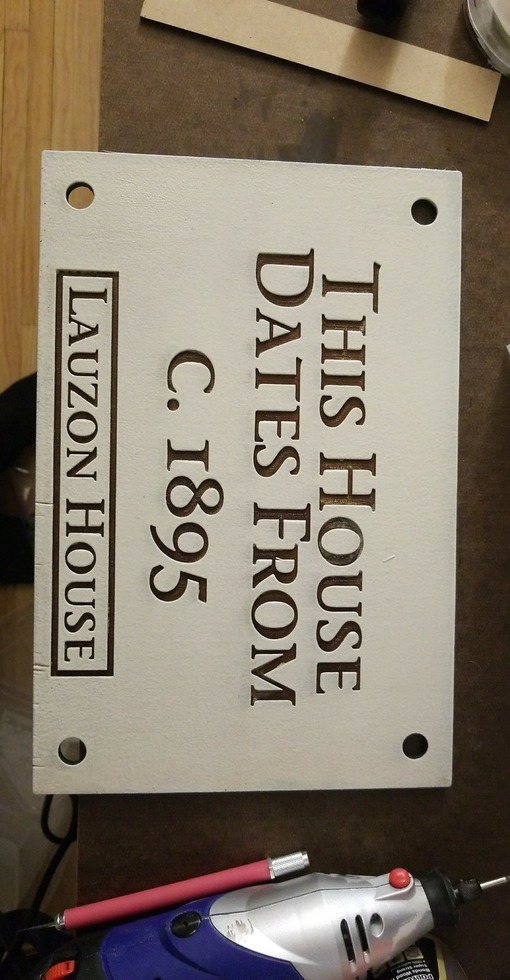
If you want black on white I’ve used the whiteboard from Home Depot. You wouldn’t have to do any painting unless you wanted the letters darker or a different color.
11 Likes
Great idea! Do you cover the board with masking tape or anything before etching?
(By the way, I use that same Home Depot whiteboard to cover my workbench. When it gets too beat up, just pull it up and put down a new sheet.)
The picture above wasn’t masked. The smoke just wipes off the surface.
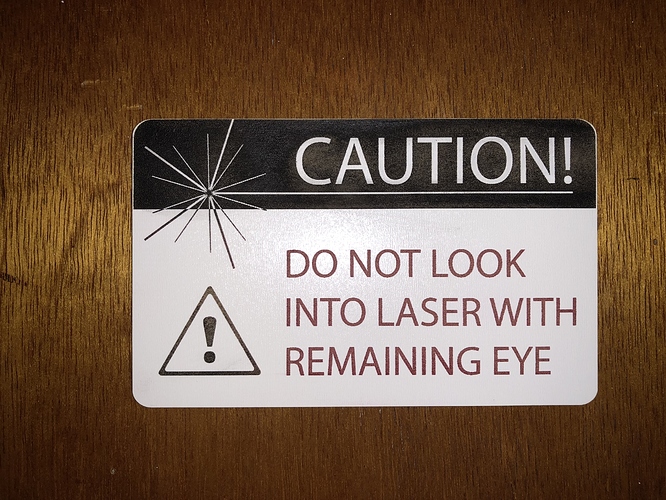
I did a second sign and masked it. I had an easier time with the acrylic paint. I was able to do a yellow triangle with a black exclamation point. Something I was having difficulty with on the unmasked one.
was the proofgrade material?
what settings did you use?
I’ve been trying to engraved a piece of painted plywood but either the power is too low and its not a clean engrave or it leaves orange burn marks on the paint.
It is whiteboard from Home Depot. I most likely used the proofgrade setting for medium draftboard. The white layer cleans up nicely but you can mask it too.
For wood you are going to get uneven results due to the grain. It will also leave smoke stains. You can clean up some of the smoke with rubbing alcohol. The alcohol doesn’t cause the wood grain to swell up like water does.
You can also use masking to protect from the smoke but then you have to remove the masking if you have a complicated design. I’ve used blue painters tape but vinyl transfer tape works better. Make sure it is paper tape and not actual vinyl.
1 Like
I did something similar and used tape just like this. But mine caught fire. Has that ever happened to you ?
Note so far. I don’t mask often but this tape is good. The only material that seems to always be on the edge of igniting is corrugated cardboard.
Did it sustain a flame or just dance above the laser point?