Planning shop location for the Glowforge

Hey! That boy needs fixin!

3 Likes

Seems fixed (repaired) to me. Removing parts is breaking, not fixing :stuck_out_tongue_winking_eye:

2 Likes

Just got my harbor freight catalog and saw a coupon for this work table for $89

1 Like

Might not be a good choice if you’re getting the pro version and want to feed material through it.

I just happened to glance at it yesterday in the store. The top part is bolted on and has a little florescent lamp. Just don’t add that section when putting it together. Its just a little over 23 inches wide so the lid might not swing open properly with the top section installed, pro or not.

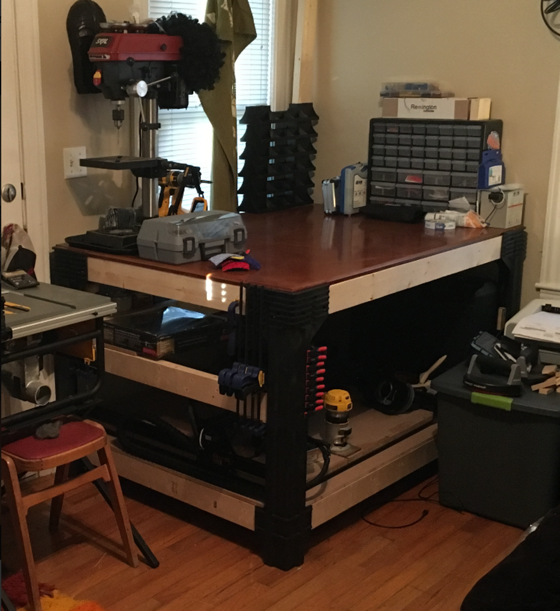
So I was considering one of these, and they are always on sale around that price, but when you get to see them in person they are really flimsy. the metal is really thin and the drawers dont feel like they could hold more than a few thumbtacks. I ended up going with a home made bench instead and couldnt be happier. It ended up costing a less too. I was also able to customize it to my liking. Ive posted it elsewhere on the forums. lemme see if i can find the post…

Decided to build the same bench this morning for something else. Mine looks exactly the same except I didn’t use the pretty kit, premium 2x4s, shellac, routed edges, add the shelving, and it’s a different size. But other than that it looks EXACTLY the same. Or maybe not.

1 Like

I only mentioned because I saw it today. I already have my table ready. I got a 60 inch base cabinet on sale and added a laminated counter top. Just need to find a home for the stuff that is currently on it.

I was thinking of going this route, but I wanted the table to only be about 24" high so the height of GF plus filter would be where I wanted it, but as far as I know those legs only come in one length. Anybody know differently?

Well its definitely taller than 2’! haha. However, it is designed to have 3 shelves, and the second shelf would sit at about 22.5" above the floor. So technically you could cut the top back a few feet to have the middle shelf exposed, still allowing you to have a high level workspace, and access to your glowforge.

Even further still you could cut your top level and hinge it to allow for half or 1/3 of it to be lifted up to allow access to what is below it.

Im not sure if you can see in my photo the x-carve on the bottom level of my workbench, but this was actually one of the main reasons for me using this layout. I now have a psuedo “case” for my x-carve and I have left the top of the whole workbench loose, so I can flip it up should I need more access to the x-carve should I need it.

2 Likes

I forgot to mention that it also comes with the necessary pieces to build shelves in any manner youd like. This picture will give you an idea of the second level height, as well as how you could potentially use the shelving supports to potentially make space for the glowforge.

2 Likes

Hmmmmm, some good ideas there. You’ve given me something to think about, thanks!

Harbor Freight has “hardwood” workbenches that might be a good candidate:

They come up for sale periodically if you are price sensitive. A friend has a couple and thinks that they are pretty decent for the money and they look a lot sturdier than those flimsy metal benches. Grizzly also sells butcher block table tops and workbench supports.

If put together well, they are rock-solid (I have one for my Ultimaker 2). Unfortunately, they are only 20.125" deep, whilst the GF is 20.75". Overhang is not an option, IMHO. Your mileage may vary…

The “feet” of the case (tub) appear to be recessed at least an inch from the corners. As long as they are supported, a slight overhang will be OK.

Is it prudent to park the GF right up to a window as @chris illustrated in his original drawing?

  1. I’ve read some postings that described how the GF’s vision system was disrupted by direct sunlight getting into the cutting chamber - dunno to what extent that is/was a problem.

  2. The GF could experience some pretty significant thermal and humidity swings right next to a window.

  3. Some (many?) plastics will experience accelerated aging from direct exposure to UV. Keeping the window closed will dramatically reduce the shorter UV wavelengths, but a significant amount of UVA could still get through.

Good point - I’d forgotten how shallow they are. It would be easy enough to attach a larger piece of flat stock to the HF bench though that idea doesn’t seem too attractive to me for some reason.

You can always run a vent hose the distance to the expulsion point, whether that be a window, or a vent hole cut in the wall, etc. Im considering encasing mine in the same type of double vented area I have my x-carve in.

So I’m planning to position my GF as @takitus describes: off to one side from a window - the same window that I was planning to vent the GF outside. Alas, using a window to vent the GF also obviates one of the key functions of a window to freshen the room air - at least while the GF is running.

Has anybody investigated installing a wall vent (away from the windows of course!) in a residential house? Easy/hard? Are there kits for this?

Standard dryer vent kit should work fine. That’s what I am going to do through my basement block wall. Done it through wood and block walls before. Pretty easy. (Use the metal vent kits for durability)

1 Like