Show and Tell

Stolen from a song.

5 Likes

Back in the '60’s mine had swede patches. Got a little funky after you washed them, but broke in soon enough. :rolling_eyes:

4 Likes

I heard it in my head when I read it :slight_smile:

4 Likes

Wow!! This looks spectacular!

3 Likes

Thank you! My best little piece of architecture :grin:

2 Likes

I know no one on this forum lacks creativity. But when I read about a new (to me) technique or technology, I immediately “wonder if…”

Engraving photographs on various materials ranks number 1 on the Glowforge priority list for me. While patiently awaiting delivery I read about using fusible decals with glass jewelry. Will it work with my antique laser printer? Will there be enough detail to scale up to a reasonable print size? Since I use repurposed glass, how will window glass fuse with the decal?

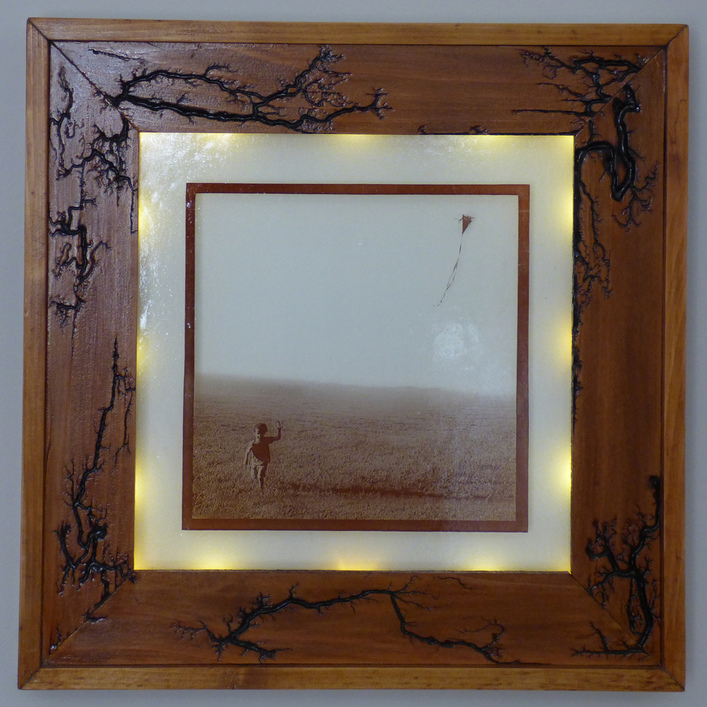
The photo is not mine. A niece posted it on Facebook, so the starting quality was not great (only 273 KB). I manipulated the photo, simplifying the background and sky. Then I printed the image on magic fusion decal paper using my 15-year old HP Laserjet 1012, applied it to a piece of recycled window glass (11 x 11 inches) like any decal (after soaking in water), and fire it to 1300 degrees, leaving only the iron oxide (hence the sepia coloring) bonded to the glass.

The decal material actually fused to the float glass as advertised. :slight_smile:

The glass picks up texture from the firing and to me has the look of antique glass. I love edge lighting, but it doesnt enhance a fused decal. So I installed a string of battery operated LEDs (fairy lights) behind the glass around the inside perimeter. There is about 1/2 inch between the glass and the mat board.

Baring a production miracle, I have more time to experiment. I wonder if I can fuse layers to create a 3D effect. I wonder if…

41 Likes

Interesting… searching :relaxed:[quote=“daskeland, post:1599, topic:1731”]
1300 degrees
[/quote]

Fahrenheit, right?

1 Like

Love that! I’ve got some of that decal paper somewhere around here and never bothered to try it out. Lovely effect though…I might need to see if I can find it. :two_hearts:

4 Likes

I’ve never heard of this material, but looking at what you have done with it on a first try, I’m sure it would be possible… ‘3D’ effect is a bit vague, but i immediately thought of putting the kite on a separate layer that slowly slides back and forth… and that thought, coupled with the antique look of the photo made me think of this still-photo animation:

13 Likes

there’s a local museum / shop here that features local clay and glass artists. one of them does these really interesting montages of glass; he creates several scenes and then fuses them together into a single block. it’s a really cool effect; i wouldn’t quite call his 3d, but there is a cool depth effect.

4 Likes

New Hampshire Craftworks Fusible Decals (Amazon)

Yes, 1300 degrees F.

6 Likes

I decided to get myself a little harbor-freight sandblasting cabinet.

It took me a little time to get it put together properly, fix the stuff harbor freight did wrong, caulk it up, let it dry, repaint to cover the caulking, and allow to dry again (it’s been damp round here). Then I wrapped it in leftover automotive vinyl, partly to help seal it up even more, but mainly because I had this section of leftover automotive vinyl that was never gonna go anywhere but the trash.

The first glass I tried to blast was a learning experience. I went way too deep. The second one I did came out much better, but I was still having a few issues with overpowering the resist in areas.

Next I tried dialing down the power. Worked out all right.

I’m gonna need to make a light box to shoot these things, they get reflections from every direction. I tried to make that work to my advantage as I attempted doing a friend’s logos, but I was getting sleepy; it was a long day.


He was stoked on it, and some of his clients and fans have already been asking if they can buy them. So that is promising.

I’m still waiting on some actual sandblast resist to be delivered, so far I have just been using paint mask and sign-vinyl. The paint mask works ok for the glass where you don’t hit it with the blast media for very long at all. Address plaques are the only thing I had ever made sandblast-resists for in the past, so I tried making a board from some scrap white-pine offcuts, glued it up, and laid a paint mask stencil. White pine is not the correct material at all for a sandblasted sign, but for a practice exercise I figured it wouldn’t hurt to be able to totally ruin it and not feel bad. Had overspray on it already, so I figured I would go with a ‘weathered’ look.

I was able to get some depth before the resist was destroyed. The 70-grit black aluminum oxide blast media discolored my unsealed pine pretty badly, almost like black paint pigment (hmmm) so I washed the front with water and gojo, and it warped like I should have expected. Then I washed the back, let it dry overnight, and came back to find it pretty darned flat. So I painted in the letters, and cut an ‘oval’ with the jigsaw (poorly, geez, make a jig already) and hung it. 1st try out of the way.

Second try with wood I laid a double layer of the paint mask stencil on a solid piece of pine, and that worked a little better… but really I should be using cedar with sandblast-resist. Cleaned it, painted the whole thing black, and then came back with some silver.


Cool, now I have a little matched set to send to my buddy.

Then, after all that, I went online and looked up how to sandblast for the first time.:upside_down:

57 Likes

That is First Tier!!

4 Likes

Oh, I am so envious. I have always wanted to try glass carving with a sandblaster. Your debut pieces are just marvelous!

4 Likes

A light box won’t make it any easier, you’ll just have a reflection of the light box itself (ie: more diffused reflections) in the glass.

Try a polarizer lens filter.

8 Likes

Very nice! How long did it take to weed each of those glasses before you blasted them?

1 Like

I wasn’t timing myself, but maybe 1-2 minutes each for the Tamalpais Productions and Essential Extracts. About 5 seconds for the EA and 10-15 seconds for my little dude.
Because of how degraded the masks have been, I think it takes longer to remove after blasting than to weed in the first place.
Clean vectors make a world of difference.

3 Likes

What, and use my real camera?!
No, you are quite right. Although with a box of sorts as well I can control what is being reflected to a certain point.
Funny, now that you mention it, the last time I went to a 3D movie I kept the glasses and broke the lenses out to have a pair of filters for my phone.
I wonder what I did with them?

8 Likes

I have seen some incredible work done with different aggregate sized blast media, enables shading.
Not like it’s that easy to replace the sand and graduate, just sayin’.
70 Grit looks as rough as I would envision. Nice addition to the arsenal!

Absolute cleaning is a welcome ability. You will find it very useful. Careful with thin metal, you can distort it easily.

4 Likes

Tempered glass is another thing. You don’t cut tempered glass, good chance it will explode. Most of the strength of tempered glass is the surface tension. You can blast both sides of tempered glass and crumble it in your hands.

3 Likes