Yes looking up Apollonian gasket there is one bilaterally symmetrical that is a series of Cleopatra necklaces
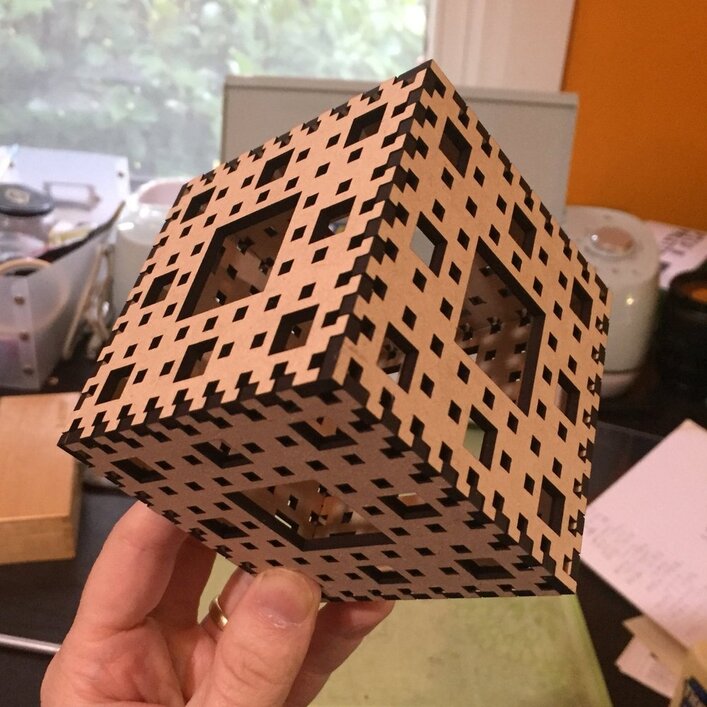
Extrapolated from yesterday’s work to a 3-iteration version of the Menger pseudo-sponge. Nice thing about fractals, they tend to scale well by nature; I could just recycle the edge design across a larger area without needing to make any other modifications to the design. I could easily scale this up to a 4-iteration version while I’m at it, and may do so after looking into ordering up some more material.
Didn’t do the kerfing adjustment for this one because I’d settled in my mind to just use a bit of glue anyway. Did switch from the hardwood maple I’d been using so far to medium draftboard because at this size I’m eating through significant amounts of material. Am pleased that the two behave pretty similarly in practice; the maple has a more ooh-la-la finish to it but the rough flatness of the draftboard is perfectly fine here.
I’m inclined to experiment with painting the finished product, one way or another, and likewise to consider some soft of glaze/sealing coat.
14 Likes
Ha! I knew this post was yours, Josh, just from the title
1 Like
I feel like we all when to high school together or something. I also have magnets and do fractals. I want to try turning a modified Hilbert curve into a living hinge.
3 Likes
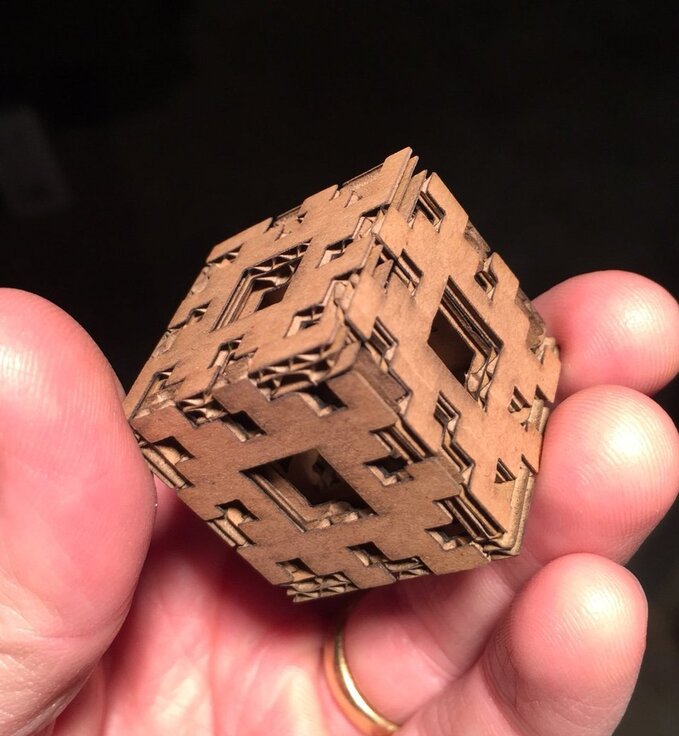
Same 2-iteration design as an excuse to work on materials. Wanted to see how cardboard would work, if I could get a workable test cut without starting a fire, so I took it real easy stepping up the power and slowing down the cut.
Eventually I settled on 250 speed, 50 power, with 2 passes. I’m not sure I couldn’t/shouldn’t just up the power but this felt like a more conservative way to go and I didn’t really want it to flame up if I could help it. The cut this way is nice and clean, and for approximately 1/8" corrugated cardboard the facsimile to actual wood or draftboard is definitely good enough for testing out a basic shape/interaction idea.
Smells like someone set some cardboard on fire, though. All those corrugated channels do a great job of holding onto particulate, I suppose.
14 Likes
More materials experiments this morning: 1/2" plywood, and leaves.
Plywood was a failure, at least so far. It’s some okay quality commercial ply (scrap from what I built my venting solution window replacement out), but I couldn’t find settings that satisfactorily cut through it all the way without charring it to hell and back in the process. Full power, min speed, 3 passes is what it took to get solidly through the other side, and it’s too sooty and flamey by half while leaving a very poor edge.
Was hoping I’d be able to use it for some relatively chunky 3D constructions, but so much for that for now. Will try some thinner, better material next time.
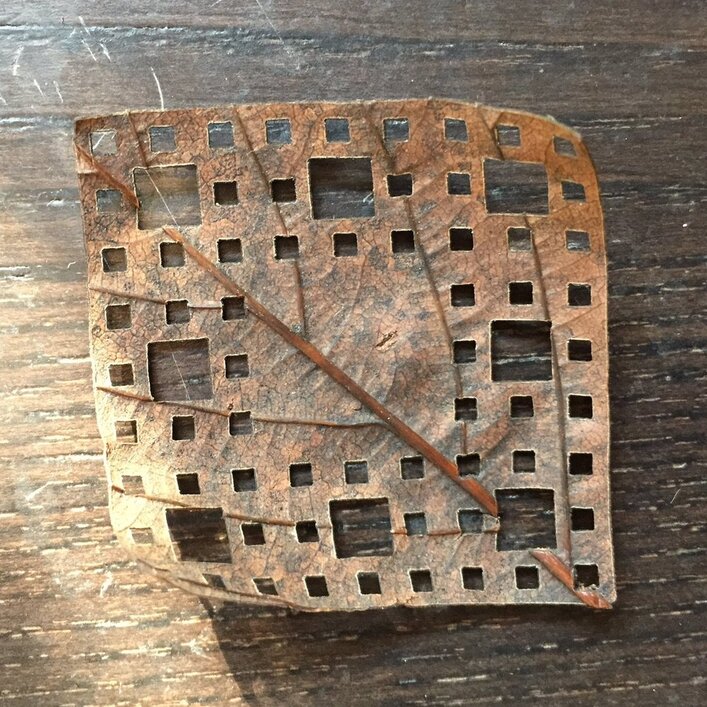
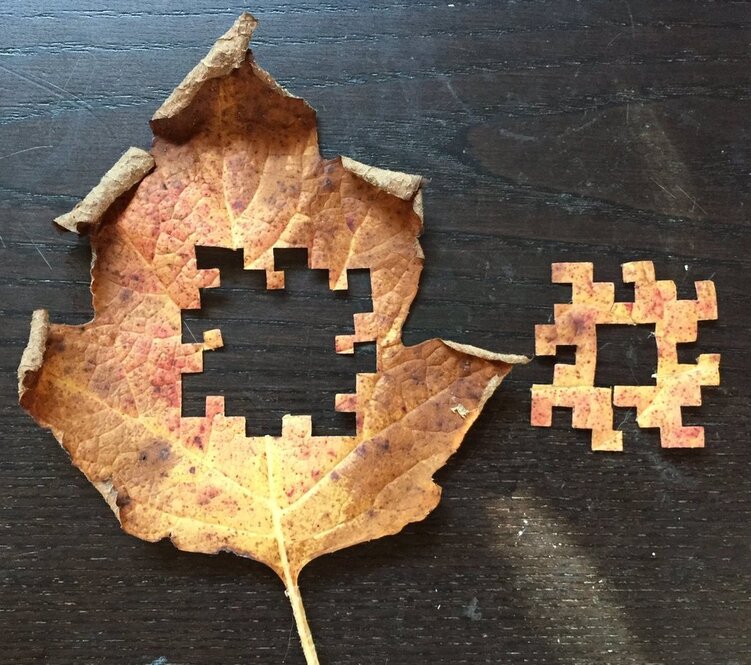
The leaf cutting went much better and produced some nice initial results. Did this with fallen, varyingly-dessicated leaves; in all cases from moist to pretty crisp it took a lot more power to cut than thin paper.
I ended up running full speed, 40-45 power to get a pretty solid cut through the leaf body, and for all that needed to do some hand finishing with an xacto knife to sever the thicker veins and stem. Higher power might help skip that part, though the stem holding put, at least, isn’t the worst outcome since it means the internal bit doesn’t fly away from the leaf in the venting slipstream after the cut is finished.
This is a closeup shot of a Sierpinski riff; measures about 1.5" on a side.
16 Likes
I’m moving this thread to #beyond-the-manual since there’s lots of great settings info!
Thanks for posting all of this.
1 Like
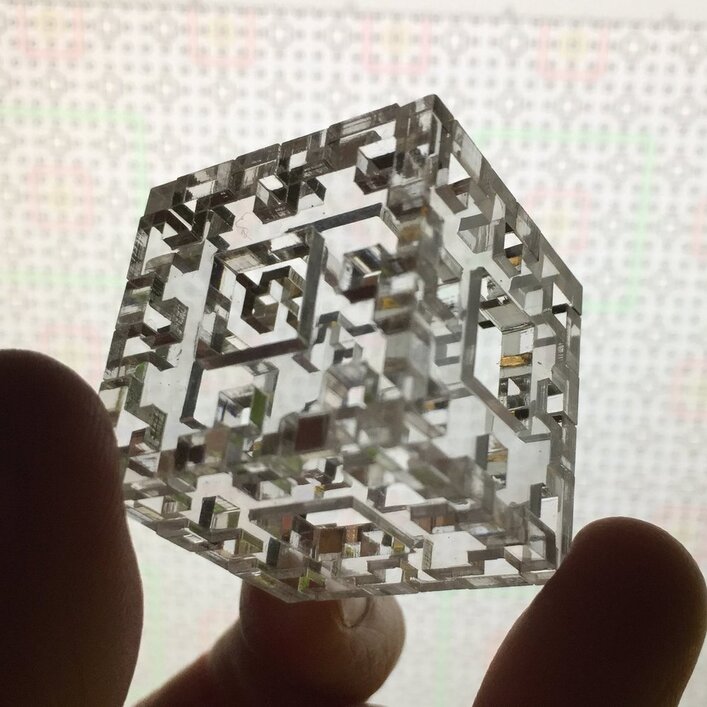
Quickie first trial with acrylic tonight. Was worried about the odor but it wasn’t too bad (though I didn’t do a ton of cutting so that still needs stress-testing at some point). I like how clean the end result is, and for the kind of 3D construction stuff I’m interested in the refractive properties of the end-on intersections are really pretty great.
16 Likes
Beautiful! (And looks quite complex in clear acrylic.) 
Oooooo, I think I like the acrylic best of all!
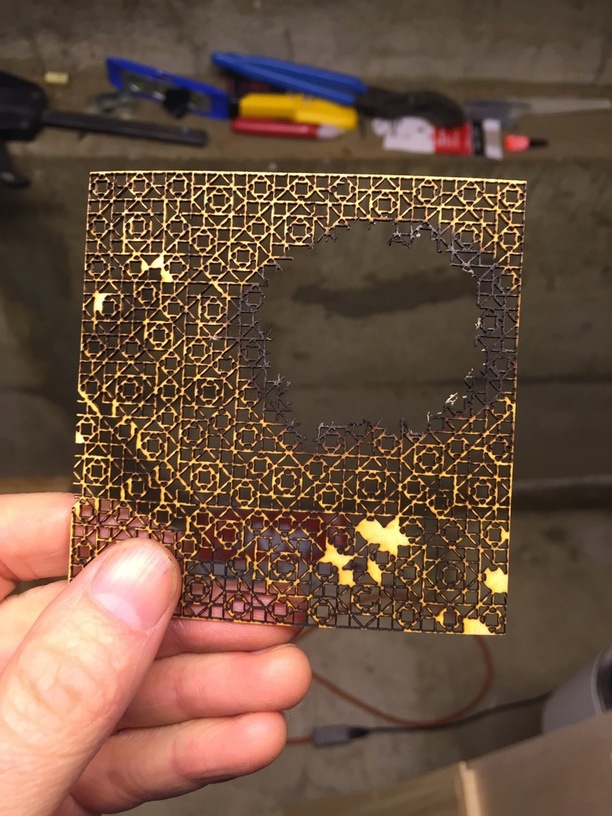
Got ambitious and got myself in trouble.
I decided to cut a 5-iteration Sierpinski carpet which is right about when stuff gets pretty irresponsible in terms of .svg complexity. Mostly because there’s 4,096 of the wee-est kind of square, I figure.
Cutting the whole design out of draftboard is an 87 minute job, but based on forum reading I was nervous about something going wrong part way through, so I broke the job up into components – cutting the small dots I broke down into three passes, for the top, middle, and bottom thirds respectively. Then a fourth pass to cut out the various larger squares, just a few minutes of work.
Everything went great for the first three passes, and I ended up with a nice array of tiny square holes. But during the third pass the app tab on my browser froze up for about fifteen seconds for who knows what reason. Cut completed fine, but afterward the app was saying “no artwork” and not responding in obvious ways to input. Not highlighting selections, etc.
Eventually I just set up the final set of cuts anyway, crossed my fingers, and let it run, because I know the error margins for manually fudging design alignment against the camera image are hopelessly larger than the error margin for this design. And I had had to originally move it a bit from where the design fell by default. So, now, either it’d still be lined up or it wouldn’t be.
Turns out it wasn’t. Not off by a ton, just a millimeter or two off on one axis, but that was enough to bork the whole thing.
Lesson learned, the hard way: get the design placement correct in the original .svg so that when in doubt I can just reload the damned thing and be sure. I sort of knew better from reading, but I hadn’t actually been burnt by it yet so I didn’t follow through.
Resulting almost-right piece still looks cool from a distance, but I’ll need to try again to get an actually correct cut. The alignment failure also ruined all the subsidiary lower-iteration carpets cut out of the holes (why waste that material when I can get some extra bits for free with a little extra cutting?), so it was a double-waste in that sense.

13 Likes
Holy cow! I hope you’re saving all the bits so you can make some kind of cool resin project out of them.
1 Like
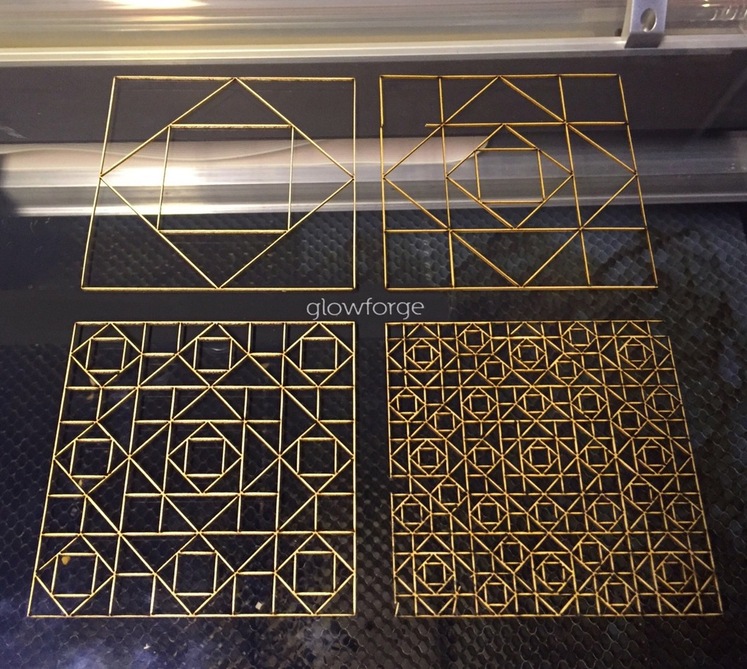
A bit of beyond-the-manual goofery here: decided to try a delicate lattice cut prototype using some 1/32" basswood sold at the nearby craft store. Went pretty okay other than the part where I caught one layer on fire:
6 Likes
The other layers came through okay though; none of them were flirting with quite so close grouping of cuts so they never managed to spark up.
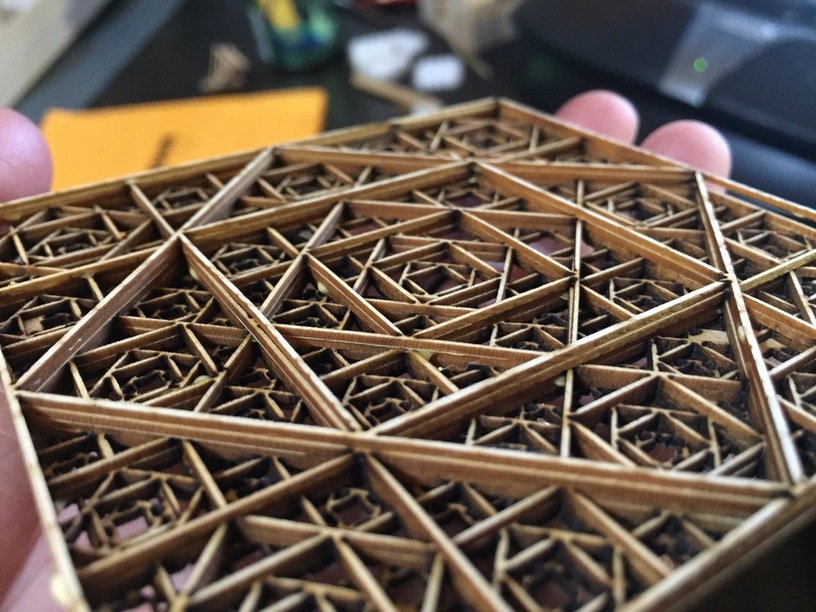
All in all it’s five iteration levels of a nested-squares fractal I ginned up this morning (though someone else probably ginned it up decades or centuries ago, I just don’t know this specific one offhand).
8 Likes
Assembled with some light wood glue application and cautious flat pressure, the whole thing comes together into a very delicate, slightly sloppy, slightly lost-to-fire prototype for a layered wood piece, along the lines of some stuff I’ve seen both here and from a couple of (insane, to my mind) hand-cutting wood artists I follow on the internet. The possibilities are definitely exciting, though I need to scale up a bit if I want the things to stand up to a stiff breeze.
22 Likes
Amazing discussion, now I’m out of likes 
1 Like