Wood Block Printing

My first attempts at wood block printing with the Glowforge.


Rather than make an engraving, I cut out the raised portions of the block and then glued them to a second block.

I’m pretty please with the results, but I have a lot to learn printing technique-wise.

75 Likes

Great idea! Gives much sharper results that way! :grinning:

4 Likes

As @Jules said, these can out really really sharp, good job!

1 Like

Nicely done!

1 Like

nice one!

1 Like

Gorgeous!

1 Like

Love it. Been thinking about doing some various notecards this way.

Mind describing what else went into this? Like did you use a press? What kind of ink/paint? What kinds of materials? Any warping from the paint?

Whoa, gorgeous!
Did you use medium Draftboard?
What ink/paint?
Roll it on with a brayer?

This looks wonderful. Looks like you have the process down - please share if you evolve it!

The wood block is made out of 5mm underlayment plywood purchased from Home Depot. The separate pieces were glued together with Elmer’s WoodGlue Max, clamped and allowed to dry for 24 hours.

The ink is Speeball water soluble block printing ink. The ink was spread on a tempered glass plate and applied using a soft rubber brayer (40 durometer according to Speedball’s website).

I used a 2.5 ton arbor press. This is total over kill, but I have one so why not : )
Pressing order from bottom to top:
2 x 4 for strength
Pressed Fiber Board (similar to proof grade draft board) for smooth surface
Thin felted fabric for limited compliance
Paper (Strathmore Mixed Media 90 lb)
Inked Block
2 x 4 for even load distribution

The thin felted fabric for limited compliance is critical.
6 mm EVA foam is too compliant
2mm EVA foam is too compliant
Bare pressed fiber board is not compliant enough
3/8" Rubber (possibly Speedball Speedy-Cut block) has good compliance but is awkward to use
Shamwow from local surplus store has good compliance. It is also cheap and easy to store.

My current process lacks any sort of consistent registration, so I’m limited to one color.

I have experimented with traditional Japanese block printing techniques picked up from watch David Bull’s excellent youtube channel. Printing on wetted paper requires less pressure and produces greater embossing depth, but requires greater care to make sure you don’t damage the paper and can resulted in warped paper following drying.

My guess is the process I’ll eventually settle on will be a hybrid between Japanese and European block printing.

Regarding block warping: I’ve had no problems with my plywood block warping. It is very stable. I’ve begun experimenting with solid poplar and laser engraving. A clear 48" x 5.5" x .25" board cost less than $5 from Menards. The resulting test prints are looking really good, but the blocks start to bow as soon as they come out of the Glowforge. I’ve tried steaming one and clamping it to a plate of cast, jig-grade aluminum to see if I can get it to flatten out. It’s been clamped since Saturday. I’m going to give it several more days before releasing it and seeing what happens. I may end up having to laminate it on to a piece of 3/4" or 1" plywood to stabilize it.

Hope this answers everyone’s questions. Thanks for all the support!

12 Likes

Wow, excellent writeup! Thanks :slight_smile:

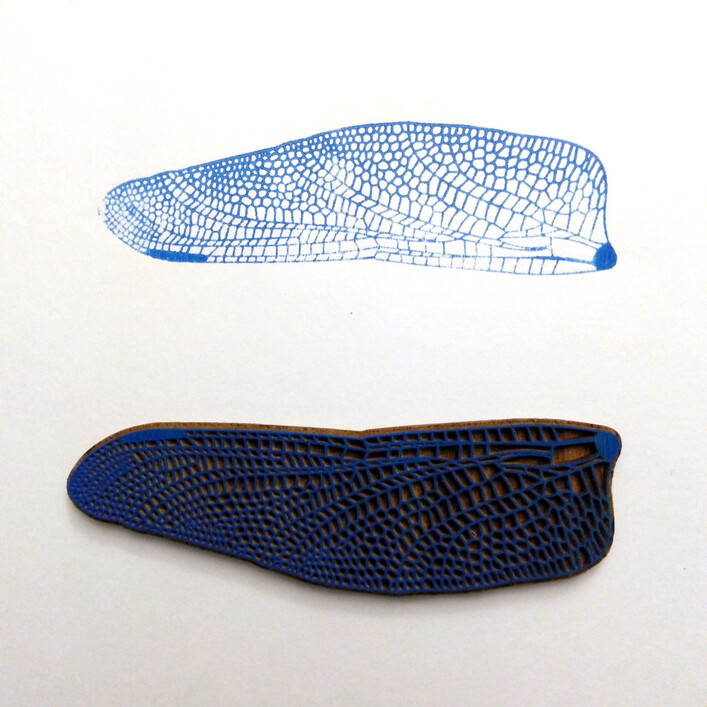
It’s been a while since my last post on the subject of wood block printing. I’ve been experimenting with engraving my wood blocks and have some really good results. Here is a Dragon Fly’s Wing I’ve been working on. The total length of the wing is a little under 5.5". The engrave is made in two passes at full power at max speed. The source image has been slightly blurred to create a slight draft when the image is engraved with the vary power option. This makes finer features stronger and less likely to break.

15 Likes

Wow! That’s one heck of an engrave job! :grinning:

for the dragonfly wing, i mean, if different from specs above. thanks for sharing!!

Really sharp looking

Congrats—looking good for your first job. Makes me homesick for when I took printmaking classes in Japan. Your design here would look lovely with some shodo calligraphy.

Normally we would seal our wood plates with varnish prior to carving, which would help the details told up better to the carving and multiple printmaking processes. Maybe worth an application after laser cutting to see if you like how it affects how the ink lays down on paper.

1 Like

Hi! I bought this wood at home depot and am looking for the settings you used to cut it? I am still fairly new at this, in fact this is my very first forum question I am posting! Could you please let me know the settings you used to cut, and engrave, on this specific wood? THANK YOU IN ADVANCE!

Welcome to the forum!
Conveniently they answered that question already:

So you know (because this is unusual on the web in general), here there is so much useful information in the comments. Definitely read (or at least skim) the whole thread.

3 Likes