Kaula Island Topographic Model

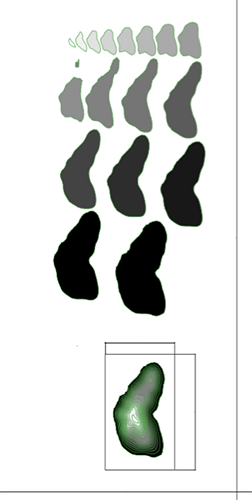
The bathymetric map that’s floating around the office is so awesome, I decided to play with some similar techniques. I did some brainstorming with friends and decided it would be cool to have a topographic style model of a volcano as the cord cover (or ’ceiling medallion’) of a chandelier, so we decided to do a small model of Kaula Island as a test run.

A friend of mine works at an architectural firm and used Vectorworks to create the topo lines for the island, and sent it to me in a PDF (he chose Kaula Island, I’m not sure what significance it has).

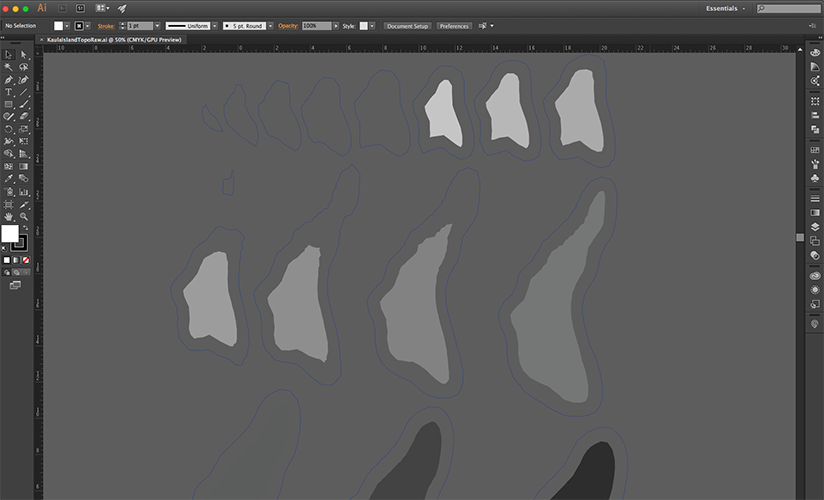
I opened the PDF in Adobe Illustrator, deleted all the weird extra stuff that Vectorworks created, and isolated the paths for each topographic layer. I wanted to nest the pieces where possible to save material, so I duplicated all the paths into another layer using Paste in place. Then I used Effect > Path > Offset Path… to create a -0.5 inch offset around each path. I used Object > Expand Appearance to get the inside path, and colored all the interior paths in a different color (mostly for my organizational sanity - I cut both paths with the same laser settings). For the smallest, highest pieces I decided to skip the hollow middle step. After grouping the paths with their interiors, I rearranged the file until I’d nested as many pieces as I could.

Finally, I found some ¼” plywood in the back and got to cutting! I copied each nested group to another Illustrator file and exported it to the Glowforge.

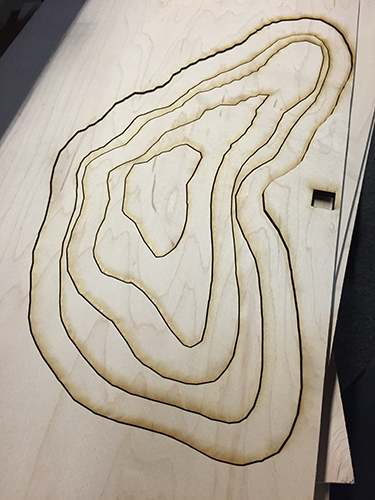
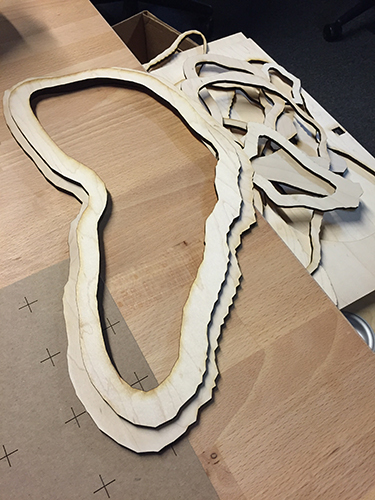
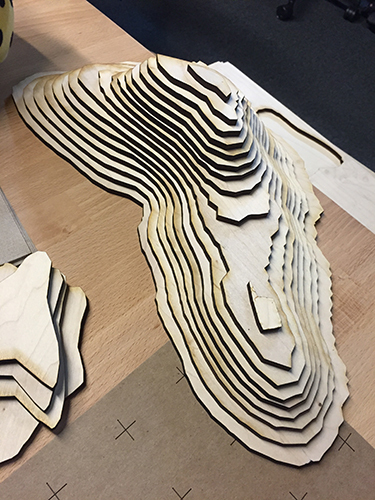
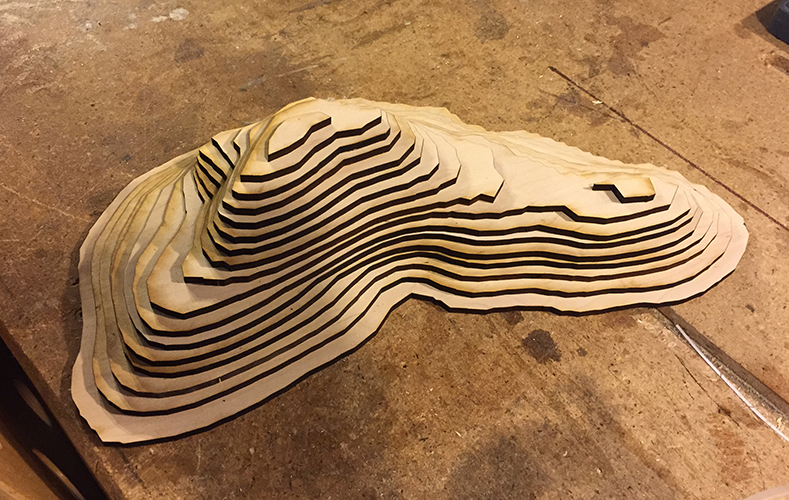
This shows an example of one of the cuts. This might be the very bottom layer, then 3 layers up, then 4 layers above that, depending on how the nesting worked out. Once I was finished with all the stacks, I did a little dry run and built my mountain (note I didn’t bother with protective mask on this, so you see some smoke damage):


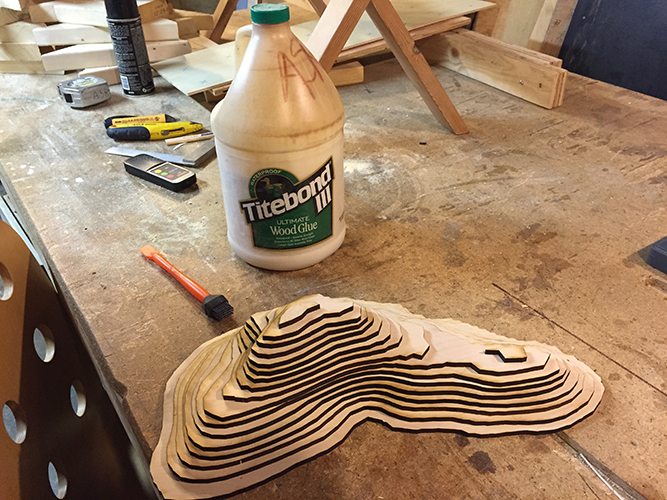
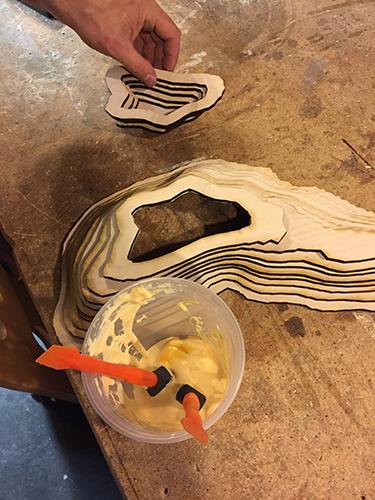
Then I packed everything up and took it to my friend’s house to use the giant woodworking shop in his basement. We used a handy little silicone brush to line the bottoms of each layer with some Titebond III wood glue and kinda guesstimated where they would go. We took some liberties and made a couple steeper sections in the island.


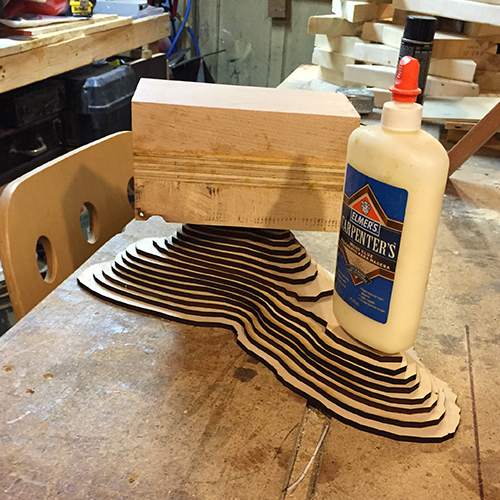
When all was said and done, we balanced some heavy things on the model and left it to dry overnight. The end result is quite sturdy.

Lessons learned: Next time, it would be a good idea to add a slight engrave of the next layer on the layer below. This would make it much easier to see where to place each piece. Also, a label would have been nice on that empty section, but I couldn’t decide on a font. If there were rivers or roads on the island, it would have been neat to engrave those as well.

26 Likes

This is sweet… I cant wait to try this with an inverse cut of translucent blue acrylic to wrap around it! Thanks for posting!

Did you cut from 2 separate boards?

1 Like

We’ve been thinking about the same! Have you seen some of these? The current thought is to try building a mold around this and filling it with epoxy (like you would see in a bar top, but more experimentation is needed to get a technique down that doesn’t have a million bubbles in it… plus large amounts of epoxy gets expensive.

I used 4 boards in the end, but have lots of scrap sitting at my desk for things like little wooden tokens for games. (the base of the island is almost 20").

4 Likes

yesssss! Ive seen the abyss table and the river glass tables. Ive been dreaming about them for months. These are some of the first things I want to make!

Along with those, the catan border water tiles I posted somewhere around here would be so cool to make. Im sure that technique could be adapted to a lot of the tiles to give them some color.

This always reminds me of one of my projects in art school where I made a number of semi-3d human faces using a similar method. I posterized a photograph of someones face, then created layers out of each one and printed the border out on different color papers, then hand cut them all out using an x-acto knife (this took FOREVER). They turned out so cool though. If I ever find them ill post them.

Keep posting this stuff! Its so awesome and inspiring

1 Like

Ive seen some cut matching @dan has done with acrylic. Have you guys tried any interlocking pieces with different materials? Im assuming it would be the same but would love to see an example using something like wood and acrylic to see how tight the fit would be, and to find out if there is anything different about the process in doing so

1 Like

Looks awesome. You should check out this thread if you haven’t already. We talked a lot about the process and products including the hairline engrave trick :wink:

1 Like

Real nice. We plan to do this and your example has given me ideas. Did you think about using different kinds of plywood to add more texture?

Oh man, this project sums up my entire four years of architecture school! Topo models for daaays!

A good method we found in studio for making hollow models like this was to have all the 2D topo lines nested together like an actual topo map and duplicate it. On the first copy we would alternate between cutting a topo line then engraving a topo line, then on the other copy we would inverse the pattern. So, cut lines on the first copy become engrave lines on the second. This way you only have to use two sheets of material (or one sheet with the topo maps side-by side, if your laser bed is big enough and/or your model small enough lol). Then when you go to build it, you can just leave all the cut pieces nested and pull from the center of each sheet, stacking the pieces as you go!

Hope that description makes sense! I can post pictures of the process if anyone would like, I know for me it only really clicked once I cut all the pieces out :relaxed:

5 Likes

I’m not sure if you have access to a vacuum chamber and/or a pressure vessel, but thats the best way to get rid of those pesky bubbles. Fill epoxy, vacuum for 5-10 minutes (it will bubble up alot, possibly overflowing whatever container its in), cure in a pressure vessel (with or without heat). We did this for encapsulations of sonar transducers, where even the smallest bubble in the encapsulant could screw up the signal.

A good way to get rid of bubbles in epoxy (two part resin mix at least) is to mix with large flat wood like a paint stick and then after you pour, let it set until you see most of the bubles are close to the sufrace (usually happens fast) then use a butane torch for sweating copper pipe and lightly heat the surface. The bubbles with magically disappear and turns out clear as glass.

1 Like

Super cool! I’m really excited to see 2.5d relief engraving from the GF, that to me would be the killer app feature.

This is on my list already, I’m kinda obsessed with the stacked acrylic water idea. I’ll be sure to post here when I get around to it.

2 Likes

I don’t know how I missed this whole thread. Very cool information in here, thanks for cross posting!

We did - one idea was to do a light and dark wood every other, and we thought about using super thin veneers. One reason we decided not to vary materials is that the laser darkens up the edge of the wood, so we used a lighter wood and took advantage of the laser darkening to have a pleasing light and dark pattern.

(However, we have been thinking about mixing acrylic into the process and putting a light inside!)

1 Like

Yes please! Cant wait to see this!

@steph_ I think that makes sense… it’s a much smarter stacking process than my kind of naive implementation.

@joe @elsman18
Thanks for the tips on epoxy! I’ve only done epoxy stuff once, and that was with liberal help from friends. They had a spray that you could use on the epoxy that helped those bubbles pop out of the surface… I don’t remember what it was though. Sounds like a similar technique for the torch. I made this epoxy filled mosaic tray (can’t find a picture of the finished thing at the moment), that we used a needle and this spray to coax all the bubbles out.

2 Likes

We have used a heat gun to pop the bubbles, and some people use torches. Works like magic. Also, it is possible to build it up to depth in layers, pouring each successive layer as soon as the last one has stopped being liquid, so they become one piece. The advantage of that way is that you mix it in small batches, making it arguably easier to mix, but it might take a prohibitively long time to do it that way for something this tall!

Will the layering be visible in the final piece?

It might if you wait too long between layers. I haven’t actually had a chance to try it myself yet, and can’t remember where I saw that either, but I just dug up the box and looked at its instructions, which say that an additional layer can be added later too, by rubbing the surface with alcohol first. We had used Envirotex Lite, but I would assume most of the easily found kits are similar.
I think I would still rather try to add each new layer before the prior layer has cured completely though, especially if it was going to take a lot of layers. Of course, if you plan to add some colorant to the layers to get it deeper blue the farther down it goes, you might not care so much, since they might be visibly different colors anyways. It seems like pouring a liquid over a solid surface would make it easier to get invisible transitions between layers than fusing layers of acrylic together would be.

1 Like

OK, so now I am seeing things in a quick search that say you should always let it cure between layers, or it could cure cloudy. Sounds like some experimentation is in order unless someone else on here has any first-hand experience they would like to share.