In fact, I think I’m aiming to be less complicated. I get the whole “anything the sun does not pass through, cut across the short length”. But I think we can also cut “Anything that DOES have the sun pass through” along the short length.
It all depends on the scale of the piece. If the slats (the parts that block the sun and are all sorts of weird angles) don’t need to be more than 1/4"-1/2" long, then I think it’s a lot easier to cut them from the top. Rather than laying flat, they are facing up. That way, you don’t have to create angle braces, and prop them up at correct angles to cut them. The laser cuts them all at the right angle immediately from the top.
It also provides an easy way to keep them all aligned with each other.
If the slats have to be longer than the material width the laser-cutter can handle, then this method will not work.
I’m not sure if I’m explaining myself well.
I think you are. If you 3D print the original model, the slicer cuts it along the longer extent. We are talking about rotating it 90 degrees to put the long extent on the Z axis. And then cutting it up for the laser cutter the way the 3D printer would do slicing now.
In my version, you only do this 90 degree shift for the “walls” and you do the sun filters individually. But I believe you are saying to just do the whole thing exactly the way a 3D printer would do it.
What I cannot see in your version is how you keep the layers connected. Connecting the walls together is trivial, one long bolt along each bottom corner, and maybe some glue along the inner disc of each wall. But if you have multiple layers making up the tiny slats… do those work out to still be thick enough to run a long bolt through? Or are you planning to deal with glue on myriad tiny pieces per layer?
So I imagine something like this:
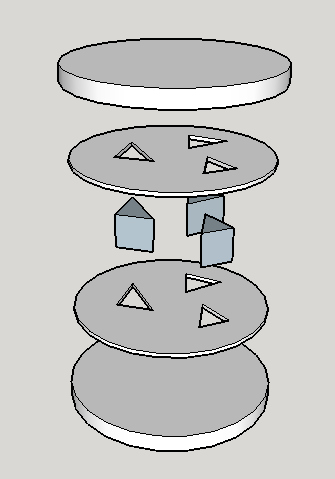
There are thin parts with slots that hold the slats on each side of the slat. There are parts with no slots that “back” the one with slots. In the end, when you sandwich them all together, it looks like this:

Note that I used circles instead of half-circles for simplicity. I also made the “slotted” circles smaller by accident. They should be the same diameter as the non-slotted circles.
This only works if the slats are no longer than the material thickness we can cut minus the slot thickness. Unless we find a way of gluing two of these side by side (slat to slat):

The slats and slots layers would be cut from the same tool path. For the slots, you keep the outside, for the slats you keep the inside. You can use tape to hold the slats in the right position with their discard until you’ve put them in place in the slots. Once the glue sets, you lift the discard away.
You would probably need some sort of dowel somewhere to line up all the layers as well.
To me, this is less work than cutting slats at angles and then gluing them in.
2 Likes
Okay, we are talking about doing the same thing. But I was assuming that the slats WOULD be longer than the thickness we can cut. So to cut them and still assemble in this manner… the whole prop up at an angle thing I described before (and the angle guides you would make on the glowforge easily enough)