Ok, who here with more brains that I’ve got is going to adapt this awesome creation into something that can be made with the glowforge?
Ok, who here with more brains that I’ve got is going to adapt this awesome creation into something that can be made with the glowforge?
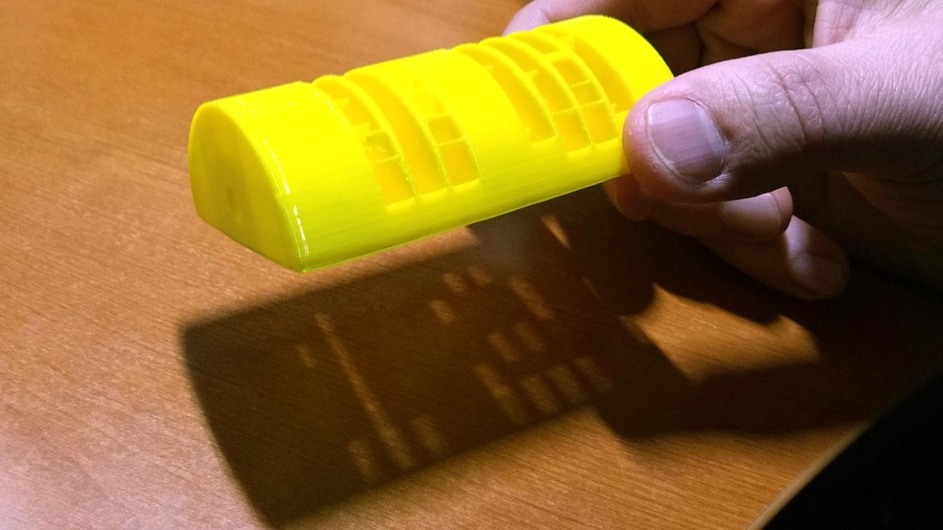
That’s a great find! Printing it now on my blobby plastic printer…
Cool, show us a pic when it’s done!
That is really, really cool!
that is totally awesome. ooh, i want to try
You could maybe do something a LOT larger with a flex cut. Maybe. Problem is you would need to make sure that the flex was cut exactly as thick as needed so that no light comes through when in place.
The different digits happen because of angled holes. And angles are hard to do with the glowforge. Actually, you could work around the angle issue since this is small enough to sit on various wedges.
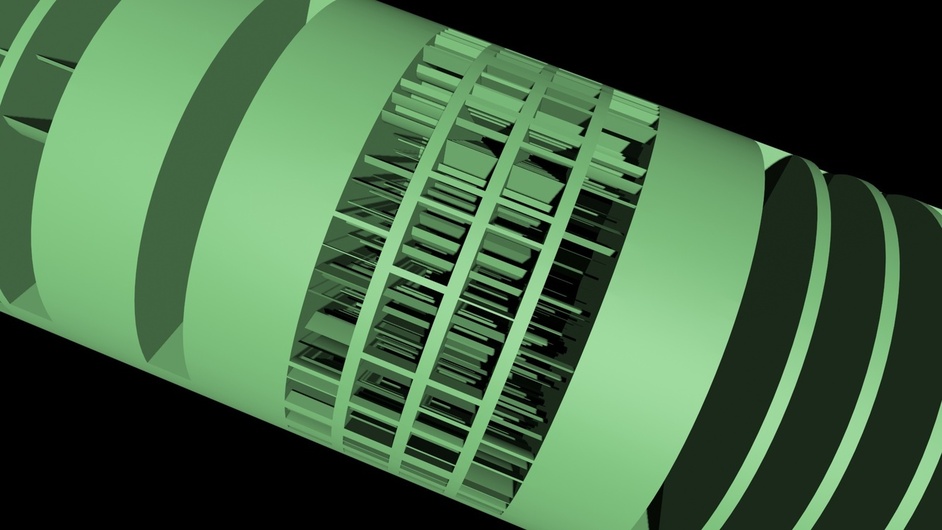
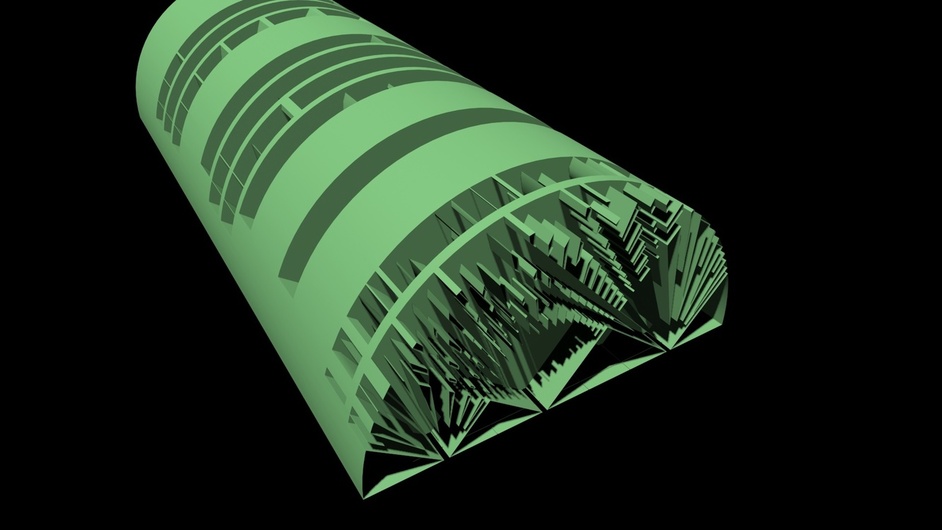
So, the insurmountable issue is that there are a lot of parts hanging free in the middle of the part. This really is a part that can only be made with additive techniques (even whittling it would take insane skill, and likely be beyond what anyone could manage)
I printed one of those on an FDM printer but the results were a bit fuzzy. The slots or wedges needed to create each of the digits are angular in nature so at first glance it seems a bit tricky to laser cut something like this. Perhaps cutting many thin layers or slices and laminating those together would work.
HOLY CRAP!! That is…ingenious!!
I’ll be printing one tomorrow! Great find.
Although at first glance, it looks like a Rated NC-17 picture. 
I’ve seen that before, pretty cool stuff. With how thin some of those walls need to be it would be tough with laser. You could do it with a ton of circular layers and the right material.
Another approach would be this.
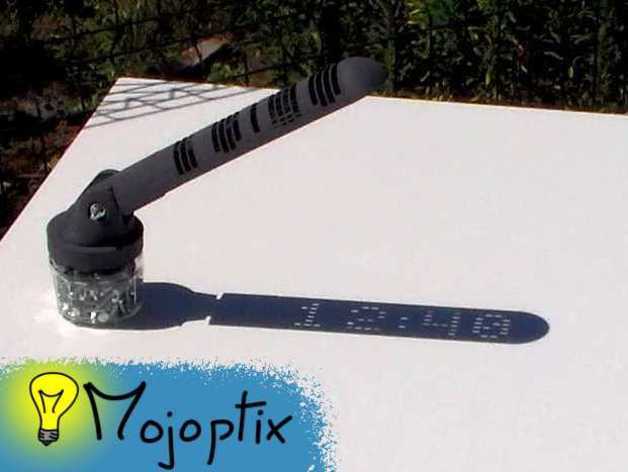
http://www.digitalsundial.com/product.html
Also this one is truly digital, photosensors turn on the correct segments.
I a wondering if its 3D file could be processed through 123D Make to create a stacked layer version of it. Might be worth a try. I am planning on using my Glowforge to make a more traditional sundial using outdoor-grade multi-layer acrylic for the disc, which should be a lot nicer and more durable than the one I built as a teenager out of 3/4" plywood and adhesive numbers! It still won’t have the same wow factor as this though!
That was my thought as well! When in doubt…slice up the model
I 3D printed the sundial yesterday. The hour section turned out great, but the minute section did not take well to the fact that I scaled the model down. The vanes that block the path of light are very thin and my scale factor had them become thinner than the resolution of my printer. I might break it up into four sections so I can print it much larger, it really is a fun project.
I brought the model into 3D Studio Max to get a better look at its construction. While I think it would be possible to cut in a lot of layers on a laser cutter, my feeling is it would be a lot of work. You would need to create a layer with voids where the vanes would go and then cut out all the vanes and place them all into their correct slots.
Here are some images so you can see my results (just under my LED desk lamp) and the 3D model.
Oh, good analysis. I was being too rigid in my thinking and just slicing it the way you would for 3D printing. But turning it sideways and cutting guides for slats would totally work.
Take advantage of being on a larger bed, and increase the scale so that the radius of the cylinder (bulk shape) is the full 20" of a Pro. This should allow you to more easily cut the insert slats to get the shadows you want.
I would say avoid wood for this, since you obviously want to place it outside, and any expansion from moisture will be disaster. But acrylic needs to be as opaque as possible so that the tiny slats fully block sunlight as desired.
Since each segment is uniform across the digit, the models would be very easy to design. Import the existing 3D model in to your software of choice, cut it apart so you have isolated each digital segment, then just run those as voids into a semi-circle.
I would say minimum of 3 layers between each segment. One solid layer in the middle to adhere to, and one slotted segment on each side to hold the slats for each digit.
Added bonus, since you are working in layers already, the entire thing doesn’t have to be a success in one run, if a single digital segment is a problem, you just take out that one segment and re-do.
I agree, if this were to be done on a laser, go big!
I can see how making “sideways” cuts would get us the “slats” we want. But once those slats are cut, they are “free” from the surrounding material. Would they not all be loose and fall apart?
I think you would have to cut the slats in 1/4" material (or thicker if we can), and then cut the same pattern in 1/8 or 1/16" material to make slots. Then you have to meticulously place each 1/4" slat into it’s corresponding 1/8" slot to hold tings in place. If you make it big enough, I see that as being realistic. But if it’s too small, I don’t see how to do this.
Am I missing something?
I think what jacobturner was getting at (at least it is how I would do it) is first cut a half circle piece of material - no slots, just a solid piece. Then cut a second half circle piece of material with slots cut out of it. Now mount these two pieces together. Your slats then fit perpendicularly into your half-circle piece. Yes, you would have to do it at a larger scale or enjoy working with tweezers.
My personal opinion is that for the demonstrated scale use a 3D printer. Otherwise you’re succumbing to the when the only tool you have is a hammer the world is full of nails fallacy. A laser cutter’s strengths are precision and a decent scale. So, as jacobturner mentioned, scale it up: as in a garden piece. Considering how much work this would be I would want the final result to be a piece of art. As wood seems to be out for its inherent properties outdoors, maybe score stone tiles with the laser (for the precision) and then cut them on a wet saw. Your final framing of the entire sun dial could maybe use wood, or definitely a metal that would patina nicely. There are still details to be worked out.
OK, I think we are both thinking the same thing. At one point, you have to manually insert the slats into some the slots. I was trying to think of a way of avoiding that step.
I guess you could cut the slots (with a solid backing piece glued to it as you describe). Then you could cut the slats. Put some painter’s tape over the slat pieces while it’s still in the laser-cutter to hold them all in the correct position. Put a bit of glue inside each slot. Put the piece with the slats over top of the slotted piece, making sure to line everything up. Then carefully remove the tape and hope that all the pieces fall into their slots. You could use a small pick to push the stubborn pieces down into the slots. That would not be too labor intensive.
It could work.
@caribis2 seems to have the idea, @polarbrainfreeze, you still seem to be aiming a bit too complicated, so not sure if you have it.
Anything sun does NOT pass through, you cut across the short length. Anything that DOES have sun pass through you cut along the long length.
Then you have a stack of semi-circles which are your main body and support, along with a massive pile of basically twigs. Stand the twigs up in the holes you cut from them, then place a “lid” on top. Now you have one digit assembled.
No real way to do the tape method to hold things together, since when you cut the slats, they are laying flat, so tape on top of them would do nothing for you. Most slats (since the angles are vital to proper function) you will have to cut, then prop up on an angle brace, then cut again.