Ever since the came in to existance I’ve had this wild idea of making 3D relief maps of famous landmarks, particularly all the 14ers in my wonderful state of Colorado. Since my laser arrived, I’ve been working on smaller things to become more familiar with software and getting to know how this thing works.
I figured I wasn’t the first person in the world with this idea, and quick Google searches show many people making really wonderful laser cut relief maps. There’s also some good instruction out there on how to do this. I’ve followed the instructions here: A Wooden Laser-Cut Topo Map of Portland, ME – The Shamblog
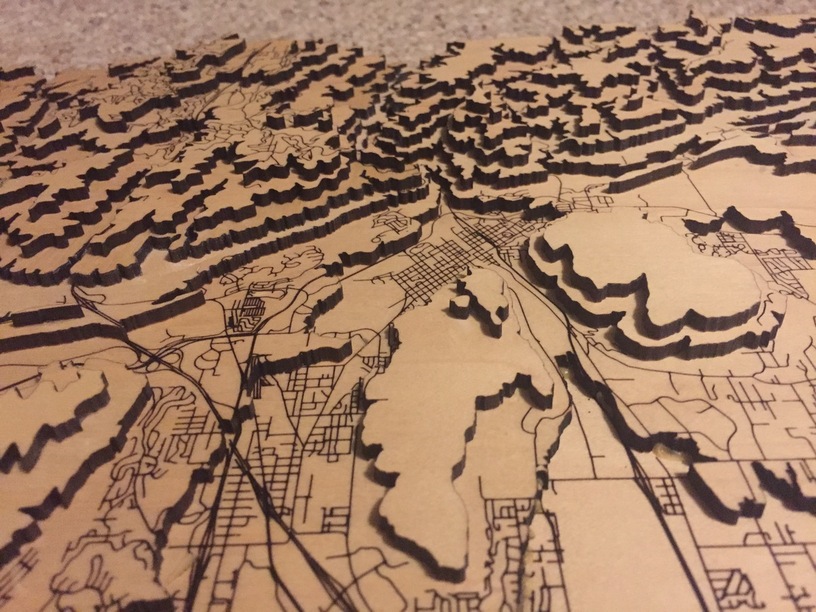
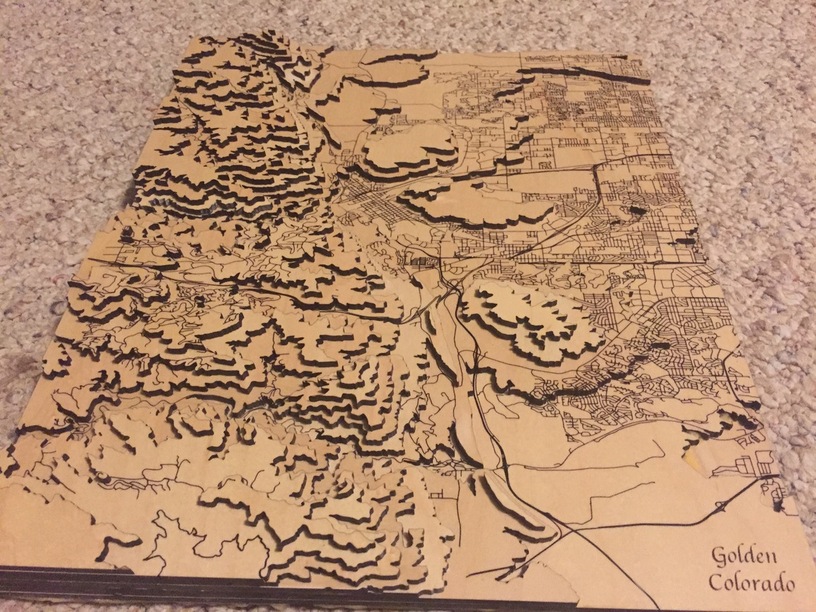
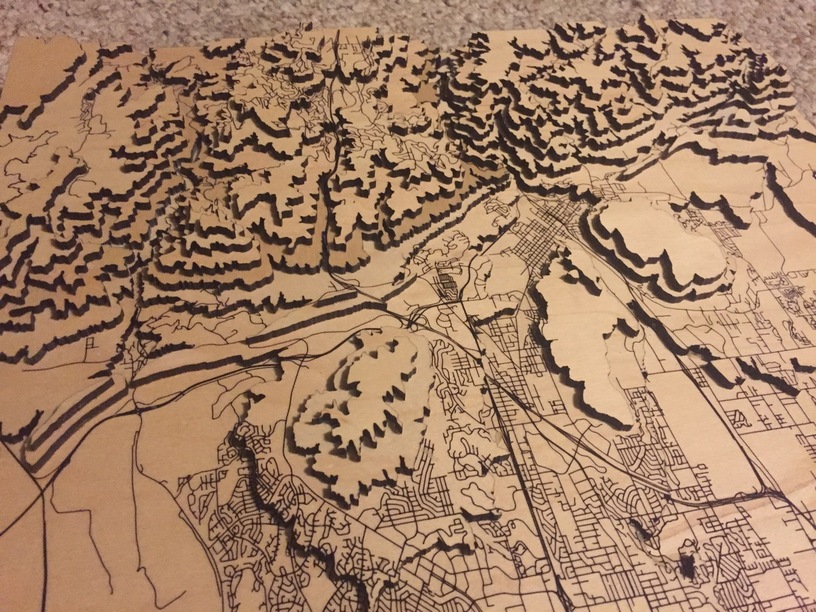
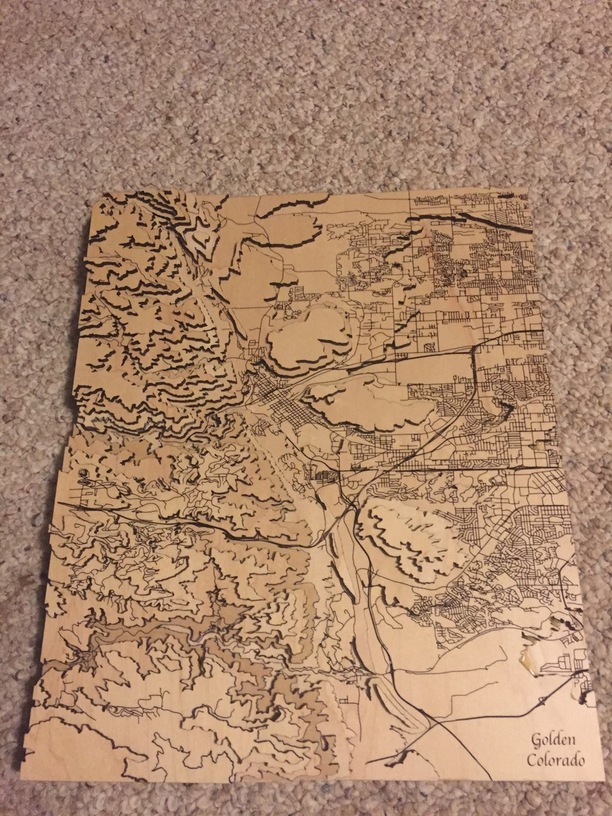
So I’ve been working on my own project for the past few weeks, learning about all kinds of interesting things. But first things first, a few photos of my first attempt:
Still trying to decide if I should make a frame for it, to hang on the wall. The edges are a little messy as things aren’t perfectly aligned and there’s some hardened glue leaking out
Some of the things I learned:
Wood Glue doesn’t stick very well to the finish on Maple Plywood
Sanding the finish off of itsy bitsy pieces of wood is annoying
Cyanoacrylate does a pretty good job at bonding to the finish of
Sometime less is more - overall I think this thing is way too busy. I just picked the area where I live, as I thought it might be fun.
I wished I put some “alignment holes” in the larger pieces that I could place a dowl through, to keep things aligned, or made a jig or something. Each panel wanted to rotate a little as I applied clamping pressure to the layers sandwiched between to boards.
Color or Contrast is good. I’m not really happy with the “monochrome-ness” of the end result. I think it also has to do with how busy this feels as well. I’m not exactly sure how to go about changing the color or appearance of already finished materials though.
Next project I’ll probably work on the following:
Use unfinished wood so that I can color or stain it for some contrast, but not apply a “finish” such as poly or laquer or simple wood sealer until the final project is done
Be more sparing with glue. I had some bleed out on to a finished surface and it dried before I noticed and now its in there, all hard and impossible to remove without doing damage.
Spend a lot more time up front figuring out map scale and releif depth, how many layers I want, and at what evelations those layers should be. This map is 8 total layers. It was supposed to be 9, but the last layer was one little “knob” smaller than the size of a pea, so I left it off.
Figure out what kind of “features” to add to the map for reference, or “beauty” and figure out what can be removed to simplify things.
People have been doing this for Board Games for some time (Advanced Squad Leader and Talisman are examples) but they have to hand-cut from XPS.
This sort of creation is what drew me to the Glowforge immediately
Your maps are exceptionally beautiful though and great of you to post the how-to, thanks
Just fantastic. WOW. You should be so proud of this!!!
I wouldn’t take anything away from this! But I appreciate what you’re saying about the “monochromeness.” If you decide to do this again, possibly consider more than one type of wood to give you some of the shading you want. Or even just an engrave of forest or something on pieces that it makes sense. Maybe even consider blue acrylic for water areas. Or just good ol’ fashioned blue paint. I dunno. You’re clearly an artist of a caliber far beyond me! I’m sure you’ll come up with something!
Hah, maybe in version 2.0 or 3.0. This one is probably going to get donated for a silent auction for my Search and Rescue team I’m a member of. Trying to decide if I want to try frame it or not. I think framing it might actually remove some of the “depth” it has, but leaving it unframe is just begging to be a dust collector… LOL.
I love it! I live on a small lake in Indianapolis now, so I’m working with a neighbor who has a fish finder to map the depth. I used to work at Ball in Golden back in High School - we lived in Boulder. Beautiful area out there! I do miss it.
Love this project! Bookmarked as my email has arrived and should be shipping soon!
This is one of the first projects that I noted in my “when I get it” notebook 2 years back. Yours came out really nice, and the documentation of your learning process is really helpful! Please keep posting!
I’m told mdf takes paint and stain very well (aka draft board.) So if you want to spend more time fiddling about with coloring and sanding off the dark edges laser cut mdf provides there is that option.
How did you keep track of all the little pieces. Every time I see these I want to make one but am hesitant of knocking them out of place during setup and jumbling all the little pieces.
@caribis2 LOL… sounds like a farmer’s version of checkers!
It might be an interesting project to find out what is growing in each of the fields and etch a different image in each location to represent the different crops for that year (corn, soy beans, new housing development, Amazon HQ, etc.)
Just one woodworkers tip. You mentioned that the layers were shifting when you tried to clamp them. If you put a little bit of table salt in the glue, it will greatly reduce the “twisting” of the layers as you try and clamp them.
 Maple Plywood


