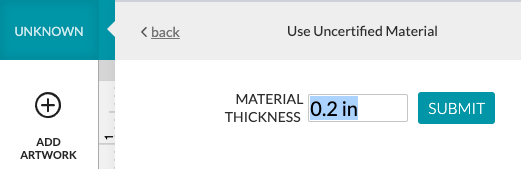
That was the dimension I measured with calipers.
1 Like
I’ve used quite a bit of this thus far. Settings similar to the rest here (150/full)
I’ve been having success with 175 @ Full (Basic) with my local batch. The edges are less charred than at 150, and everything thus far has cut fully through. My test samples worked at 180 also, but with 185 failing to punch through, 175 seemed like a safer bet.
3 Likes
After further projects (several wooden jigsaw puzzles), I have indeed run into a few spots where 175 (or even 165) barely fails to cut all the way through. So at this point I concur with 150 as a reliable cut speed for this material.
Also, having tried various engraving settings, I am really liking “vary by power” at 1000 speed/100 power for engraving gray-scale graphics.
2 Likes
Sadly our Home depot doesn’t carry it here, but I did find this “1/4 in. x 2 ft. x 2 ft. Gaboon Virola Plywood” but can’t find out what glue it uses. Would this be safe?
I really cannot comment for sure.
If you want to figure it out, you can look at what glues that material is made with. Then look up what is put out when you set that glue on fire.
If it is interior glue, you are generally ok.
Then try some small and quick test cuts. Look at the quality of the cut, if it chars a lot, etc… Also, see if there are any unusual smells.
If it cuts ok, and smells like basic burnt wood, and does not have nasty chemicles in it, then you should be ok.
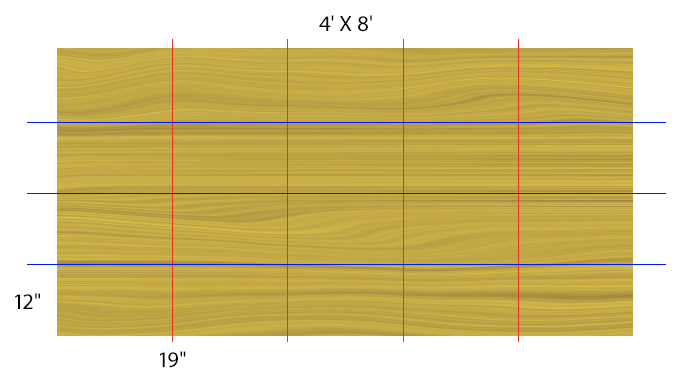
I just want to add… I had been going to Home Depot to get my 5mm underlayment cut into 2ft by 4ft sections and then cutting them down the rest of the way at home. But today I had an epiphany! I had the guy them into 19 inch sections.
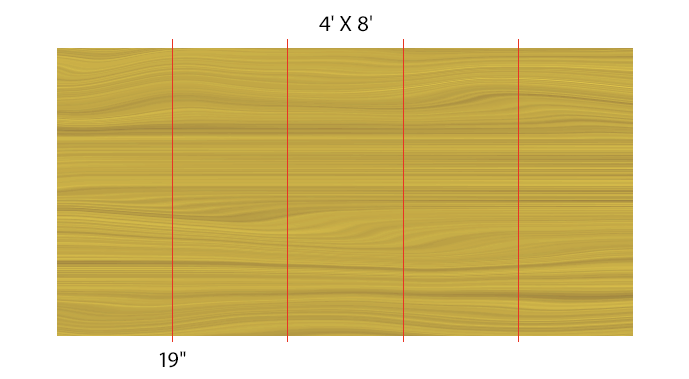
Then I cut them down t home into 19 x 12, for total of 20 pieces!
6 Likes
I have been doing that and commenting on doing it that way for about a year now. At first, I was cutting the 48" pieces to 3x9" and 2x10" so getting a total of 25 pieces before realizing that I can use the pass-through and use only as much as I need. ![]()
By making overlaps I could have 2 18 x 11 parts that was 4 " at one end on a 19x 19 inch piece with some left over.
3 Likes
I tried to create the gift of good measure on the 5mm underlayment and it came out charred and never actual cut all the way through. Would someone mind posting their settings here? I set the cut as shown in the pictures but something must be wrong.

I don’t have personal experience with this material, but in one of the posts in this thread a speed of 150 was suggested. Please note, however, that this post is 2 years old and changes have been made to the Glowforge. Your best bet is to use one of the material testing templates to work out your optimum speed and power settings. It is quite possible that the material you are using is a bit different than what others have used. With all non Proofgrade material, a few minutes of testing will save lots of material and time in the long run.
Very few material manufacturers are thinking about laser cutting - they make their material to be cut with saw blades and the like. So be prepared to have your settings work in October and then not work in December on a different piece of the same material. I mainly use non-proofgrade and this is just something you have to be prepared for.
FWIW, my setting for Lauan underlayment is 145/Full (on my Pro) and I’ve rarely had issues. Every sheet will vary, however, so it’s always a good idea to test on offcuts or unused areas in the design. It’s also very apparent that the makeup of the layers can change drastically from one part of the sheet to another, so be prepared to check cut-thru carefully before moving the material.
This is one reason Proofgrade is worth paying for. I only use Lauan for projects where appearance is secondary to function.
1 Like
I have used 1/4" Virola with good success. I usually cut at 140-160 depending on the fineness of the design. The lower speed is more reliable at cutting all the way through, but it will mess up an intricate design because of the buildup of heat.
2 Likes
Thank you for your response 
4 Likes
I felt the under layment to be dirtier than the “birch” plywood (both from home depot). A lot more soot for sure and the edges look charded. I found the safety sheet for the Birch plywood but not for the under layment. So I switched totally to the 1/4" birch plywood. It is a bit more expensive but not that much more. I think I am on my 5th or so sheet which is pretty amazing given that most of my work is with small items.
I too have Home Depot rip it to 19" strips - (the long way ) to feed into my Pro slot, and have a horizontal “cut line” drawing that I use to trim off my working areas.
I use 0.17" as that is what my calipers say the depth is.
I use 135/full for a cut, 500/30 for most engraves
5 Likes
Hi Bensostrom. I bought this wood, but with 130 full I need to go through it twice and it barely gets through and I get a lot of scorch. What settings do you use? Thank you!
Yeah, this wood is ‘dirty’ and scorches a fair bit. That is how composite materials tend to be. Baltic birch is just a better material.
carmialt164a, if you are using a GF basic, then you may need to drop your speed a little bit. With a GF pro, it will still not cut though 100% of the time as the wood filler the use takes a lot more to get though. If it is spotty and just a few bits are not going though, using a razor knife may be better. If it is not getting though at all, try lowering your speed some more but supervise it to make sure you are not starting a fire.
I have a basic and I use 120/full, one pass. Sometimes that works and sometimes I need to pull out the exacto knife to clean up cuts. I only use this material now for simple designs or flat shape pieces due to the charring. I tried a mandala design in it and ruined many pieces of wood before I switched to birch.
2 Likes
What settings do you use !
What settings are you using? I’m having issues getting it to cut