So this is more easily done with a traditional printer, but I have a laser. The problem is I own a side-by-side duplex with different layouts. I live on the small side. The large side is currently empty because I don’t need the money and the last tenants annoyed me. I setup the back room in it for the glowforge and at about the same time found out a friend could use a cheap place to live. As I can barge in on them to use my work space, I trust them to not sell my tools and it is better for a house to be lived in, I asked if this person wanted to move in for the cost of utilities. “Sure, could you take some pictures,” asks the person with a job, but also a lot of debt. I took a video instead and created a YouTube channel. As the video is unlisted I needed a method of conveying the link. Below is a reproduction of what I came up with:
I started by just engraving the “A Home Tour”. My first try used 1000 speed, 5 power, 225 lpi & 1 pass (Pro). The engrave was a fairly light brown. I upped it to 1000 speed, 15 power, 450 lpi & 1 pass and it was a dark brown engrave you could see parts of from the back side of the cardstock. Basically, I found that I needed more power than kittski did in this post:
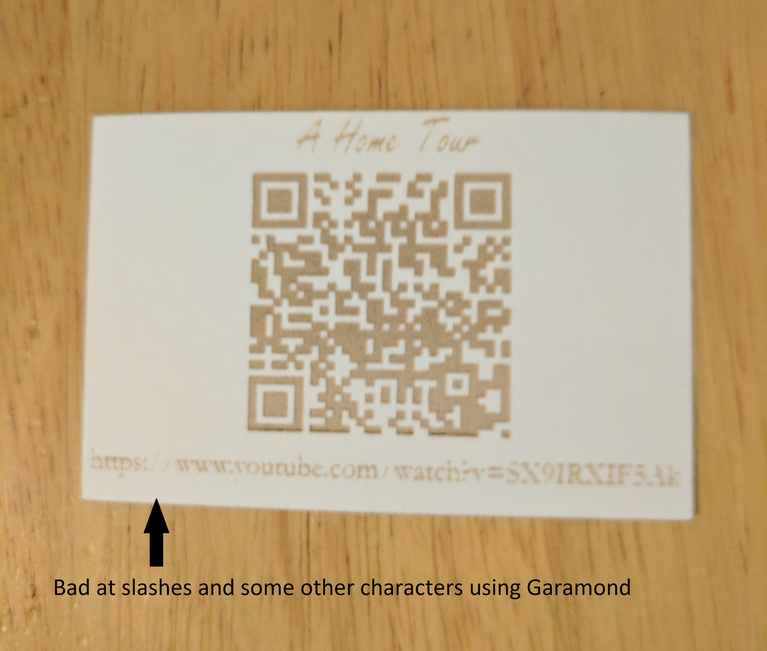
So I then printed the entire card using 1000 speed, 10 power, 340 lpi & 1 pass for the text and 1000 speed, 15 power, 450 lpi, 1 pass & Floyd’s alg with its defaults for the QR Code. Whoa, the slashes in the URL and some of the letters barely registered. The font on top is Freestyle Script and the font for the URL is Garamond. The photo above is of the third try with the Garamond settings at 1000 speed, 15 power, 450 lpi & 1 pass. The slashes still don’t really come through, but you can at least read the rest of the URL. Note that the photo is pretty blurry. The QR Code reads okay in good light, very poorly in low light (same results using two different Android devices, but same app, with very different cameras.)
The cut settings I arrived at during a different project and they are: 400 speed, 45 power, and 1 pass. Those settings still leave a couple of tags holding the cutout to the larger sheet of stock, but they leave a brown edge and not a burnt edge so it’s what I’m using.
So what I learned is you have to dial in the settings on a per font basis, some characters (at least in Garamond) engrave better than others and you’re better off with an inkjet for bar codes. So at least for this I use a different color for different fonts so I can use different settings.
When I first received my Glowforge Pro I tried to upload some text to do a test with and the glowforge app refused to load it, politely informing me that they didn’t do text yet and I need to convert it to a path (there are some helpful error messages.) On one of my iterations for the above I forgot to convert some text to path and instead of receiving said warning, it simply didn’t load up the offending text to engrave but loaded everything else. I caught that it was missing, fixed it and uploaded again. So I also learned that the warning about text was either removed or doesn’t always work.

