Well, I cleaned out the exhaust and cleaned the inside and cameras, restarted the Glowforge and did a two-hour cut and engrave from about 8:00 to 10:00 am, come back in and flip 4 parts over for the engrave on the back being careful to keep the work in exactly the same place, go back to the bedroom with the computer and see this that everything was an inch out of place.
Yes it is not proofgrade, but poplar plywood, and yes if I put in and made it in proofgrade it would still be off, and If I reboot everything it will be more accurate but it would seem as there are many accuracy measurements, that It might self diagnose and ask if you want to update the accuracy.
I will try and do the second cut I planned hoping that it will repeat exactly the current error as there is not more to lose, but you wanted an inch off example and this is close to that much.
If you stack your design in your design software so both sides are on top of each other and they’re different colors then in the GFUI turn on the first side & the cut. Then flip the pieces over and drop them back in the holes they came out of, turn off the first layer and cut and turn on the second side. Disregard the position on the screen. Do not move anything. When you print it will be in the exact same place as the first side - the post job picture isn’t indicative of where it will land if you print again.
The post pic is always offset from where the objects will be placed. Not sure why and it’s disconcerting to press the print again when it looks so far off but it works.
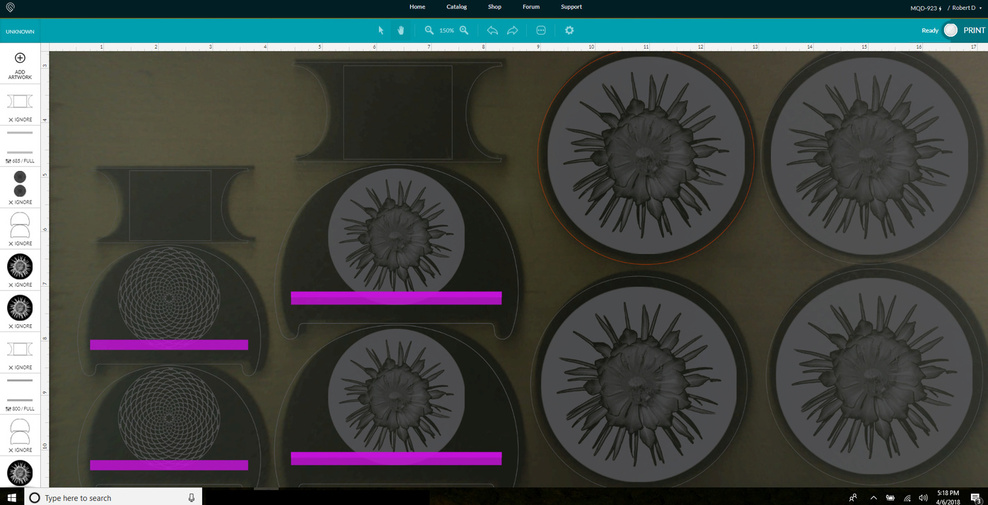
the major problem here was the death of the two flower coasters. I had planned everything very close to the bottom, bus as you can see it went past the top, plus wasted time and what was in the can engrave area now is not, and woth no pother changes.
I rebooted the Glowforge and redid the whole thing. the sheet was large enough the laser could not go outside it. the cut worked but was still off even right under the camera.
The mistake is in assuming the camera is good for anything except scanning. It’s not. Even the slightest changes in the “geometry” of the camera and the area being imaged will make a difference to the camera’s alignment. To make things worse, the camera is attached to the lid and the lid moves and it doesn’t have a “positive locking” mechanism to ensure it’s always closed exactly the same. The alignment can’t help but change. Use the “jig” technique and stop relying on the camera altogether and these problems will be a thing of the past…
There is always a jig, but the jig has to have a connection to the image or it is useless. the sides of the holders were made absolutely symmetrical, and the same size for every design except the small ones, so any design can fit front or back in any hole so the design can be on one side and the connection to the cross piece on the other. With the crumb tray settled in the raised edge becomes an absolute vertical line and the steel cover on the pass-through the absolute horizontal and everything is an offset of that {occasionally the back pass through cover will be used} then magnets are placed where the other edges land to complete the seal. but after all that the camera and tests still have to isolate the connection to the cut and just where it will show up.
As the location that is between the cut location and the image (even the ability to do an engrave) keeps changing no permanent (or even temporary) jig will ever make the problems " a thing of the past…"
I’m not sure I understand what you’re saying, sorry. But…
Any system for two-sided cutting that relies on the camera image is likely doomed to failure. The geometry of the camera setup means that even slight errors in the orientation of the camera or the thickness of the material will translate in to position offsets (where the laser cuts will not be where the GFUI shows the cut will occur). Each time you open and close the cover of the GF you change the position of the camera slightly. You probably don’t get the crumb tray back in exactly the same spot each time, either. And the material you’re cutting might not be completely flat or have true uniform thickness (assuming you measured it to confirm how thick it was). All these things contribute to changing the “registration” between the camera’s image and the real position under the laser head. So if you’re doing things with the GF that rely on camera registration being accurate you’ll end up with inconsistent results at best.
I’m new at Laser Cutting, but I’ve been a hobby machinist for many years so the solution came pretty easy to me. The good news is, the jig does not need to have any connection to the image. The bad news (which isn’t really that bad) is that you have to make a jig each time you put new material in the laser cutter. And if you’re going to put something in the GF for etching or engraving, you have to make a jig to be sure what you etch/engrave will be lined up properly even if you never look at the camera.
The process is simple. Enclose your artwork in a vector box outline, and include both the front and back side art and any cuts required to define the final outline of the part. Tack or tape the material to be cut to the crumb tray so it can’t move. Load your artwork in the GFUI and set the back side art and any front-side cut required for the outline to “ignore”. Do the front art and cut the enclosing box outline. Open the GF and flip over the piece inside the box outline. Then disable the front side art and the box outline. Then enable the back side art and the cut that defines the final outline of your part. Cut it. When you’re done, the part should be perfectly aligned front/back.
With this method there is absolutely no dependency on the camera image. The only thing you use the camera for is to be sure you’re somewhere inside the workpiece before you start cutting anything. I know my camera is fairly close, but I basically leave 1/2" margin to any edge just in case.
Yes all that is great, and what you describe is what I do, but sometimes the Glowforge does not cooperate and changes things after that first set of cuts. That has been my complaint all along, in the particular case in point it even engraved one side and then changed the allowable location for engraving, so that it would not engrave the back side where it had just before engraved the front! Same locations setup thickness and everything. and allowing a half inch play is no good when things move over an inch!
Nope I had moved the gantry about while cleaning (with the Glowforge off} and then pushed the gantry all the way back (i had made the mistake of not doing that and everything was a slight angle till I figured it out and straightened it ) and then rebooted the machine.
not noted in your tutorial (I don’t think) is that the design has to be symmetrical. I do this as when I am finished, cutting the outline in half and mirroring it so it not just looks symmetrical but is symmetrical
If you are working with an asymmetrical image, you mirror it and cut two, then switch them out. Or cut a weeding block around it so you can turn the item halfway after engraving one side, engrave the other side and cut it out.
(It’s what I did with the carousel horses, which are engraved on both sides - you have to mirror it around the centerline.)
yes with the carousel horses you would have to have two facing each way, For my coaster containers they could actually be symmetrical so that is what I did,
My mother actually read me the Dolittle books over 65 years ago and they were not new then. they were out when she was a child as she mentioned that they called my grandfather Dr Donothing when he took a vacation.
Great discussion! Since the issue is being seen on materials that were purchased from another company, we can’t offer support for prints that don’t come out as expected. I’m going to move it to Beyond the Manual so the conversation can continue. If this happens with a print on Proofgrade materials, please open a new ticket in Problems and Support and we’ll help you right away!