I will try and do that in the future, but I had already done one in wood that was perfect so was just odd that it ‘moved’ even after my extreme zooming and positioning. I am a stickler to accuracy.
2 Likes
Different height on the wood and the leather. It can really make a difference in how the lid camera focuses.
5 Likes
It was all proofgrade 
1 Like
I’m not sure that you wouldn’t have to reset that based on the different heights of the materials. If you used the after-image to place the leather instead of starting from scratch with a different height that correctly focuses the camera, the placement can be off.
Did you create a jig for it, or did you try to line it up again using the afterimage?
Definitely a challenge to align perfectly an imported bitmap, resized or otherwise on an already cut shape. I am successful most of the time but otherwise not. Placement of an entire image file, bitmap and vector together works pretty good. Hence all the discussion about accuracy. I can usually place an image on a single small bit of material and ensure that it fits, but usually there is enough margin for error. Dead center under the lid camera and exact height of material helps. @takitus’s suggestion is good for a quick alignment and is pretty accurate.
I wonder if some of these issues are due to creeping alignment issues if the Glowforge has been on for many hours and done many different operations.
4 Likes
These were done on different days and I have been turning off the Forge between projects.
And yes I let it run its initial setup each time before I do anything 
Don’t know what to tell you, one moment the image was perfectly aligned, start printing then it wasn’t.
Hmm, really thinking hard it did say everything was ready to go and for just a moment the message came up about re-aligning but that was after hitting the button on the Forge. Maybe that is a bug?
It didn’t get shifted by the air assist did it?
Hey @zerbyte, why don’t you give the procedure I described in the first post of this thread a try, and determine what your machine’s offset is. It might get you to where you want to be. Any time I’ve had issues similar to yours in the past, it turned out to be that for one of the instances I moved the object to match the already cut or engraved outline, without taking into account my machine’s offset amount.
2 Likes
Nope, it was still in its cut out location.
Of course I am also talking to support about the founder ruler not having the hash marks show up and the numbers barely visible. Hoping my machine is ok.
1 Like
Is this because of potential missteps on the stepper motors? Just curious for my educational purposes and not to problem-solve. ![]()
1 Like
What did you pick for your engrave colors? The dark one should have worked.
Kentucky windage … new to me also!
1 Like
this is Great!
Thanks for sharing
1 Like
Another process to keep your stuff centered that I use is:
When I use inkscape for designing, I have a 1/8x1/8 inch guide up at all times, as that is the most common thickness of material, so when I’m designing for boxes, the kerf is acceptable. It also makes centering circles super easy because of “snapping midpoint to grid”. You can import your other image, which I would expect was a PNG, do the trace bitmap step, and take the new image there with smoothed, clean paths, and center on the same midpoint.
7 Likes
This may be the most helpful thing anyone has ever posted on the forum. Thank you!
3 Likes
I could not zoom to 450%. At 250%+ it stopped refreshing the image of the bed. But it helped a little. I had to add 15 clicks to the left and 2 up and I was still off on the left by a lot. Here you can see the intended location and the actual engraving behind it.
2 Likes
Hey @justemail, there are known issues with Safari and the Glowforge interface. Until they get that under control you should give another browser a try. Chrome or Firefox are what I’m using. The zoom error is just one of the problems with Safari. And don’t forget that the method I describe requires you to do the calibration in the center of the bed.
3 Likes
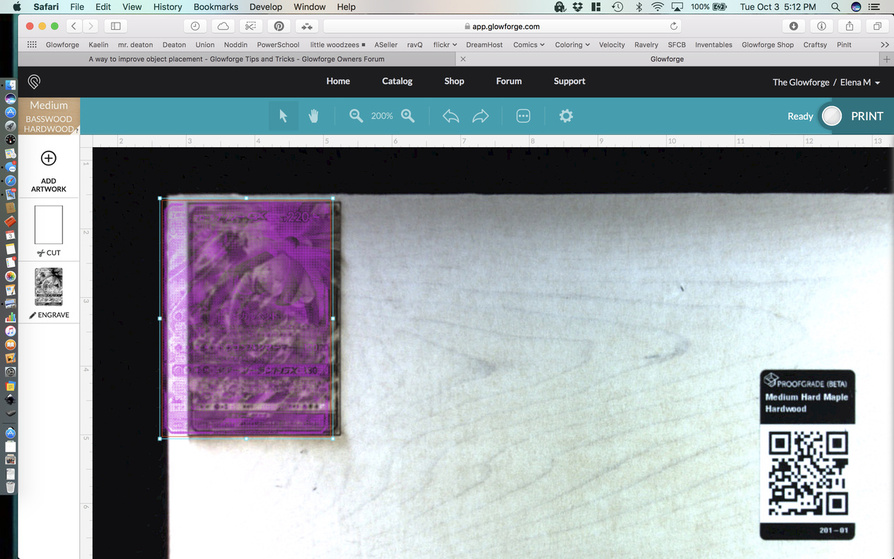
FYI, you have Maple Hardwood in the GF and Basswood selected. Probably the same thickness but if not the optical placement will be way off. The power settings are likely to be different.
4 Likes
I totally missed that!
1 Like
Thanks! I thought I picked the right one.  I wish the QR code part worked all the time.
Update: I just did another print using both of your suggestions (fixed material selected, put material in the center of the bed) and it came out perfectly. Thank you again!
5 Likes