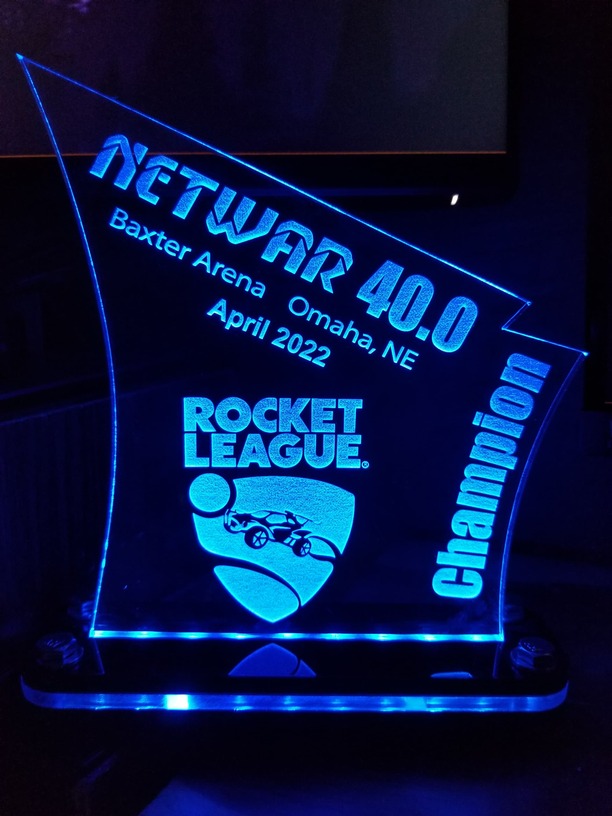
I was working on a few acrylic projects a few years ago and was asked if I could make trophies. So I made the awards and didn’t like the LED bases out there so I made my own. Bought some LED string lights, cut some pieces, bolted them together and Boom a USB powered LED base with a remote to change the colors and how they flash. Now I’ve made them for every gaming event in the last 4years.
37 Likes
That looks great!
1 Like
That looks awesome! Would you mind sharing the SVG please?
2 Likes
Hello and welcome to the community. It is against forum rules to ask for files. If the OP wishes to share their work it can be posted in the Free Laser Files category here on the forum…or, they can add a link to their online store on their profile page.
4 Likes
Nice work! I bought some designs for edge-lit displays and discovered how important it is that the designer tailor the shape to allow the light to reach all parts of the design. Several of the designs I made were unlit in enough places to be unusable. Since people usually only share the ones that worked, this particular challenge is not obvious to the casual observer.
Which is why it is worth noting that you’ve done a great job there of making the design visually interesting while still managing to provide a path for the light to reach the furthest corners.
Looks good! The ones I have bought lately have oversized slots and no matter how I fill them light seems to leak out at the base. They must like them if they keep coming to you every year for more. Great work!
I saw “Netwar” and thought it was a gaming event, but then I saw the car in the trophy. What kind of event is it? And have they actually had 40 of them?
5 Likes
Some of the most memorable sushi I ever had was in Omaha - of all places!! Blue in downtown. Been there a few times. They had a place closer to my customer (if you’re local you probably know who that is) and we would go to lunch there, but it appears to have closed.
Google is your friend. Yes, gaming convention.
omaha has a lot of great food (and not just steak). i’ve been there many times for work (my company is headquartered there).
That is so true.
2 Likes
I prefer the 1/4" acrylic, and I dialed in the thickness of the tab by engraving both sides of it to fit. That way the slot is completely covered. I also like the thickness so I can engrave deeper as the design gets taller to better illuminate all of it.
5 Likes
Ooh, those are great tips. Thanks!
Just curious, has anyone tried polishing the edges and of so what was the result?
3 Likes
I see. My bad. Thanks for letting me know!
1 Like
Sweeping a propane torch across the edge will ‘flame polish’ them. That’s why the laser leaves a nice edge. Don’t deposit too much heat too fast or the corners/edges will start to round.
For thinning the tab, I found registering the acrylic on the bed when you cut out the shape allows you to just flip the shape in the hole it was cut from works well for alignment.
This is what I dug out of my notes for thinning the tab; Full/905/340
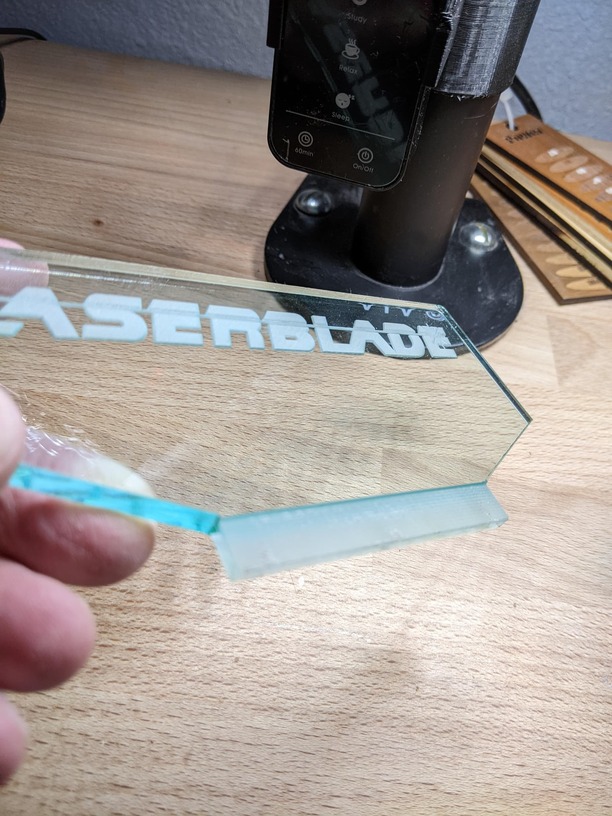
Dial the settings in on a scrap!
8 Likes
Nice to get the retuning customer. Good work!
2 Likes
NETWAR.org is a (Non-Profit) LAN party that has grown from a persons basement with friends to now filling the floor of an arena with over 6oo gamers. They usually have about 4 game tournaments and throw in case mod and trivia contests. And this IS their 40th event coming up!
About the design… Part of lighting the acrylic boils down to the LED strip, aligning the strip with the slot and what I call knowing the angle of the light. The LED strips I use are smd5050 tightly aligned so I get at least 9 LED chips in a 5.5 inch opening/slot. With the bright LEDs lined up with the slot you get maximum brightness. I use to use the $5 strip lights at 5below but I would only get 5 LEDs in the opening. Then the Angle. You will always get the best light straight up from the LED chip but you still get some to the outside edges. It’s a fine line how far your design should go wider than the slot in the base. I’ll never say I’m a super expert but I’ll probably start showing a few more fun things I’ve made some time soon.
3 Likes
Those are good tips and I prefer 1/4 inch acrylic too. I’ve had mixed luck with etching the tab. I think it maybe because the cast acrylic is not always even thickness. If you use a digital caliper, I’ve some variences from one side to the other.
I’ve even used a tabletop belt sander from HF. Sanded with the slightest angle so as you slide the sign/award in, it gets tighter. You just cant bevel it too much or you loose some of your light.
3 Likes