This is what worked for me.
CUT
Masking OK
Speed 200, Power 100
ENGRAVE
Remove masking
Speed 1000, Power 40, LPI 675 (Pass 1)
Speed 1000, Power 10, LPI >= 225 (Pass 2 to erase discoloration, if needed)
In this image you can see how the engrave has some pink in it. If you don’t see this or it doesn’t bother you, no need for another pass.
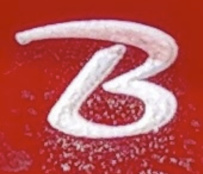
You can get a very sharp engrave with this stuff. This is a .25" test object engraved at 675 LPI.
