The only thing causing confusion is the middle of your three yellowish lines.
I think that clipping paths work like looking through a paper towel roll. The only things “visible” is the part inside the tube, anything outside the walls of that tube would not be visible.
This could work for any shape. But still confused why one of your lines is pointing within the “visible” area
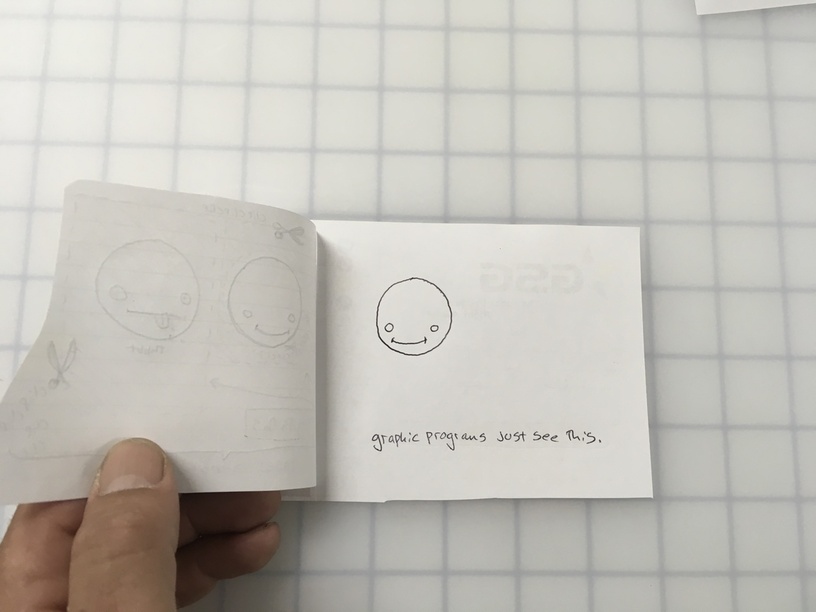
Ah yes, you are correct. However the GF sees ALL the yellow arrowed parts since it knows nothing about postscript masking, and doesn’t have a concept of masking at all (if you have 2 paths on top of each other you get 2 cuts at the same place, rather than a postscript printer which does have Z-masking and only prints the visible parts.
We need to stop thinking of drawings as images, but rather a collection of instructions, so on that image there is a set of instructions to draw the minuteman and a second set to draw an oval and they are independent of each other as far as the GF is concerned.
Now this is the true boolean crop where you eliminate the part outside the circle, the GF would cut this one correctly, since on select all you note there are no points outside the circle area
Thank you @henryhbk, I think I “get it” now. You actually have to delete the parts you don’t want to be engraved or cut, since “hiding” things in the editor won’t translate to what the laser “sees” and will engrave or cut. The clipping path is the boundary that will determine which part is hidden and which part is visible in the digital file, but does not delete any of that information, just hides it.
welp, this was certainly true. After @henryhbk put it in a graphic format, I re-read the explanation from @hansepe and @henryhbk and they both make perfect sense to me now.
Glad it helped. Yes if you look at all the little icons on this panel each one does a different boolean (of course Adobe has to name them differently than every other CAD program on earth) so you can end up with unions, and any difference you want. It’s best to just experiment with an image and a circle over it like I did. And I’d take a screenshot of each combo so you remember what each one does to an image…
BTW: have to give credit to the insanely awesome @Jules for being a fount of knowledge for illustrator as I have had my PRU, since illustrator is one of the most opaque programs ever (the good/bad news is it can do anything with paths).
The clipping path is essentially the lines along which you would cut with scissors if you were working with a physical drawing on paper, and cutting shapes from it. It can be a solid shape (like a rectangle) or it can be a compound shape (like a rectangle with a hole in the center.). The digital clipping path does not actually cut that part of the image away, it just hides it. This makes it a non-destructive editing method that is fine for representation onscreen.
The laser, though, does not understand the clipping paths, so it throws the error. This is better than if it just cut/engraved everything that it saw, as getting an error and fixing your file is probably better than ruining material by cutting all sorts of data that you did not want.
edit: wow, that moved along quickly while I was making my little drawing
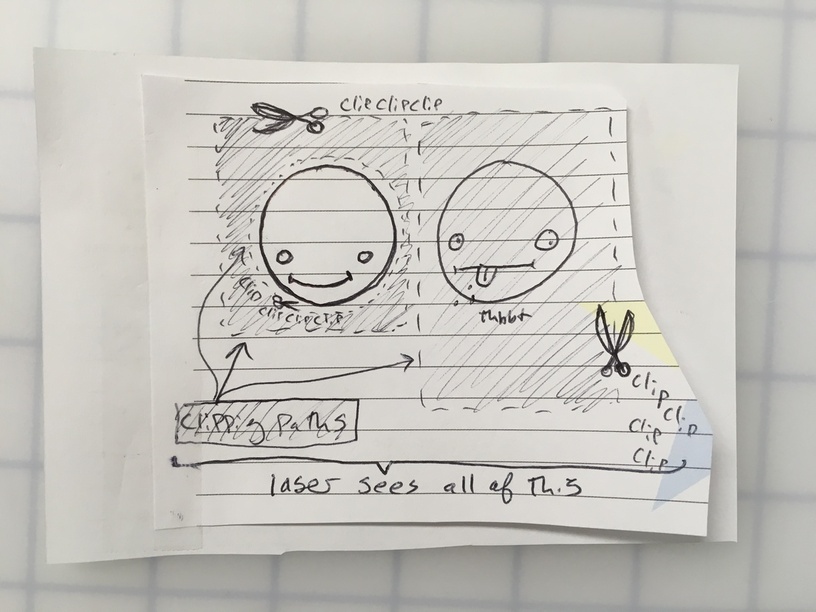
This brings up a good question though. You are showing three clipping paths. Do they automatically work together? Or is it essentially the most recently made clipping path is the one that is ultimately chosen for the graphical editor?
If they all work together, I’m confused as to what the final picture would be, post clipping. (my best guess is two rectangles with their smiley faces, the inner circle one on the left side would be essentially ignored.
If it works where the most recent one is the one used, then your “output” makes sense assuming that the circle was the most recent one created.
Sorry for the scribble. It made sense to me while I was scribbling, but now I see how poorly thought out it was.
Clipping masks are made with clipping paths. I am essentially showing two “clipping masks” (the shaded areas) with the arrows pointing to the clipping paths that define said masks (the imaginary scissor cut-line).
The full rectangle is a “simple” shape, with a single clipping path /cut line. the whole rectangle is masked.
The rectangle with a hole in it is a “compound” shape, made of two clipping paths; outer rectangle and inner circle. Depending on how you set up your mask this could either be used to only show what is in the center hole and block the rest of the rectangle, or it could be set up to block the center hole and everything outside of the rectangle.
here is a fairly well written tutorial by someone who presumably re-read and edited before posting away all willy-nilly:
as an aside, using the term “masks” in this context is kind of confusing to a laser newbie such as myself. We’ve been using masks and masking as terms for putting a layer of material onto the object we wish to laser in order to reduce “flashback” or soot (i.e. masking tape).
I think that when everyone is using the term masks in this context, they are referring to “hiding” part of the image?
for example, when you say “define said masks” in your second paragraph, are you actually saying “define the area to be hidden or revealed”?
Remember photoshop and illustrator come from the publishing world, and the publishing world was traditionally photographic based, so these terms come from photography (you put mask on top of the photo paper to block exposure). The problem is if you never developed film photography pictures yourself, many of these terms seem meaningless… Especially when applied to other disciplines.
FYI to everyone who might be struggling with defining terms. The author that @jbv linked to has an EXCELLENT definition for masks.
“The term “mask” is used in digital compositing to represent elements which are hidden or partially hidden from view. Both clipping & layer masks perform similar functions: they show/hide pixels in a non-destructive manner.”
The “non-destructive manner” part speaks directly to what @henryhbk was talking about earlier.
The terms are related, in that weird way that historical physical terms get transferred over to thier digital counterparts.
the digital “mask” in photoshop hides bits of the images from our eyes…
the paper “masking” on materials hides the surface from the laser (and also from our eyes).
…and again, I am too slow!
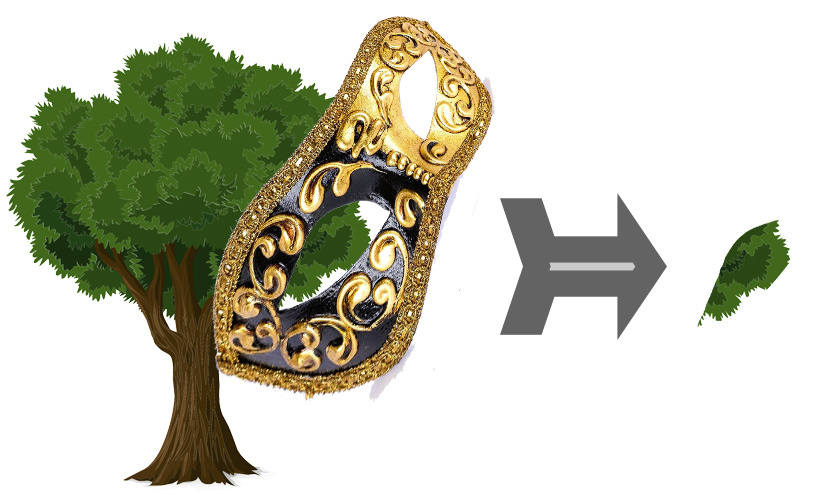
Think of photographic masking as literal putting a mask over something (so only the eyes are visible). So same concept of putting a mask over the tree pic yields the eye shaped tree pic.
If anyone is still confused, there is a slightly different way to twist the analogies made here which I thought of while reading the questions, but the various portions of it are already present in descriptions, so I won’t bother risking re-confusion by explaining it yet again. But I can help clarify anyone who remains confused.
Clips/Masks are some of the most useful tools for creating graphics. So any time you use someone else’s artwork for your own engrave, just operate on the assumption that there is a clip/mask at play somewhere, and try to eliminate them immediately.
In inkscape, this would mean doing CTRL+A to select everything, then right click and look to see if “Release Clip” or “Release Mask” options are available to you.
While you are there, it is probably in your best interest to check if there is a bounding box around what appears to be blank anywhere, and Release Group on everything as well.
OH! I get it! Thank you. Now recalling the image that I was using, that makes perfect sense. Thank you for stating it simply enough for me to understand.