I just cut out a leather clutch from the catalog (Proofgrade Heavy Leather), and peeled off the masking. Before I assemble it, I would like to clean off the char and dye the leather. I tried washing off a scrap in water with orange pumice hand cleaner and it worked great. My question is, can I do this with the clutch without the piece shrinking? The clutch design is the Better Together clutch where the leather sides have tabs that interlock with each other.
Any tips for even dying of leather are also appreciated. I have a set of the water-based Eco-Flo dyes and I wanted to dye it a pale green.
when I made the Better Together clutch, I rinsed the whole thing in the sink with warm water and scrubbed the cut edges with an old toothbrush. That got rid of the char and the bad smell. Then I pressed it between layers of towels for a little bit. I “assembled” it while it was still damp and dried it over the defroster vents on my truck’s dashboard on the drive home.
I had engraved designs, but didn’t do any other finishing.
A week or so later, my Girlfriend brought it with her on a trip, in a checked bag, and something must have rubbed hard against it, because when she unpacked it there was a large discoloration/scuff across the front.
I wash my leather with ordinary dish soap (Dawn), and scrub the burnt edges gently with the scrubby side of a regular dish sponge that I’ve dedicated to my laser projects. The dish soap is gentle, and does not risk drying out veg tan in the way that many other cleansers will. Your leather should not shrink from washing, and as long as you wash the surface gently (without a lot of pulling or stretching) the shape should not be distorted.
FWIW, I usually set my wet leather pieces outside on a towel for an hour or so, just to let them air out a bit and lose the burnt leather odor.
Dying techniques are outside my wheelhouse, since I really only use dye as a base coat before painting with soft bodied acrylics. You’ll find lots of good input on dye in this thread over on the leatherworker.net forum, which is an excellent resource for LW info.
I haven’t noticed much shrinking doing this. Normal processing for tooling leather is to wet it with a sponge (casing), let it dry somewhat, but not all the way (leather workers go by color and feel) and then tool. This makes the tool impressions deep and permanent. This leads to the main thing you want to watch out for when drying the leather. It’ll pick up the impression or shape of whatever you’ve got it laying on, so face up on something flat-ish. Like Drea, I use a towel.
So far, I’ve only used antiquing so “even” hasn’t been the goal. But to avoid streaking the idea was to keep moving and use circles for both application and wiping.
I’ve not received my GF yet (it’s arriving tomorrow!) but I have made things by hand in leather before. I would be burnishing the edges anyway. It finishes them off nicely. You can get a burnishing tool on ebay for a couple of quid and some gum tragacanth.
Yes, please do! I did wash and dye the leather, and it’s drying on a towel now. Looks pretty good! I’m thinking the next step is to condition with some kind of wax, then burnish edges (do I need to bevel a single thickness of leather? Afraid I’ll ruin it with a beveler since I’m a raw newbie), then assemble.
If it’s veg tan it will take it evenly. I tend to burnish edges after stitching. You’ll need some good quality waxed thread for stitching.
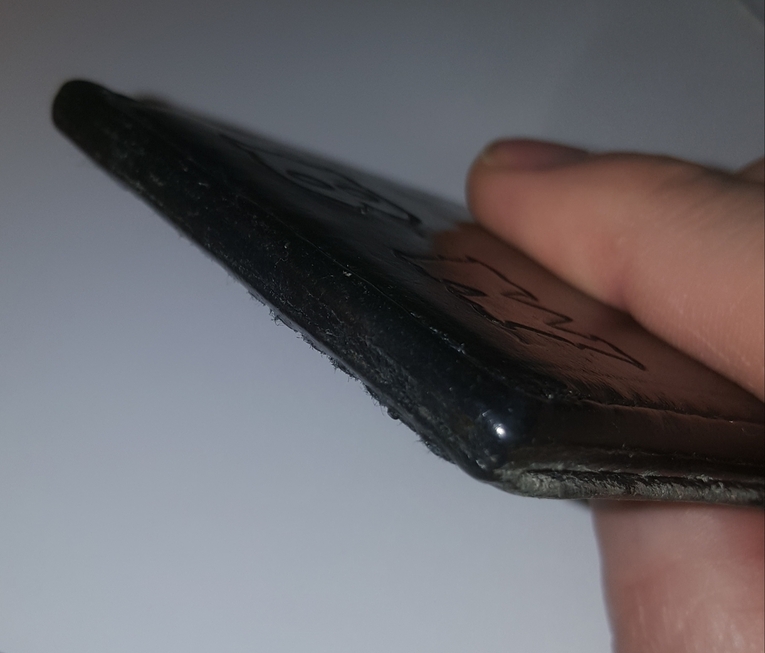
This is 3 pieces of stitched leather that I burnished on a credit card wallet I made about 5 years ago. It’s been in daily use since I made it, it’s all I carry. I can fit notes in it too.
For a few dollars you can also buy a bevel tool. This will make a huge difference to the finished look and make it a great deal easier to burnish. It’s a “V” shape blade that cuts the leather at 45 degrees around the edge. It creates a much better finished look.
Neither did I, prior to owning a Glowforge. Laser cutting leather produces a fair bit of char and sooty bits, especially along the cut edge. Wiping the leather down gently - and hitting that charred edge with the scrubby side of a sponge or toothbrush - helps to take down some of the residue & odor. Done neatly, it cleans that burned edge so that you can hardly see it anymore.
Air drying the piece outside also helps to eliminate some of the smell. As others have so aptly described, laser cutting leather smells a bit like getting a root canal - and some of that scent does linger. Fortunately, a good airing out should eliminate the smell.
Very Clever use of time and materials. I used to cook hotdogs on my headers when racing a heatsource is a heatsource how you choose to use it is up to you.