Alignment issue and camera blur

The allignment seems to be getting worse. Last night it ended up 3/4 of an inch off last night. I even attempted to use snapmarks but the GF didnot theven recognize them since they were so far of (the enclosed picture shows what I had after attempting snapmarks). The GF does not even recognize Proofgrade material due to camera bluriness causing the QR codes to be unreadable…What can I do to fix this?

For support to help you need to start with knowns. Use Proofgrade material with the Gift of Good Measure engraved. If the material is not recognized you can select the material height through the dropdown menu. Include the rulers in the image. Make sure the material is flat. By the looks of your Snapmark scores it looks like the focus is way off or the power is really high.

The reason you need to provide a more controlled example is because an error in entering material thickness will cause huge errors in excess of what is seen here. For other issues the operator’s file is often the problem. Without the rulers it is difficult to determine the true error.

Your screenshot tells me your camera doesn’t look blurry (beyond current expectation). Most often the QR code simply gets obfuscated by light reflecting off of the shiny label. You’ll probably find if you move the sheet slightly up/down/left/right you’ll find a position where it will detect properly. Sometimes it comes from the 'forge’s LEDs themselves, sometimes room lighting. So you can try turning off the lights in the room. Alternatively you can select the Proofgrade material from the dropdown.

For any true testing of your alignment, you’ll need to use Proofgrade material with its associated Proofgrade settings.

Thank you for your response. The Snapmarks were done on proof grade draft board scraps and and I selected it in the drop down menu. The material in the middle was not used at this time, the visible black image was set to ignore as I was attempting the snapmarks on either side of the intended material. I have had the same non read issue with brand new snug fitting sheets…Tonight i will try raising it to see if that helps…Anything else I can try?

Thank you for the reply…The snapmarks were done on PG draftboard and that was the setting I chose from the drop down…The material in the middle was just there to setup for the next step of printing…to get it to print on that material I had to shift down 28 (I based this number on the number of clicks it took to get the pink symbol over the scored ones. I will try the ruler tonight but with knowing this was PG material a
re there any other sugestions?

Don’t raise Proofgrade. Then you’ll falsely report the distance of the material from the head. Proofgrade should be flat on the tray. Flat is important. Make sure there’s no warping. A series of flat neodymium magnets can help with that if needed.

1 Like

Sorry I miss spoke. I meant raise it from the bottom line not off the crumb tray

1 Like

Ha! Okay. Good.

Yeah, it’s hard to describe movement in 3D space sometimes. I realized the same thing when I said “up/down” above. :slight_smile:

You may want to try a lighter score setting for the snapmarks – in the image they look pretty burnt in, which may affect their detection.

Also, how are you making sure that the snapmark scraps are not moving? Since they are not scored into a single contiguous piece, any movement (in x, y, or both) could render them useless, since their spacing and orientation would change.

3 Likes

You can’t just arbitrarily place Snapmarks on scrap. Their location needs to match exactly where they are in the design file.

2 Likes

Yeah, i agree with @dwardio & @jbmanning5 here…I’m not sure that’s using the Snapmarks correctly. The marks need to be burned onto a fixed jig, not separate pieces of scrap. The distance between the snapmarks as burned on the jig, and the distance between the snapmarks in the file has to be exactly the same for the snapping to work.

The other thing is you need to be Scoring the snapmarks onto the jig, not engraving them.

Try this:

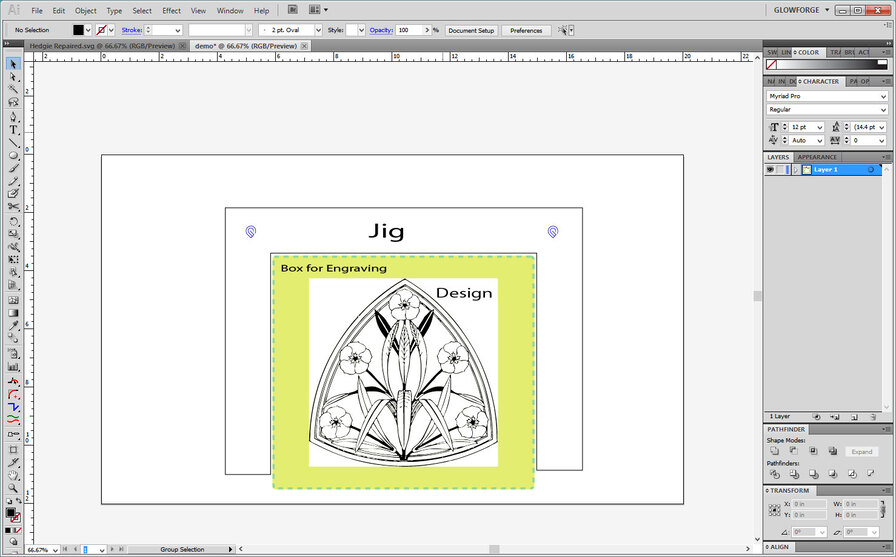
Create your file, cut a jig shown like the one below (or you can make it a completely closed rectangle and just drop the box in for engraving.)

The file should contain the jig, the snapmarks on the jig, and the design that goes onto the box or whatever it is you want to engrave.

  1. Score the Snapmarks on the Jig material.
  2. Cut the Jig.
  3. Remove the cutout and drop the box into the hole.
  4. Set the Snapmarks and Jig Cut to Ignore.
  5. Engrave the design.

If you want to reuse the file, you keep the Jig with the Snapmarks scored on it.
In the file, you can change the Design in the file, but do not touch anything else. Leave the jig in there for aligning purposes, and leave the Snapmarks. Only change the Design part.

Then:

  1. Put the Jig in the bed.
  2. Snap the new file to the Snapmarks on the jig.
  3. Engrave the new design on the box. (Rinse, Lather, Repeat.) :smile:

There are detailed notes on using the Snapmarks for various functions here:

3 Likes

My camera isn’t recognizing the proof grade either and the alignment is off a bunch to! Hopefully you get some answers!!

@kaanke05, if you are having alignment issues that are off by more than 1/4" you’ll want to create your own Topic in the Problems and Support section so that support can assign a ticket to it for analysis. It helps to show an after-print screen capture shot of the alignment being off, with the rulers included in the image. Helps to give them the date, time and time zone of the problem print as well so they can search the data.

I’m going to close this thread. The Snapmark feature is still in beta, so the support team can’t help with troubleshooting yet, but you can receive support here: Introducing Snapmark (September 2018)