This is awesome! Thanks for sharing your settings. A friend asked me to do luggage tags so I am grateful that I found your post. Do you mind me asking whether or not you used a jig? Or did you place the anodized aluminum tag directly on to the crumb tray without a jig? Thank you!
With the new calibration you can eyeball things into place. Make sure to use the Set Focus first before aligning your art.
I did use a jig when I made this before we had set focus. I cut the jig from cardboard. The pieces sat on the crumb tray once I made the cutouts for them.
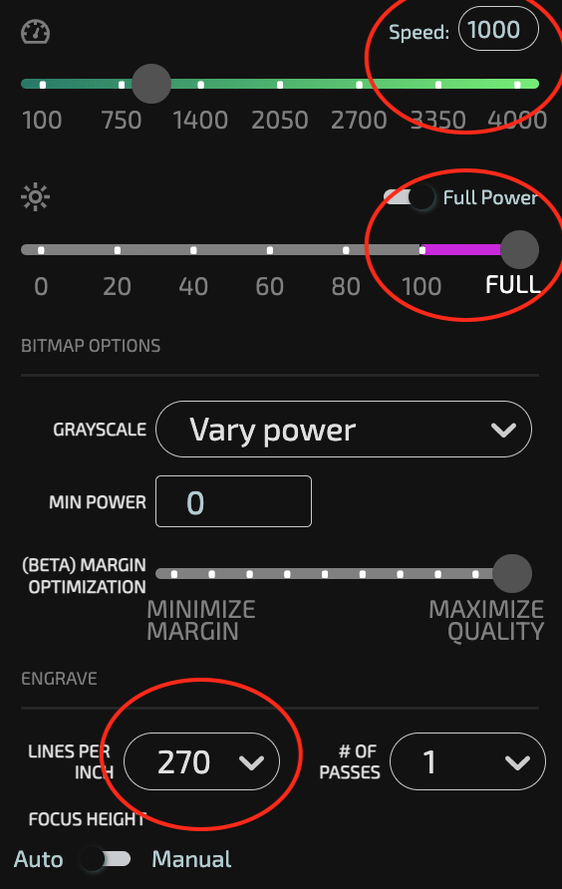
For settings I’ve been using 270 or 340 lpi and have been happy with the results. Full power and speed work great on the anodized tags.
I am super new and not sure what settings to use. I know you listed above but at the same time I am not sure what it mean in relation to what I am seeing on my end. Can you help me out.
The first number is speed
Second number is power
Third number is LPI…lines per inch.
The OP also stated that he gets good results from 270 or 340 LPI.
Some testing would be a good idea for you to find the settings that give you the best outcome.
For anodized aluminum you don’t need to use masking, there won’t be any soot or anything to clean-up after.
I use “Set Focus” under the “More” menu (the 3 stacked dots) and let the machine set the focus. Use Manual settings and choose speed 1000, power to 100 or Full, and LPI as required. I generally use 270 LPE, but as I noted for this one I used 675 LPI. That was probably overkill
Give it a shot. I use the same settings for dog tags, key chains, bottle openers, etc. Anything that is anodized that I can fit under the laser. And I always use Set Focus for the height since that allows you to place your graphic better when the interface knows exactly how thick your material is from direct measurement.
Although I generally agree with using “set focus” for placement, I’ve not had much luck on the gloss black anodized “business cards” I’ve engraved (or other gloss black material for that matter). For those I use my modified version of the snapmark ruler. I’m kind of in the habit of doing that now for any anodized or reflective material.
I recognize that many don’t have snapmarks, and some may not even know what they are. They are covered in the support pages, for those that are curious.
If you have difficulty, I think a piece of tape/masking on a similar item placed adjacent to the one you want to print on would work.
This is the only time I might use a small piece of tape to aim at. A lot of times another piece in a different color solves that too for Set Focus.
You can always sacrifice a piece of paper or cardboard to make a template to locate your part on the bed and just use a manual height setting. I very rarely have to resort to this.
I’ve never bothered making a modified version (or any version actually) of the snap marks ruler. It is just another thing I’d never find when I need it.