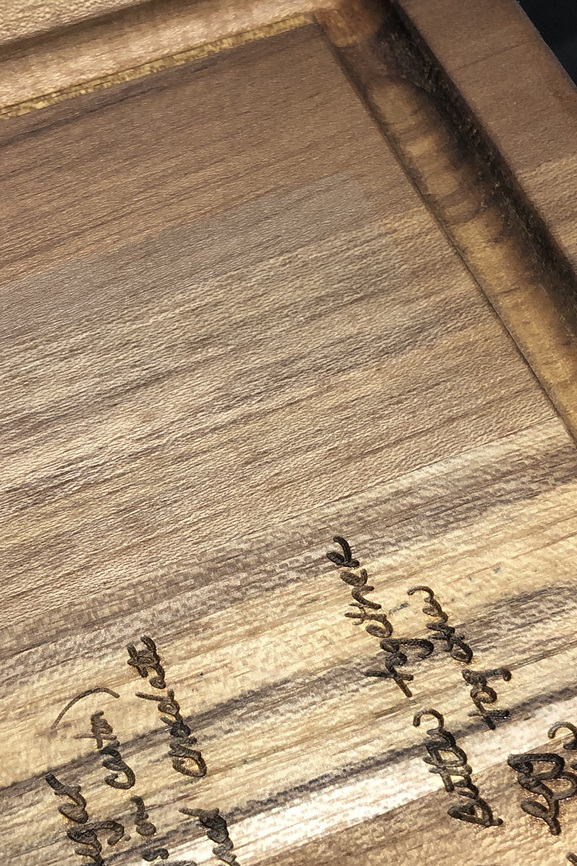
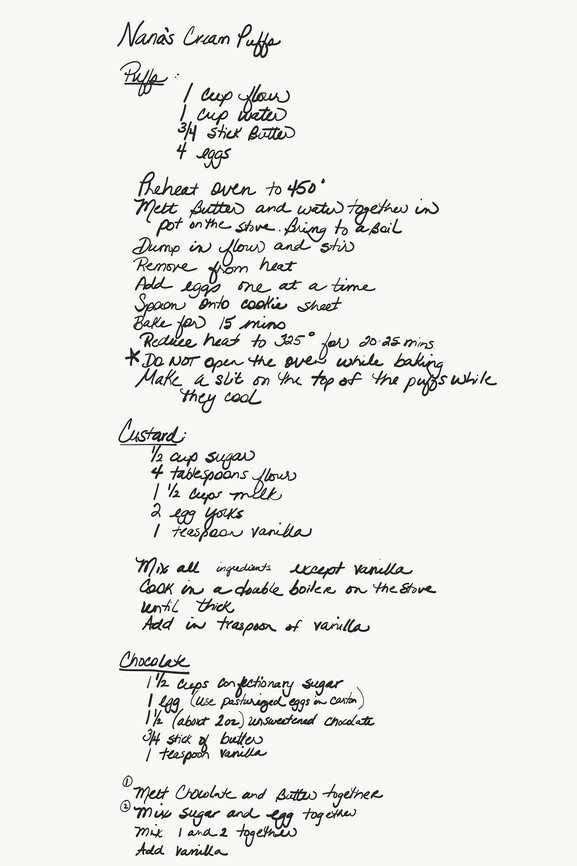
Today I engraved my very first cutting board. I think that the image saved the white background so it transferred that to the cutting board. I wrote out the recipe on my iPad and then saved the file as a .png
The cutting board is Teak wood so I was unsure of the settings to use. I just selected “GF Maple” to engrave. It’s on SD Graphic also.
Should I have tried to remove the white background?
I’m not completely worried about this cutting board… it’s for my son and he’ll love it no matter what, but I just would like to know what I might have done wrong. Any help would be greatly appreciated!
Well… I didn’t “turn it Black and White”… .I just left it as the png file that I wrote it out as. Should I have brought it into photoshop and made it black and white? Here is the actual file… (It does look a little cream color for the background.
After going back and looking at your photo, I see the area you are concerned with, so yes convert to black and white. Sorry I missed it originally, but it still looks fantastic.
Thanks! After I looked at it all I kind of figured that is what happened. I think it’s all going to be fine for my son, but at least I know what to do for next time.
If by this you mean truly turning your image into two colors, either white or black:
This will fix your problem, but might have slightly negative effects on the edges of your words, as it leaves no room for aliasing the edges of the text.
That said, if your image is high enough resolution, the aliasing might not matter.
If I were you I’d just make sure you replace the background with actual white (or transparency).
Thank you! I actually added my Nana’s signature to the cutting board and changed that to a true black and white image and it worked perfectly! Lesson learned for any that I do in the future! I am so thankful for everyone’s help here!
I usually advise that cutting boards not be used after engraving since the engraving will catch and hold food debris. For cutting boards that can be used, I recommend engraving the back.
The cream isn’t just a black/white problem. To make sure the bg doesn’t engrave it must be entirely white, just making that image black and white/grayscale would make the cream a light gray that would still engrave a bit. Since you have Photoshop at your disposal - adjust the levels. Or in your iPad creation app make sure the bg is pure white before you begin
Most likely he will just stick it in the closet and hold on to it for the rest of his life. haha… he’s a minimalist really, but is super sentimental. Because it has both my handwriting and then I added my Nana’s handwriting he won’t touch it to make sure nothing happens to it. He loves to bake and cook and is amazing at it. He’s only 19 but shares the same birthday that my grandfather had. This was also the first recipe he learned to bake. So… lots of connections, but not even sure he will display it.
If you plan to use it as a cutting board, you will want to engrave on the back so its primary use is a cutting board. If you plan to use it as a display piece, engrave either side. A cutting board with a blood groove should be engraved on its smooth face so you can still use the grooved side, which is the front.

 )
)