New Glowforge owner here. We’ve been having a great time learning how to use our new machine.
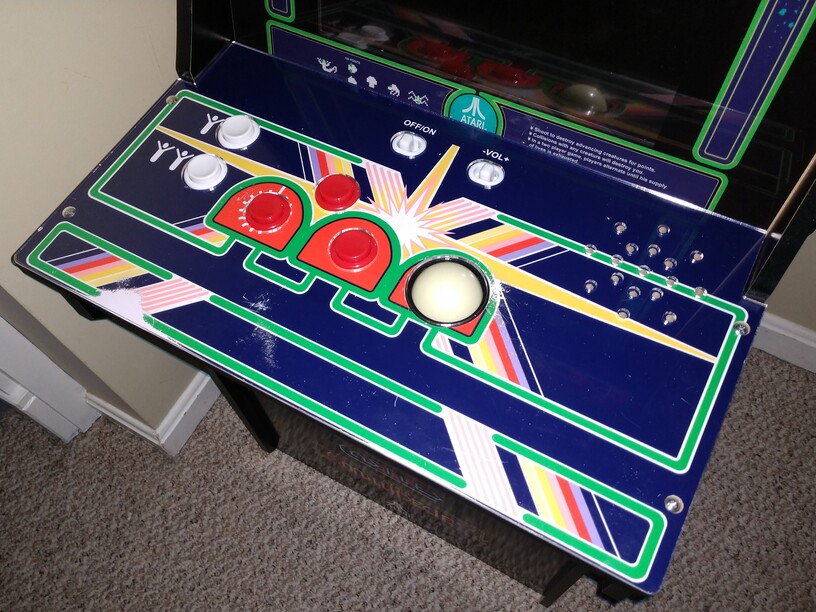
For Christmas 2018, I had purchased my wife a Arcade 1UP Centipede 3/4 sized arcade. It gets used quite a bit, and has been showing some wear on the control panel around the buttons and trackball. Recently my wife mentioned that she hasn’t been playing it as much as usual as she didn’t want to damage the graphics any further. Glowforge to the rescue!
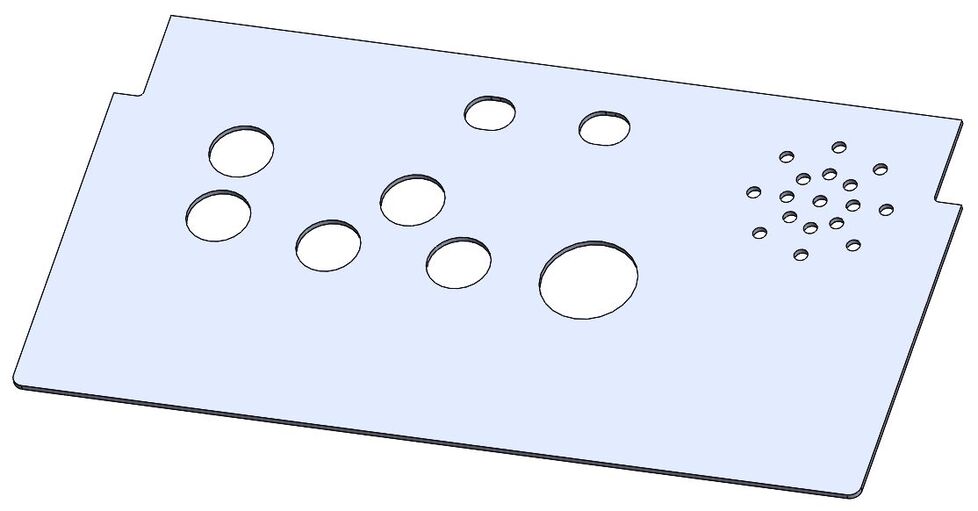
I started by removing the control panel and 3D modeling it in SolidWorks. Once I had duplicated the outer profile and added the holes for the speaker, track ball, buttons and switches, I created a 1:1 drawing in SolidWorks on a custom sized sheet of paper (instead of 8.5x11, 11x17, etc.) that is the same size as the bed of the Glowforge. I saved the file as a 1:1 PDF file, and opened that in app, dragged it and dropped it in the very middle of the material. This is a tight fit, and was just inside the cutting envelope of the machine. The PDF file is attached if anyone else wants to make their own. I should have done this when it was new…
Great save. Laser to the rescue for a vintage game.
That’s awesome! (I have a full sized Centipede arcade game., hubby has a Battletank game.)
OMG that was the only video game I was good at (my wife was an honest to god pinball wizard). The trackball was perfect - used to use one on my desktop for years.
I’m so jealous you have one. Really nice job on the plate though. Looks like it belongs to the machine.
Thanks for the kind comments!
This is a 3/4 sized machine - they sell them at Walmart:
Or they used to…
Oh no! I need self-control 
Great idea!
Nice work!
This is on my to-cut list as well. I own a bunch of vintage coin-operated machines, and recently bought the Arcade 1UP Tempest cabinet. Other projects have prevented me from setting it up yet, and the box is actually serving as a temporary table for my Glowforge while I move some other machines around my shop.
I’ve also been meaning to cut a control panel to build a nice two-player MAME console running on a Raspberry Pi. You can actually convert these Arcade 1UP machines to MAME fairly easily if you get the right video adapter.
Oh, and don’t kick yourself for not protecting the panel from the get-go. No self-respecting arcade machine has a pristine panel. (Maybe it’s a Velveteen Rabbit thing…)
Thanks!
It does look more authentic with a bit of wear. This should help prevent further wear.
The longer term plan was to convert this to a MAME cabinet. I’m glad to hear that there are video adapters available. Part of the reason for making this cover was to measure and see if it could be laser cut in one piece. I’d like to make a alternate panel with more control options, or make them quickly interchangeable, depending on what game is being played,
Yep. You should have no trouble doing a nice conversion. A friend of mine has the Galaga version and already did the MAME conversion. (He bought a new panel cutout shortly before I got my Glowforge.) It didn’t take him long. The video adapter was about $30 - $40, which is sadly necessary because Arcade 1UP uses some non-standard interface. And of course you’ll need the Pi and an arcade controller kit.
You’ll spend most of the time and effort loading up ROMs.
It’s so nice to see the old classics coming back around.
Fantastic use! Great work!
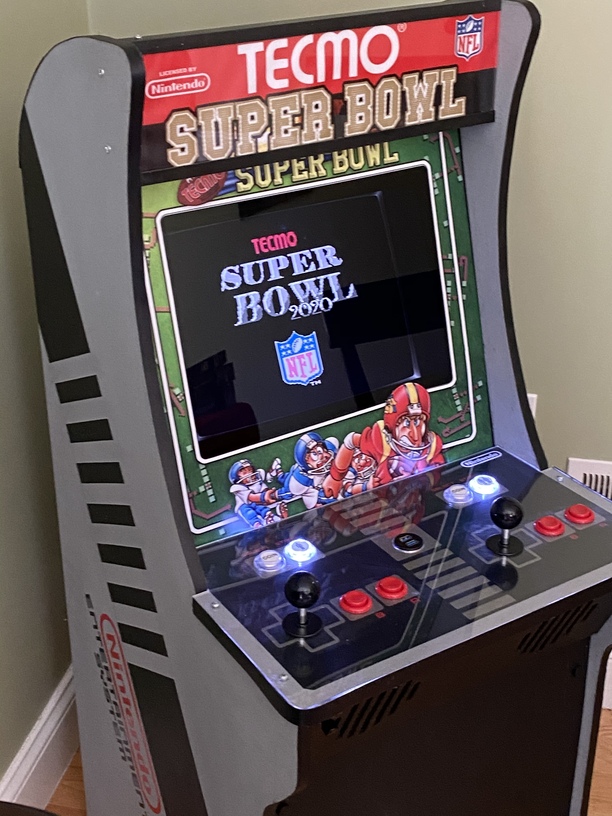
Very nice!! I’m currently building a 3/4 size cabinet from scratch (using an Arcade1up cab as a template). It will be a Tecmo Super Bowl cab.
I used my Glowforge to make the control panel (3 layers of baltic birch) and the acrylic top.
I  this thread.
The first thing I think of when I see this is Up Down Up Down B A Select Start…
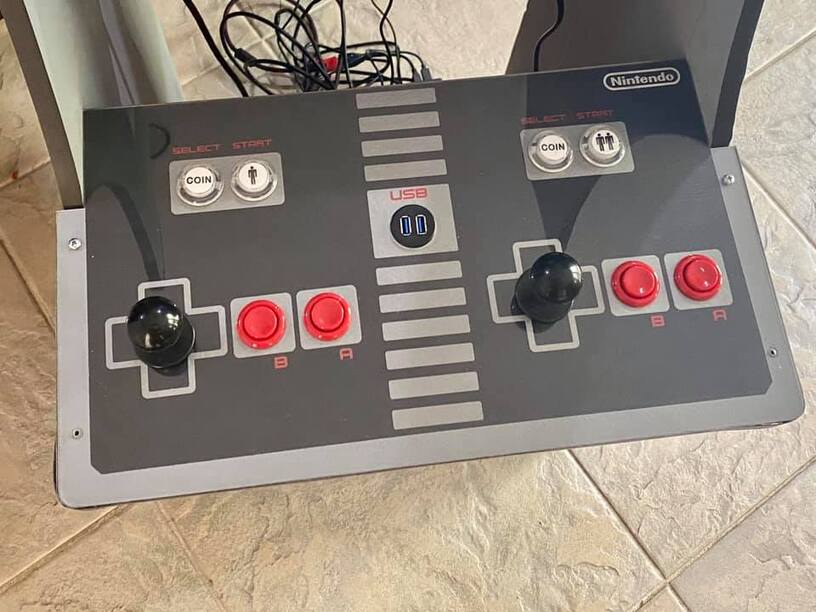
Great graphics & clever integration of the USB ports. Do they allow the use of other handheld controls?
Will this be a MAME cabinet?
Thanks! Yes., you can use old style NES controllers or SNES controllers by plugging them into the USB port (or any USB controllers for that matter)
Rather than running MAME, it’s running a few Nintendo emulators (NES, SNES, etc) to keep it on theme.
The main game however is Tecmo Super Bowl, including the versions with current rosters…
You had me with the graphics on your cabinet and control panel. That is just incredible. How did you manage to make that? Did you cut stencils or masking, or are those decals, or…?
Thanks!! The stripes on the cabinets sides and the gray border on the console was done with masking.
All of the other details were all done with vinyl using a Cricut.
Cricut is one toy that I somehow don’t own yet. Thanks for the details. This is really excellent work.
Wow, that is impressive. I got my wife a Cricut and she used it a couple times, but now it is in the corner gathering dust…
Nice! I built my barcade before I had my GF but looking to incorporate new parts in a re-design of the control panel. 2 joysticks and 8 buttons each leaves a lot to be desired. I want a Tempest spinner and a trackball, so re-doing the layout and WILL use the GF to cut parts.