This isn’t a Glowforge project so much as it was a project where I used my glowforge (and a 3d printer) to create components.
- Video demo/walkthrough here: https://youtu.be/hh8N5mQOfNc
- Photo of the juicy stuff: Reed Switch and Battery Pack Closet Light - Album on Imgur
My hallway closet is dark and kind of hard to see into. I wanted to add light, but there’s no power in the closet and I don’t feel nearly qualified enough to run my own power through my house. I also didn’t want to have to flip a switch on and off for the closet light.
After a few months of noodling on the design, I finally built it this weekend:
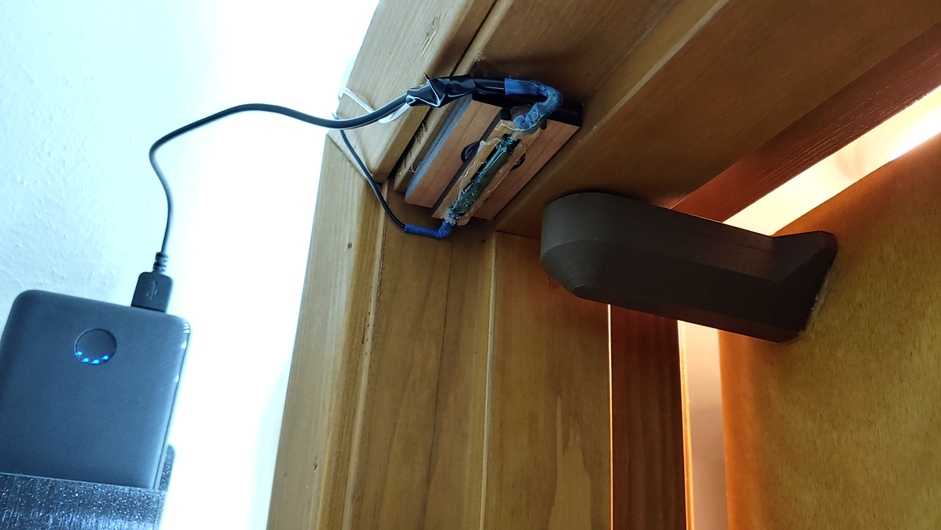
- 5m USB-powered white LED strip, lining the back of the door frame
- Powered by 10,000ma USB battery pack mounted to wall in a 3d printed casing.
- 3d printed “door arm” with a magnet embedded in the top mounted to the top corner of the door.
- Normally closed reed switch (sort of, I’ll get back to this later) mounted in a lasercut casing, mounted to the top of the door frame.
Now, when the door is closed, the lights are off. The moment the door is opened, the lights come on!
I originally was thinking about a motion or PIR sensor, but that was going to draw power constantly. I did NOT want to have to recharge the battery every week or two. That’s when I came up with the idea for using a reed switch - it shouldn’t draw any power unless the lights are on. Since it’s a closet light that won’t be on very often or for very long, the battery should last months.
I needed a normally closed reed switch, but all the closed ones I found on digikey maxed out at 700ma. The battery outputs 2.4A… so I was pretty sure that wasn’t going to work. I found a normally open switch that operates at up to 3A, and I discovered you could flip the reed switch from normally open to normally closed (or vice versa) by permanently adding a second magnet. Which makes sense!
So I used my Glowforge to lasercut a small wooden enclosure for a magnet, then a small enclosure for the reed switch, and dumped a gallon of hot glue into it then mounted to my door frame.
Like I said at the beginning, it had been a long time since my high school electronics class. So long, in fact, that I forgot about the value in using consistent and standard colors for my wires… So I present to you, a red wire that turns into a white wire that turns into a black wire. Because I’m an idiot.
But other than that mixup, I’m very happy with the result. It works great and looks better than I imagined.
The two big things I’m watching for right now:
- The battery pack overheating (since it fits pretty snug in the 3d printed casing). After a straight hour of being on, it was still room temperature, so I don’t think this will be an issue.
- How long the battery pack lasts. The LEDs draw so little power, and will be on so infrequently, I think my biggest enemy is going to be the battery naturally losing charge over time. My estimate, based on the manufacturer (Anker), is this should last between 3-6 months. I’m okay charging this system 2-4 times a year.
Any questions?