I’m very new to woodworking and staining. I got some 3mm B/BB Baltic Birch from a local supplier and would like to use it for a multilayered project with different stain colors.
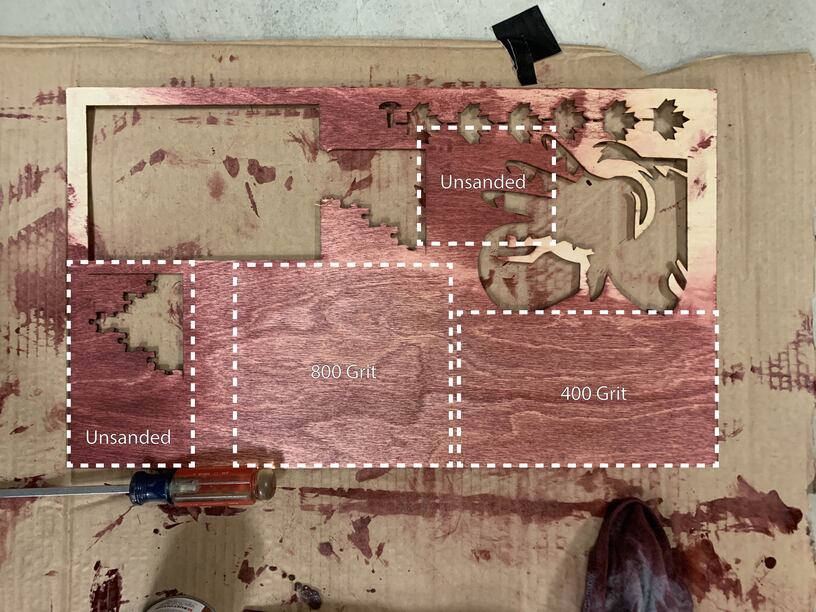
I got this cabernet colored Varathane stain and I love it on the unsanded birch, but it comes out a lot lighter on sanded wood with tons of black lines showing.
Applying multiple coats (before and after sanding) doesn’t really change the color of the sanded sections. (Also, I should note that 240 grit gives almost identical results to the 400 grit).
Is there a way to get that rich purple color of the unsanded version but have the smooth, professional finish of the 400 or 800 grit?
I’m not the expert in sanding for sure! I do have a couple of testing things to try though
Not sure if “Applying multiple coats (before and after sanding)” includes sanding and cleaning prior to even the first coat - if not, that’d be the first thing I’d try
Adding a top coat may bring out the colour more - something as simple as tung oil, or a full on lacquer tends to bring out the colour of the wood.
The lines you’re talking about are the natural wood grain your stain is trying to bring out…you may want more of a dye than a stain if you want to hide the grain - or fall in love with the grain (which is what I do)
Most BB has a “fuzzy” surface which , and as you’ve seen, the more of that you remove through sanding, the less stain it absorbs. That’s one of its desirable properties that makes it popular for woodworking, especially cabinet making and such, as it gives a very uniform finish across the grain structure.
If you want it darker with a smooth finish, use a darker stain, or choose a different material.
Birch is one of the more softer woods that is not pine. On soft woods with no finish to harden the wood surface, the finer grit abrasives will not have the same effect as with a hard wood or finished surface. Many stains and penetrating oil finished recommend sanding at 150/180 before staining. Finer grit paper will create dust particles that will fill the grain and inhibit the penetration. I recommend using a penetrating oil like Danish or Tung after the stain. These oil finished will penetrate into the surface and harden inside the wood surface. These oils will darken the wood somewhat so that needs to be taken into account. If you are using colorful wood dyes, you would not want to use penetrating oils or oil finishes. There are water based polyurethane finishes that are water clear. Oil based finishes can be applied over penetrating oil treatments if you want a very smooth an shiny surface.
One can get a smoother surface with card scrapers, but it is a lot of work and probably would not be very useful on birch. An additional advantage of card scrapers is that dust is not formed to fill the wood pores.
I’m finally getting over a hand injury and able to try out your recommendations, but I’m still not ending up with something high enough quality that I’d be comfortable using in a product.
The issues I’m running into:
What type of “clear coat” do people recommend for the top coat? I tried this polyurethane, but the surface was still rather rough after two coats and it was more milky than I’d like (though I very well could have been doing something wrong). @JimmyWayneWestie Are you using something like this spray on poly?
I tried out Tung Oil from @deirdrebeth and @jgf 's suggestions. Are a couple coats of that considered finished? It seems softer and oilier than I’d expect.
I got this transfer tape to cover my Baltic Birch, but it pulls up a lot of pricklies that I have to take off with a tack cloth. Is this just to be expected?
Is lacquer commonly used in Baltic Birch laser projects? Is something like this spray on the “clear top coat” people were recommending?
Thanks again for the help! This community has been a wealth of knowledge for someone starting out on their own.
I would sand stepping up to 220 grit, then prestain, then use one coat of whatever oil stain you are using. As to before or after you burn/cut, depends on what you are doing.
Polyurethane when dries, it has a yellowish sheen to it, works well in protecting. I like it, complements lighter stains, but not noticeable when doing darker stains.
Using Tung or Danish Oil, just apply it once or twice, then wipe off the excess and let it dry, works out well. I use it for items like coffee tables or old vintage pieces which should be out of denser woods, I also use Polishing Wax here and there.
Best thing is trial and error and have fun while doing it.
It may not be obvious but I commented on this above. BB is pretty soft and naturally has a “fuzzy” surface. You have to sand the crap out of it to get a smooth finish. It’s quite likely the reason you won’t find it amongst the GF Proofgrade selection, it’s disproportionally expensive to produce a quality finish.
It has its advantages for many applications, but if you want a smooth, hard, natural wood finish like you’ll find on Proofgrade ply and hardwoods, you either need to invest a lot of effort and finishing products, or choose a different material.
It takes forever and a day to fully cure - up to 30 days if you went with pure stuff and didn’t cut it with anything. If it’s still oily to the touch, it’s not fully cured. That being said, you can use stuff faster than that, but the oily-to-the touch feel is that.
Depends on the size of the project. On small items a spray on poly is fine. On big flat surfaces, I prefer the paint on kind, poly will lay down pretty well on its own. I use MinWax for most of my items.
My daughter happened to ask me to make something for her today, so I had to apply a nice finish to a piece of BB (paint, otherwise would have used PG…)
Using spray paint, it took about 8 coats to get a nice enough layer down to sand, then another 5 on top of that. I also sanded it before I started applying paint to get rid of the “fuzzies” mentioned above. It’s probably taken me about an hour start-finish, of course I’m letting it dry for a couple of minutes between coats, then about 15 before sanding.
You can really tell the difference just tapping on it with a fingernail, compared to another unfinished piece I was testing the engrave settings on at the same time. The BB has such a soft surface without finish.