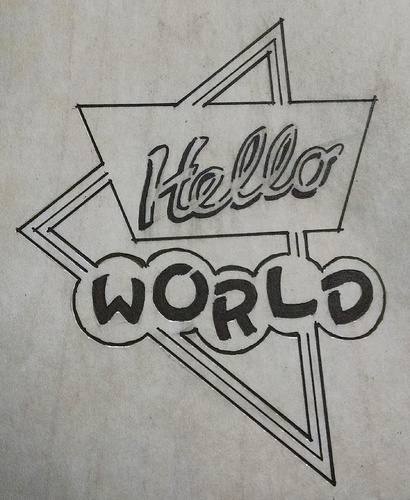
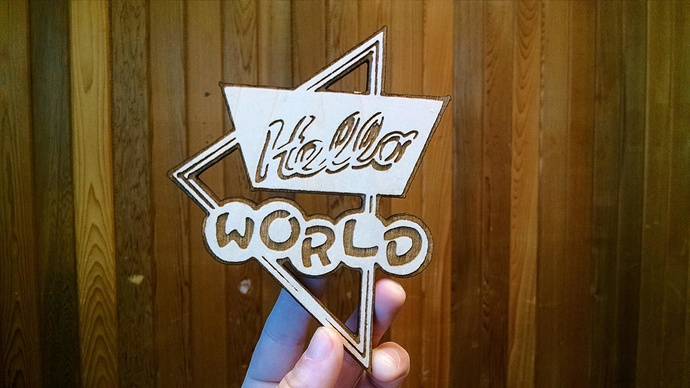
Howdy folks. Here’s my “Hello World” and my first laser cut project! I left gaps in the lettering out of concern that the GF software would recognize the closed shapes as cuts, but it wasn’t an issue. The second photo is my ink drawing on the paper backing for comparison. Need to get started on my second project!


Oops, I forgot to crosspost this from the beta forum! @RyanL and @maryellen work together, so the 'forge there is getting a double workout.
Looks good, thanks for posting the before and after! Did you also paint it?
There are a couple discrepencies between the middle line in the triangle and the engraved output. The most notible being some of the bottom/left line being skipped. Since asking isn’t allowed I’ll just state that I hope whatever caused that problem becomes known and is resolved.
Maybe it’s just that paint got in that part.
My guess, since I know the trace is accurate when using thick lines, is that the line may have been too thin. Thats why its stipulated to use a sharpie…thicker lines
Another Beta! (clap! clap! clap! clap!)
Great job on your Hello World - it looks very “Viva las Vegas”!
This is fun to see! It’s similar to some of the things I have in mind. 
Tha’d be my guess too, except it worked for so many of the seemingly equally sized lines.
I guess the question (that we can’t ask) is similar to when that one Glowforge logo that was engraved: was the flaw present in the simulation?
Seems that would be a hard paint job to pull off. Unless you had a non-dripping brush that you swipe over it without allowing any sag into the lines.
I can kind of convince myself I see wood grain through the white above hello. So I am going to venture that the white cover paper is simply still in place.
Yeah, I see it too. Now I want to know if it is paint or , like jacob said, cover paper still on it.
Or an error. But that what beta is for ;D
Lobe the project! The world welcomes you!! 
You are totally allowed to ask me. ![]() @smcgathyfay is right; this is a thinner line than we’ve optimized for, and it’s the reason we use sharpies. The version of the trace code that @RyanL used is more or less unchanged since Maker Faire, when you may remember errant sunbeams would wash out the image.
@smcgathyfay is right; this is a thinner line than we’ve optimized for, and it’s the reason we use sharpies. The version of the trace code that @RyanL used is more or less unchanged since Maker Faire, when you may remember errant sunbeams would wash out the image.
However, our own @jonathanpark has been hard at work on this, with the help of @dmartinec, and improvements are afoot.
Well, now you two are in the game! Can’t wait to see you solve the mystery!
And this is important. Code - not hardware. Betas are good but not perfect. I’m sure once they start rolling out, the general population will find more. You guys nail the hardware and I will be happy with RTM versions that nail the software. Any thoughts to a beta program after production line is released - at least for major software upgrades?
I hope to eventually see the trace feature accurately recognize a finer line than a sharpie! Reproducing my hand drawn art is likely to be a primary application, and my preferred instrument is a rapidograph.
(I would stop whining if it could do a fine tip sharpie!)
Depending on the camera resolution, a high contrast black and white would seem possible, ideally to approach the resolution of the laser, although that may not be realistic - I encourage @jonathanpark & @dmartinec, applaud their effort and will adapt to what they can manage to provide us!
The ability to update the software post delivery is a great innovation, and another feature that attracted me to the Glowforge.
I know it’s an extra step but you may be able to scan your drawing into the computer and then print with the laser.
From what I’ve seen of line-tracing elsewhere (e.g. inkscape) it seems to be hard to handle both thin and thick lines well in the same image. I would love to have thin lines also, but somehow magically not pick up random pencil marks, erasures or vivid wood grain. Maybe in later software a slider?
I think the GF software will get there. The software that came with our Silhouette does a really good job at vectorizing raster images. My kids will sketch out on lined notebook paper what they want in pencil. Once they have their design sketched out they trace it with a black marker. The marker lines are far from uniform and the stray pencil and page lines are all still there. With a few tweaks of the controls in the Silhouette software they are off and cutting.
Hehe, extra steps don’t bother me much after the “two steps forward, one step back” Cha-Cha I have grown accustomed to across life! 
Ultimately the only limitation is the resolution of the camera - and to get around that, you can draw at 3x final size, then shrink it down to get more detail!
Curious, as I know you can reduce the original size, can you flip the image within the software to mirror it for engraving on the backside of clear acrylic?