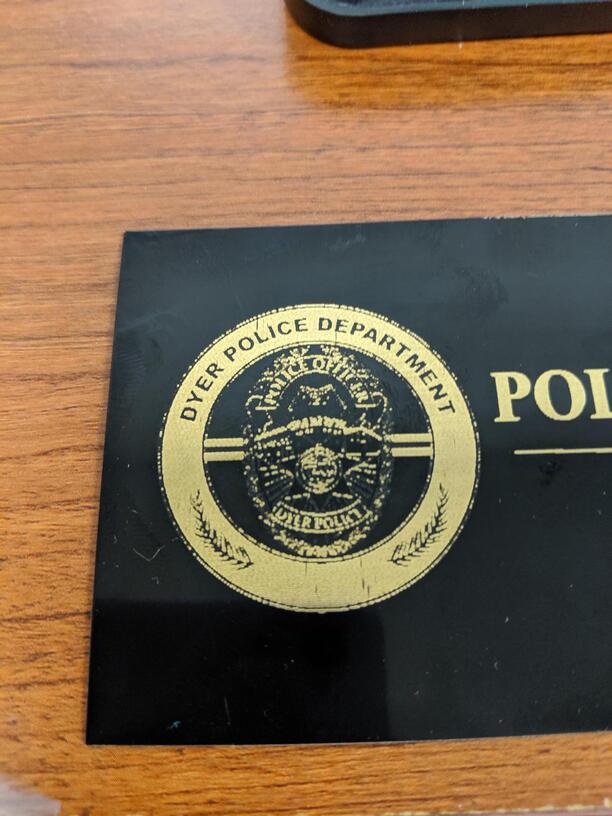
Does anyone have suggestions for increasing the quality and detail in my engraving. I’ve attached the original design and then two attempts at engraving. One was done with 750 speed and 75 power and the other was 1000 speed and 50 power.

Does anyone have suggestions for increasing the quality and detail in my engraving. I’ve attached the original design and then two attempts at engraving. One was done with 750 speed and 75 power and the other was 1000 speed and 50 power.
I’ve moved your post to Beyond the Manual as that’s the only place we’re allowed to discuss settings
What material are you engraving on.
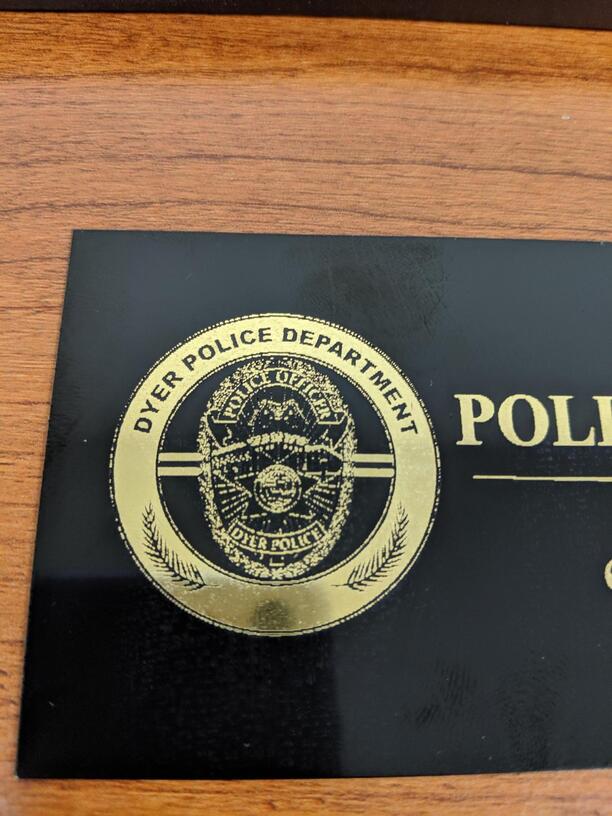
Generally a slower speed/higher LPI will give you a finer engrave. It looks like your art is clear, but material will definitely make a difference! The 2nd image is clearly better, but I’m not sure which of your settings listed link to that image!
The second image is engraved at 1000 speed and 50 power. The product is actually Lasermax Brass Plated Steel.
Coated metal can be engraved at an extremely high LPI (lines per inch) since all you are doing is removing the coating. It’s going to take a long time, but using 1335 LPI will give you the best results on that. If you don’t want to wait that long, 675 LPI will probably be adequate.
The LPI settings can be seen at the bottom of the Manual Settings for Engraves.
Use high speed (800) and full power…the LPI will take care of the cleanup. (Don’t look at it while it’s working either.)
Practice with a small (1/2") engraved square on a piece of scrap material to see which settings you like best before running the full engrave.
Are you using the Set Focus feature before each engrave?
If the image you uploaded is the same one you are engraving, the detail is probably too poor to get the results you want. Can you get a more high-resolution file? A vector file would be even better.
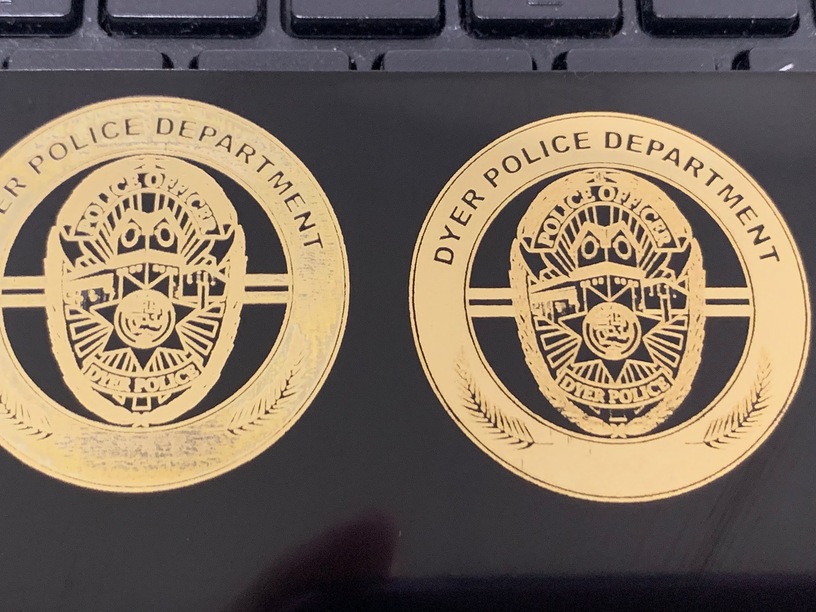
Still having problems, the first one was set to full power, 800 speed, 675 LPI. The second one was 50 power, 1000 speed, 1355 LPI. Any suggestions
Focus height is .02
The second one is much cleaner, at this point I’d tend to agree with @GrooveStranger that you might need to just clean up the original image.
The artwork is a vector image. The image that I attached to this string is a PNG, but it was saved from a vector file.
How large is that print …is that a keyboard behind it?
The image is 1.5"
1.5" is pretty small. You might want to widen the unengraved portions of the pattern. You can’t go any smaller than the beam width with a stroke and that is approximately 0.2 mm or .008 inches wide. A lot of the detail in that might be being lost because the lines are too close together.
Oh man, I’m at a loss since I’ve never used the material. I second Jules concern though and maybe a file adjustment could help. That last one you posted looks pretty good engraving wise, but the lines engraved a bit thick and I don’t think you’ll ever get clean detail at that size.
Lower power with higher speed is giving you better results. Perhaps the coating material is fragile and burns away very easily. The slower speed with higher power might be burning away stuff at the edges that you don’t want removed. Your first image (with full power) even looks like the brass coating over the steel got damaged a little. I’d try going to an even lower power and leave the speed high. Get it to the point where you are using just enough power to remove the black material, and no more. If it were me I’d write a few test lines of very small text in a flowery font (to simulate the fine detail) and print a few of those out at different power levels to see what looks best. If you can get that to look good, but your emblem still looks messy, then you will need to clean up the image you are working with.
You should be able to get better detail than what you are seeing if you have a fairly clean vector image. I just did a bunch of 1 inch emblems with text and fine detail on stainless with cermark at 270 lpi and they look very crisp.