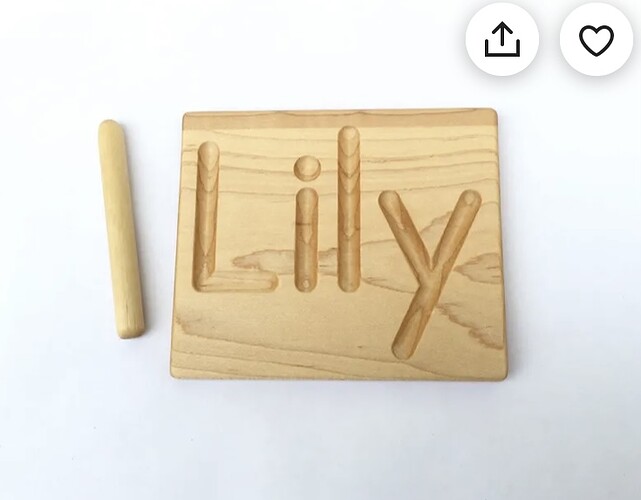
I am not sure where to post this so please move if this isn’t it. I’m wondering if I am able to make something like this picture? I’m not doing letters, but I need grooves like this. Is this possible on the glowforge?
Ehhhhhh… Similar maybe with variable power engrave. But “right tool for the job” comes into play here. You probably want a CNC for that.
If you don’t mind grooves that aren’t round at the bottom you could make it out of 2 layers - cut the letters out of the top layer and glue to a solid layer below.
Lasers only burn, from the top straight down.
Your photo is of something that was carved, not burned.
To get those smooth curves, and a carving that’s natural wood and not burned wood, you’re looking for a CNC router not a laser.
I don’t mind the burn, just wondering if I can get the roundness… something I can place marbles in a line and they don’t roll around?
I just need a round groove for like marbles to line up and roll down the line. It’s ok if it’s engraved with burn. Just wondering more about the roundness to hold the marbles in place. Am I making sense right now? Lol I’m not using the grooves for letters. I just mainly needs lines of grooves to roll marbles 
This is what I’d do if the Glowforge were the only smart tool at my disposal,
Make a template using Glowforge and some draftboard, do the actual cut using a router. You can pick up a decent trim router for $60 and then figure another $60-100 for bits and guides (tooling).
Cut channels will hold marbles too, they don’t have to be rounded unless that aesthetic is important to you…. You can even calculate the required width, it’s called a chord. We’d just need to know the thickness of your material and the diameter of the marbles you plan to use.
For example this site: Chord Of A Circle Calculator - Online Calculator Tool
For a half inch diameter marble (0.25” radius) and 1/8” material, the channel width is 0.433”. If it were me I’d probably go about 0.01” wider just to have a little slack, and do 0.443” wide channels.
All you’d need to do is get your calipers out and do careful measurements and you could figure it out pretty easily.
Then use a single stroke font, set your path style to have rounded ends, and set the stroke width to your desired channel thickness.
Do a stroke to path on the text and you’re all set.
It sounds complicated but with practice it would take all of five minutes to do it, I promise it’s not too hard if you take it one step at a time.
You could get a round bottom with a vary power engrave but I’d still just cut a layer and glue it to a solid layer. I don’t have the patience for engraving and the resulting cleanup; a non-round bottomed groove of the right size would still keep your marbles in 
Bonus: use a contrasting material for the backing and you can have a visually interesting piece. ![]()
Oh wait you said no letters. Ok cool whatever shape you need in vector form, set the stroke width and style as described and go nuts 
You should come a long way with the gradient tool making a bitmap
The only way to get a uniform depth engrave to produce a “rounded” pocket is to use a manufactured product like MDF/Draftboard or Acrylic. “Regular” wood will not give you that uniformity because of variations in density.
It’s totally unnecessary given the use-case you describe. Just layer two pieces, with the the channels cut from the upper piece. As stated, use contrasting material for effect.
Or use a router.
your option is really a layered base.
otherwise it is about santa getting you a CNC unit. 
I made a game board for a friend that required dimples for marbles. In my case, they didn’t have to roll (but no rolling away if the board was moved), so I just used 2 layers of draftboard. The top layer had the holes sized for the height of the marble to fit; the bottom layer was plain, except I’d scored the same details as the top panel to make it easier to align for gluing.
If I wanted to do something like yours, I’d use 4 layers: bottom = draftboard; layer 3 = thick card stock; layer 2 = draftboard; top layer = cardstock. Each layer will have to have a larger version of the cut. This will help fool the eye into seeing a curved surface. Painting all the layers the same, or perhaps a gradient, will improve the effect.
Or a router .
I have a dremel tool with a router adapter and some round bits. I’ve carved something like that, but i sucked at making straight lines like that. I didn’t have a jig, but for what i was making, straight lines weren’t necessary.
Lol agreed !
This is the method I’ve considered for making an Aggravation game board. My grandpa used to make them (I’m assuming with a router) and I so wish I’d gotten one of the boards when my grandma passed away. 
