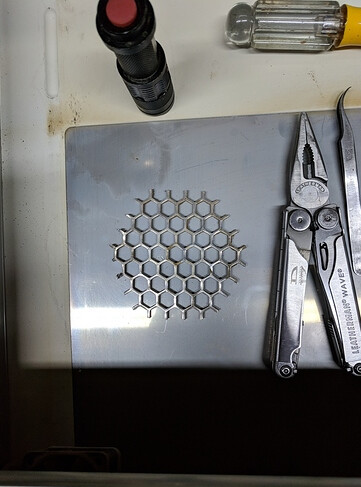
That grill was the first issue I had with the pre-release unit. The debris accumulate and evacuation is less and less efficient, I was taping up the cracks like others have done. One day the smoke was so thick in the shop it was “All Stop”. Let’s investigate this. I found that grill completely occluded. It cleaned easily and the machine could breathe again, but the episode clearly identified the grill as a periodic maintenance task besides being a restriction to smooth airflow.
I had about 2 months of warranty left on my personal unit when the fan developed a hard vibration in the exhaust fan. When I pulled the top left glass to replace it (all it needed was cleaning) I was looking at that grill with unobstructed access I just couldn’t leave that thing in place.
Hi! I’m in a similar situation with my fan causing a vibration and noise over and above the normal exhaust fan noise and my machine is of the same vintage. Was it difficult to cut out the metal grate?
Not bad. I used a jigsaw and a fine-tooth blade cutting from the rear. My major concern was metal shavings blowing around the PCB there on the left side. Since I removed the left top glass I had easy access to vacuum the area. Without removing the top, you might position a shop-vac hose inside as close as possible to the fan to capture the swarf.
I really thought the fan was toast because of the severity of the vibration. Turned out it just needed cleaning. The odd thing was the vibration wasn’t there at all when I shut down the laser that night but in the morning it was terrible.
Eventually, I removed that stock fan for an inline fan in the exhaust run which cut the noise by at least 2/3. That’s because the in-line has an impeller in it that is about 10" in diameter. It moves as much air as the 4" fan but turns much slower than the 13,000 RPM of the 4".
It made a massive difference in the comfort level in the proximity of the running laser.
I have the basic, if you have a pro it may be more difficult because of the cooler mounted next to the exhaust fan.
I do have the Pro so was considering using an oscillating tool with a metal cutting blade or something that creates less fragments for the reasons you stated.
Was the removal of the glass panel on the left side of the machine difficult?
No, I was just paranoid about it. It really isn’t a big deal, and I’ve had it off a few more times to clean. Here is the thread of my adventure.
I was most uneasy about the amount of force it took to pry the big plastic tabs far enough to release. The piece is chromed plastic and is quite strong. Just about the time you decide not to pry any harder it pops loose. You need to work from one end progressively toward the other. It helps to insert something thin between the top and the case to prevent the tabs reseating as you work on the next one. There are three tabs and three screws that secure the top.
A word of caution, if you have any warranty left I would advise against doing it. (Oh, I see you’ve been around since '16)
Just be methodical and patient, you’ll be fine.
I think you would be able to turn a tighter circle with a jigsaw, and the swarf is less of a dust. Just my opinion.
Another thing I did the second time I had it removed is to slightly round over the shoulder on the case tabs that secure the top. Made it easier to remove.
Thanks for the encouragement!
I see the mounting screw at the front and 2 at the back holding the left top glass panel but don’t see the “clips” you refer to?
You are correct, a jigsaw will turn a tighter radius than an oscillating tool.
The PCB you refer to is the one the fan is plugged into? Which in my case is in front of the heat sync on the left side - or is there another PCB I can’t see due to the heat sync?
I’m asking because i think i can protect the one the fan is plugged into from the fallout while cutting out the grill.
Yes. those are the screws, under the rubber seal for the lid. The clips are behind the aluminum tape circles. you have to peel those off to access the clips. Doing it with patience will let you put them back on, and prevent the laser residue from depositing in there… can’t say I see a good reason for that, but taller minds than mine engineered this thing.
After I sent my last reply to you I went down to the machine and looked and realized those foil stickers were where the clips are hiding. I also found the thread from 2018 where you detailed your workflow and a photo where you had marked the location of the clips with pencil on the inside of the case with the glass removed.
Apologize for making you rehash
No problem - No need for apologies, I wouldn’t do it if I didn’t choose to. When I wandered into this place I was clueless. This community gave me what I needed - This is just a little reciprocity. Have fun!