Custom lanterns with animals and Star Wars

My vent solution is here:

One thing to note: when a sliding window is open, even if you seal the opening, there is another gap on the other side of the sliding window, between the frame and the glass of the non-sliding window. My build closes that with an additional piece of foam.

Also, since taking those pictures, I added weatherstripping to the sides of the foam insert. We’ve been having some sub-freezing temps here in Seattle the past weeks. With the blast gate closed there hasn’t been any problems with leaving it installed. (Just always remember to open the blast gate :slight_smile:

2 Likes

That doesn’t sound like an ideal situation, although under normal circumstances, it’s probably fine. But yeah, if you don’t have the window sealed up, you’ll probably get more smells than if you don’t. Air does tend to go everywhere. Four feet away is not too close, but you’ll get more scent.

The smells probably aren’t going to hurt you - we go through much more obnoxious exposure to smells on a daily basis, particularly if we live in cities. Or when cooking.

But some people can be sensitive to certain smells (maple hits me hard, the others don’t) you definitely want to reduce exposure to it. For those, you will want to just take a bit more care to seal everything up and keep the smoke outside where it belongs.

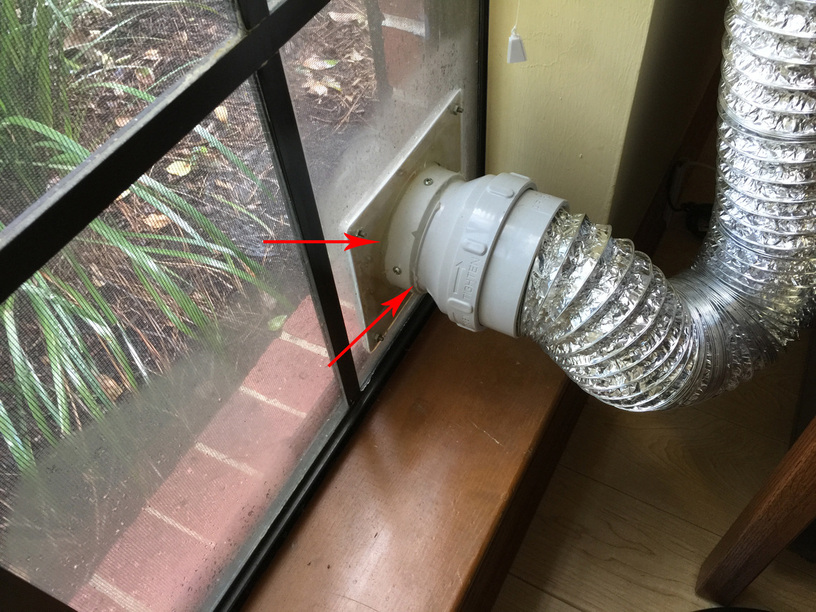
So if you’ve got a cardboard panel with the hose running through it - consider something a little sturdier. Maybe a sheet of plywood or plywood and foam with a hole cut into it and a Quick Connect, that can be installed in the window and left there. You can seal around the Quick Connect with silicone, and it won’t leak. (Pictures of our setup below…we removed a sheet of glass and replaced it with an acrylic panel.)

If you have small panes, you can even cut the hole in the acrylic on the Glowie.

But wood or probably a thick foam might work just as well, and it will be insulating as well. 1/4" plywood cut to shape, cut out the end cap hole on the glowforge, install it with silicone, glue up some thick foam core on both sides, and you will have something that you can prop into the window and remove if you don’t want to leave it in.

Or if you want to spend a bundle for the same thing:

https://www.amazon.com/Intake-Vent-Diameter-Adjusts-Through/dp/B01LXS6T8K/ref=sr_1_fkmr0_3?ie=UTF8&qid=1514836077&sr=8-3-fkmr0&keywords=window+vent+for+4+inch+hose

There are lots of options to try for non-permanent installation. (By the way - the one we’ve got is non-permanent - all we have to do to change it out is replace the pane of glass.)

1 Like

Like I said, it’s a personal thing - you’re free to make whatever decision you’d like. I’ve been using and teaching the use of lasers for several years but I’m not a materials engineer so it’s possible people are dropping like flies from the residual fumes from a properly vented laser. The big expensive venting & filtration systems are there for big expensive lasers. Because improper venting is a problem. If you want to point me to some of those cases of laser related cases, I’d appreciate it because I’ll use the info in my classes.

Because this is not a properly vented system. Four feet is definitely within the vapor return radius of laser exhaust. My home GF is vented out the basement window about 6 feet below a bathroom window. When the bathroom window is open, laser exhaust fumes re-enter the house. Remember, it’s coming out of the GF under pressure and is warmer than ambient air. Warm air rises. So you’re creating vertical air currents that most certainly will re-enter your apartment window.

You need to seal the the window and the hose to window blocker material too. Lots of postings here on how to do that. Since mine is in the basement I used foam insulation board that presses into the window frame and removed the window. My wife has suggested I move it upstairs and re-do one of the kids’ rooms. In that case since I have side opening casement windows I’ll need to build a panel to either replace the window or that I can insert into the interior frame space when I’m using it and the window is open. Easy enough to do out of plywood/MDF/Acrylic but not something I was going to mess with until the spring.

6 Likes

I’m going back playing catchup on the cool designs I missed…great job on these! They look professionally made! :grinning:

3 Likes

Thanks Jules! Means a lot coming from such a regular.

1 Like

The engrave time must have been super long.
The results are fantastic.
I am the outsourced laser for a designer. For him, I have cut a lot of a two-layered acrylic black on white that gets a similar result. It took a lot of finesse to get just the right depth to be highly translucent without holes or cracks.

Well done. That clearly took some serious time and effort.

2 Likes

so, wouldn’t exhausting it to outside still result in other people breathing it in? hmmm

Depends on how close you tie in relation to the exhaust port. :smiley:

This is the same pegboard I put up in my garage. It’s great stuff; although their sales material is a little misleading, because their panels are not truly 16" wide, so you can’t mount long strings of them directly on studs and maintain proper spacing.

I was not the one who said it was safe if you exhaust it, I asked isn’t it dangerous either way.

How did you conversation the picture to print ? Bitmap or str8 picture to the glowforge?

I got the contrast levels I wanted, then used Photoshop’s Stamp filter.

Photos of the lamps in their new homes:

14 Likes

Those look great.

Did you have to show the unsolved cube though? You’re totally triggering my need to solve one but I can’t see enough faces to match it. :open_mouth:

2 Likes

littlebits R2? My girlfriend got me one for christmas… fun! but I was annoyed to find that they made the components unique (apparently you can’t just add one of their regular dc motors for head swivel along with steering, you have to buy the special R2 dc motor, which is more expensive and sold out :frowning: )

1 Like