Again, the bevel doesn’t photograph well but it looks great in real life.
The settings I used for this one:
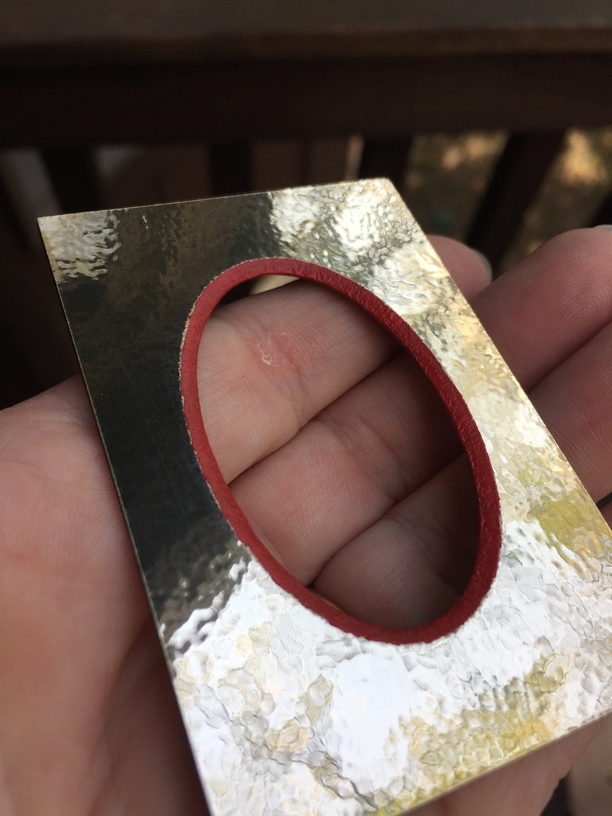
Four passes of engrave at Speed 1000, Power 100, Map Grays To Power from 1 (not the default 10), focus height 0.05"
Followed by a score of the inner oval at Speed 250, Power 80, focus height 0.01" (one pass).
Then cut the rectangle with Speed 250, Power 100, focus height 0.05", one pass.
Was that in standard mat, or black core?
I assume the former, so I wonder what starting with black core would be like. It might be a medium density foam material, so I can’t guess what it might do.
John
It was standard white core mat board. You could try masking the board and painting the engraved edge white, as @jrnelson suggested, if you don’t want to see the char.
Perfect colour - now a light smear of a suitable gold over the top should give you a nice ‘distressed’ look.
If you’re really sneaky, a light knife cut through the gold, radially about every 1-2" around the bevel should give the impression of gold leaf having been used.
I’ve just looked at you photo again, and realised that you’ve gilded the flat surface ?
I was eating ice-cream while I was looking, so it might have screwed my vision up !
Yes, I covered the scrap of mat board with Oracal 352 polyester gold film. Then applied mask. Then did the engrave and cut. Then painted the bevel red (don’t have any spray red so I used a brush). Peeled off the mask. And there you have it.
That’s very kind, Cyndie, but wait till I’m back home. Only 31 more days to go !
John
EDIT
Difficult to think at the moment - I’m listening to Turandot live from Royal Opera House, Convent Garden(not the Met, my mistake), one of my favourite, spine tingling duets coming up.
Where was I ? Oh yes, I’m wondering about using something like this film, stuck onto heavy paper, then lasered, peeled off, and the card exposed ‘engraved’ (scored).
Means an accurate registration process, but I’ve done worse.
2nd EDIT
There’s a type of flat centred picture frame that we used to call ‘Venetian’ when in an earlier life I was a frame maker (Think 4’ x 6’ for size).
That central flat would be painted, often dark purple, the whole lot having been gilded, and a gold vine leaf pattern or similar exposed, by scratching away the paint.
Sorry, got to stop.
OMG too late.
3rd EDIT
I could produce the first Venetioan fan frames by lasering the paint off the flat.
Can you paint over this film?
Sorry Cyndie, got two ideas overlapping !
Comes of listening to Puccini when I should be concentrating.
My first idea was about a fairly complex metallic gold decoration over a 12x20 area, by kiss cutting the areas to be removed, peeling off the unwanted parts, then engraving the exposed paper layer.
That area of the design might have been printed on first, of course.
The second idea concerned using a similar technique, but applying it to the actual framing.
I would have to explore a technique like Bill Laba did for me with the ‘sequins’, where transferring after cutting might be the sensible solution.
With the first idea, I would need to be able to ‘distress’ it, hence the question about painting over.