I have a design I made that is an SVG. It’s basically text but I’d like the middle of the text to be cut out completely. Do I have to add another layer over the original for just the cut outs or is there a way I can have it to cut the parts out that have no fill?
What do you mean by “middle of the text”? Do you mean you want the letters cut out or do you mean you just want the ‘counter’ of the letters cut out? The counter is the enclosed shape in certain letters – like the triangle in a capital A, if that makes more sense.
Yes, sorry my power of description is usually lacking. I’d like the counter cut out. Right now I have it as two separate files and I have to line them up but it’s kind of a pain.
1 Like
Oh, don’t make them two separate files. What design program are you using?
What you want to do is make an svg file with all the text in one colour and just the counters on top of that in another colour right on top of eachother – the glowforge will allow you to assign different settings to each colour, so you can engrave one and cut the other. It’s sort of hard to describe how to do it – if you happen to use a program that I have, I can give you step-by-step instructions. But if you don’t, you could just post your file here, I’ll do it in my program, and then upload the fixed file. Then you should be able to download it and play around with it in your program to sort of reverse engineer what I did.
5 Likes
First, line them up in your regular software. if you make them different colors they will be on different layers in the GFUI
(what @erin just said first)
1 Like
I’m using Illustrator but I’m not great at it yet. I’m extremely proficient in photoshop but it won’t save SVG files so I’ve kind of been going back and forth between the two programs until I get better at understanding Illustrator. I’ll give it a try as a separate layer and see if I can figure it out and if not I will post the file! I wish that you could use layered PNG files because that would make my life a lot easier lol.
This is actually something I do all the time… sort of. What you do is make your png layers and save each of them individually, then upload them into a vector program that has a trace functionality. You’ll upload the png and the program will trace around the outline and make the outline a vector. Usually, they work on contrast, so you want everything in your png to be black and white (or black and transparent, rather). After you do that to each individual layer, you should have a vector outline of each layer. Arrange and combine all the outlines as you like, and there you go. If the arranging needs to be very, very precise and you don’t want to eyeball it, you can basically put registration marks in your png layers. The ‘center’ function of your vector program can just center everything for you and then you can just delete all the registration marks.
I know it’s a totally assbackwards way to work, and learning the program will be good in the longrun, but when there’s something that’s more easily designed in raster it can save you a ton of time. It can also save you a ton of time when you need to make something before you’ve totally figured out the vector business.
1 Like
I use Gimp and run many layers so I can always go back if there is an issue, then I can make up an arrangement of layers to make different pngs. In Inkscape one layer is pure black and transparent to use to create the Inkscape vectors, then a more complex design can be fit. You can have a dozen images lined up and just turn on the one you want and hide the rest. In that way I can have several designs in the same file.
1 Like
Thank you! I did a bit of a workaround like you suggested but instead of a PNG file I save the layers as a PSD file and it opened the layers right up in Illustrator. I then just saved it as an SVG!
Bah! Never mind. It’s reading it as a bitmap even though it’s an SVG with layers so it won’t allow me to cut.
Oh, the reason it didn’t work is because it probably just embedded the image, rather than actually turned it into an svg. You need to actually trace the raster image to get it into an svg. You can check it’s actually an svg by seeing if you can manipulate the points and paths. Even if it has a fill, an svg is essentially just points and paths (an outline, in other words). If the png has successfully been traced, the trace will have points and paths.
You do still need the vectors as Erin says. What I was explaining is that by freezing and thawing stuff before saving you can have different designs as the same base file but for all cuts and any engraves that will have a simple single depth I keep as vectors.
1 Like
Thanks! My brain just isn’t working and for some reason I can’t figure out how to trace the empty space. I trace it but when I try to fill it with color it’s only filling the black lettering. I’m a visual learner so it’s hard for me to get it without a video tutorial and I can’t find one that is this specific when it comes to illustrator. I know there’s probably just one simple step that I’m missing.
If you are starting with Illustrator and making text, then you just need to copy the text that has the counters.Convert to paths. Remove the fill of the copy and define the stroke outline a different color. Then break apart the letters with counters and delete the outer part.
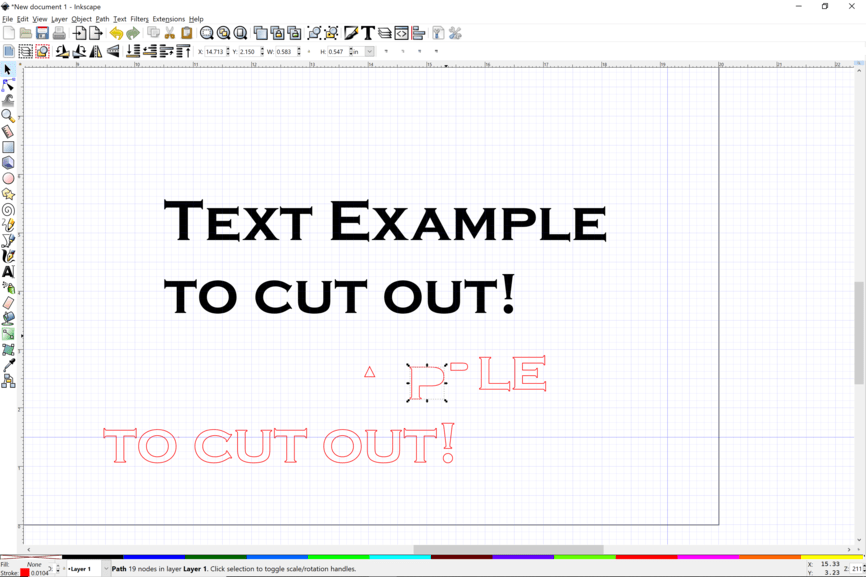
Once you have the counters that you want to use, align them back over the original text.

Is this something you are thinking of? right clicky for the svg.
2 Likes
Actually you can very easily export SVG files out of Photoshop, complete with vector data. You just have to make sure any vector Smart Objects are converted to paths first.
If you just want one path out of your PS file that’s doable to via this method: Introducing Exciting New Tools from Ceros: Farewell to Avocode Products
4 Likes
The trace is a line around all the edges and filled in. Like the letter “O” the line on the inside limits the fill to be between them. In Inkscape [path->break apart] makes them separate things each filled in in the inside, If you set the fill to a semi-transparent color you can see all the lines and increasing darkness as they re stacked it is much easier to see what is happening than if everything is black.