Cutting Without the Crumb Tray - The NO MATH Edition

Bookmarked! Thanks for the tutorial!

Brilliant use of calipers !!

I don’t have my GF yet so forgive my ignorance. I find it surprising that you had to take into account the distance from the honeycomb to the top of the tray. Since many small items would just sit on the honeycomb why isn’t that surface considered the top of the tray?

The tray has a lip on the left and right sides, and that lip sits proud of the surface of the honeycomb, so the top of that lip is the top of the tray.

The referenced surface is the top of the tray because it’s the highest part of the tray.

Perhaps you’re asking why the tutorial isn’t showing how to measure directly from the honeycomb surface to the floor of the Glowforge. The reason for that is that the tray has a sheet of metal (I think) below the entire honeycomb, this metal makes it impossible to measure directly from the honeycomb surface to the Glowforge floor, so you have to measure up from the honeycomb to an intermediate surface, so that you can then measure from that intermediate surface down to the floor. The top surface of the lip on the tray is a perfect intermediate surface.

8 Likes

Ahhhhhh

2 Likes

Here’s a pic of the tray that I hope clarifies things.
The measurement we want is A, the distance from the floor to the top of the honeycomb.
If you put a depth gauge through the honeycomb you’ll only get measurement B because it hits the floor of the tray.
So instead we measure C and subtract D, because it’s easy to reach both.

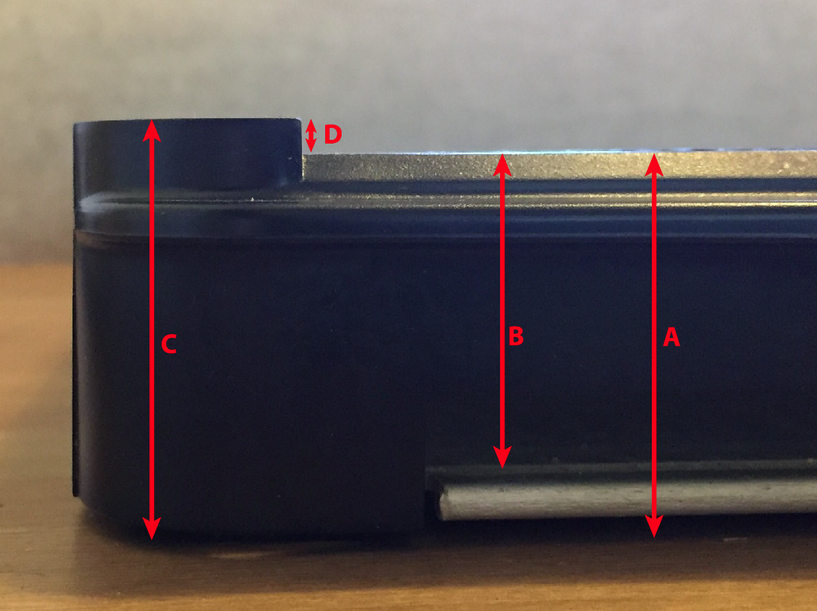
The fact is, though, that A is supposedly pretty consistent from machine to machine, so you don’t even need to measure it on your own. Just zero your calipers at something like 1.37 or 1.38 and you’ll probably be close enough.

34 Likes

Thank you very much for explaining it in such detail (as well as showing me the step on the back of my caliper.)

3 Likes

Fabulous tutorial and clear illustrations & explanations. Thank you for the insights and time to put this together.

1 Like

Thank you very much!

1 Like

FWIW, I’ve found that this type of “caliper” is also very helpful. It’s normally used to set the height of a table saw blade, for example.

In Glowforge use, It’s good for measuring something that is not proofgrade that is going to sit on the crumb tray, even if that something is not perfectly flat. It can also measure further from the edge than a typical 6" set of calipers.

2 Likes

Edit - just realised I’m a tad stupid, the crumb tray isn’t open bottomed of course so what I had said here about just using the depth gauge part was wrong.

Thanks for the tip!

3 Likes

Nothing stupid about it. I use calipers for lots of things and as “I’m a professional” (ha!) grabbed the nearest set to measure thru the tray using the built-in depth gauge (other end of the slide) - I got a consistent 1.2" (near enough) and was quite frustrated until I glanced thru this entire thread and saw Nathan’s image. That when I remembered the tray was enclosed - DUH also…

2 Likes

Thanks for taking the time to do this for us. Much appreciated!!

Yes! this is exactly what I’ve done the few times I’ve had to remove the tray. Works quite well! Thanks for putting it into text on here!

I am a dope - I couldn’t puzzle out the step measurement so I had to resort to a video.

Interestingly, the video shows another way to use calipers, which is to zero the calipers (fully closed), stick them so the butt end of the slide is flat on the honeycomb bed, and then extend the inner rail down through until it hits bottom.

Edit: ignore this - it’s interesting trivia about calipers but not a good measure for the GF deck height.

I’ve tried something that seems to be much simpler. I measure from the bottom of the printer head to the top of the crumb tray with a ruler. Which in my case is 1-3/8"
Then measure (again with a ruler) from the bottom of the printer head to the bottom of the GF with the crumb tray removed. My measurement was 2-3/4"
Subtracting 1-3/8" (11/8) from 2-3/4" (22/8) = 11/8 (1-3/8").
No calipers were hurt using this method.

2 Likes

The honeycomb is closed at the bottom, though, so measuring through it won’t give you the distance to the floor of the Glowforge.

See this comment and its pic: Cutting Without the Crumb Tray - The NO MATH Edition

3 Likes

Correct. You need to measure with the caliper depth gauge sliding down the outside of the honeycomb which is the back edge - the sides have the black plastic lip that will make your measurement high.

3 Likes

I hope some kind of “tray out” support is in the legendary Hopper.

1 Like

I have a probably stupid question… What is the point of the “Scanning your material” part of the operation if you have to manually enter the height? I thought the glowforge comes in and scans the distance to the material to set the autofocus? So as long as your material falls within the range of the top of the crumbtray to 0.5 inches above that, why do we have to enter in a thickness at all?

1 Like