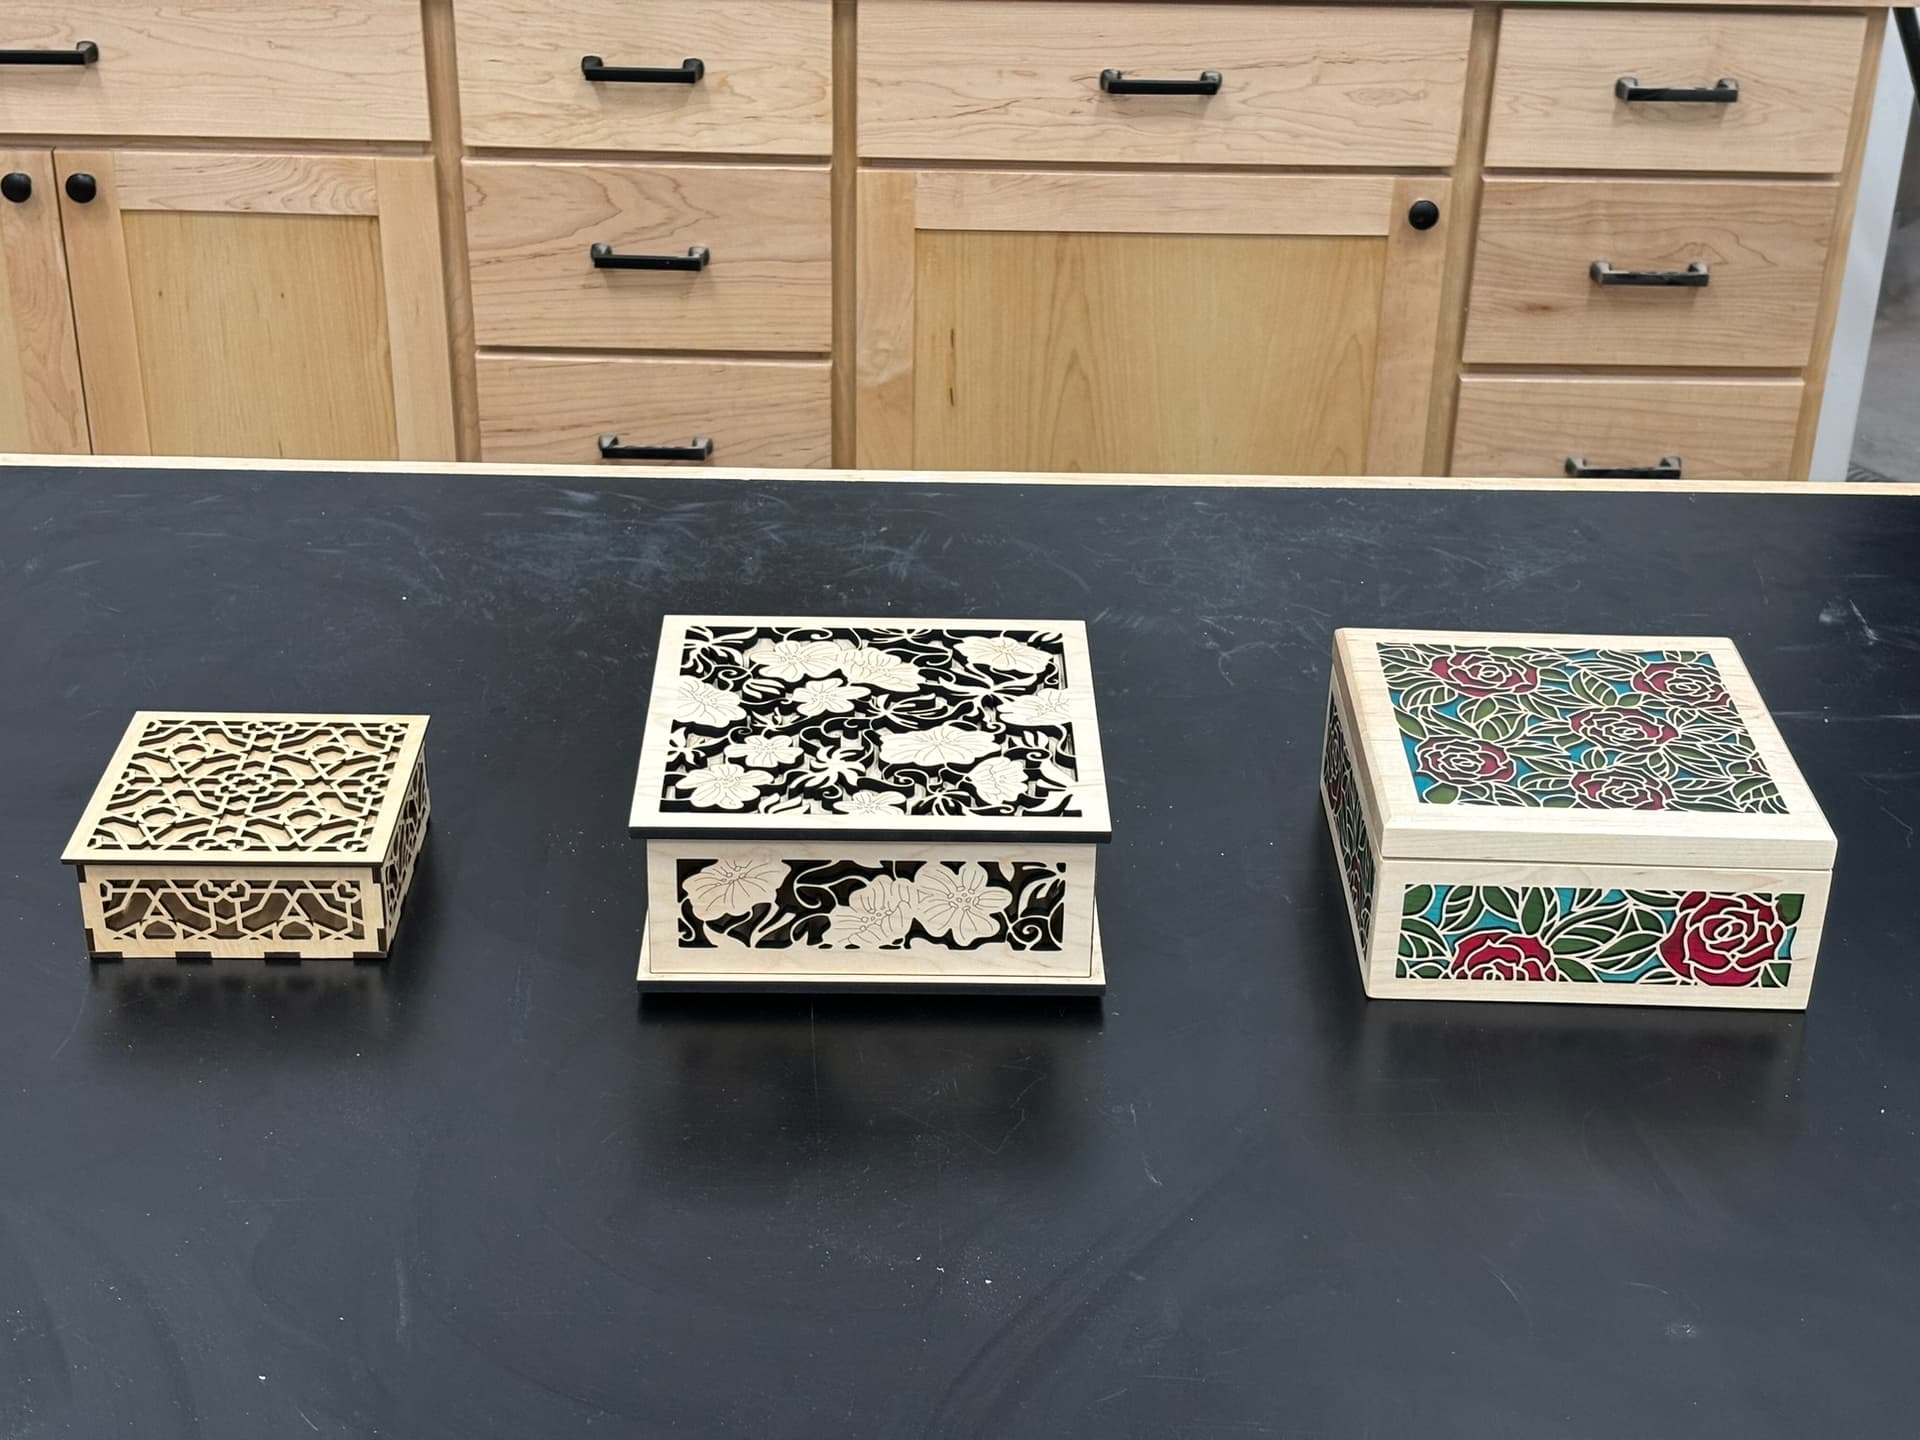
I took a basic decorative box template that I got off Etsy, made it, then tried to one-up the design twice. The result is what you see here.
I made a video of the process, which you can see here:

I took a basic decorative box template that I got off Etsy, made it, then tried to one-up the design twice. The result is what you see here.
I made a video of the process, which you can see here:
Way to hit it out of the park with your first post!
Something I think about when doing the corners…
This does make a much stronger bond and can be important in the design. Dovetails are harder to do and only work in one direction, but are stronger still and very legitimate.
If you are doing two layers or don’t want end grain if all the sides are vertical grain you will not see where the sides come together. You can also rabbit out all but the last 1/32" and only that veneer thick piece will show.
Great projects, excellent first post. Welcome to the forum!
For anyone who may be a little video averse, the gist is that he used to combination of laser techniques and traditional woodworking tools such as chisels, a conventional router/miter saw to make beveled edges, and even a shaper origin to make a pocket. The colored panels were done with colored epoxy inlay to achieve the final results. A good mix of techniques to get results that are difficult or impossible to do using only the laser.
I think that with a little more laser time you’ll find that your process for aligning your lid could be simplified, there’s no reason to make micro adjustments, you can cut the lid to size first and then use a jig in the laser to align it in one shot. With kerf correction, it’s easily possible to get alignment accuracy to within 0.01”.
Also I think that your stained glass lid design is great, how long did you have to wait for the epoxy to set up before you poured the next color? I suppose you’d only have to wait until it simply wasn’t flowing, not for the full cure.
Good stuff.
Welcome to the forum! Thank you for sharing your work with us. The colored box is absolutely stunning! Please continue to share what you make.
Welcome to the group! Your boxes show some nice artistry. And it’s a nice difficulty progression you’ve demonstrated; I like seeing that kind of post. Are you working on a fourth one? I’m not sure what adjective comes after “legendary”!
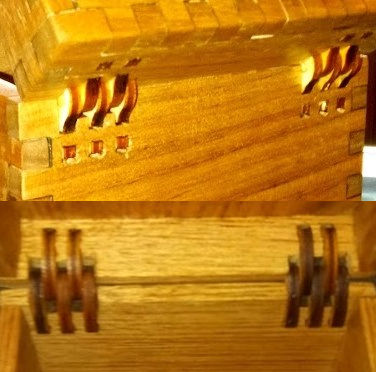
Those hinges are a BUTT to design and even worse when they break while you’re glueing and such, great job!
I appreciate the welcome and kind words.
I consider myself more as a woodworker who has added a laser to his set of tools rather than someone focused specifically on laser cutting. I’ve only recently begun making YouTube videos of the things I build. The one I posted here has been my most popular video by far.
To respond to a few of the things brought up:
The terms ‘common’, ‘epic’, and ‘legendary’ and even the colors of the words are a play on current video game culture around loot.
The majority of my videos involve a laser cutter, though most of the time I am making router templates or base plates, and it is a small part of the build (my latest video is an example of this). Given how popular the video I posted here was, I have just made a playlist for laser cut builds, and in my next video, I will focus on making laser cut wooden signs. I can make a new post here when that goes live.
Doing alignment on 1/8" material is really easy. You just put some carboard or cardstock down and run a score along the outline. I have not been able to replicate this with 3/4" material. The laser complains about the focus distance being too far away. This means I either have to raise the alignment material, score, and lower it (which brings in error), or I have try and do the alignment on the material itself in an area outside of the one that I will be keeping (which means micro adjustments).
Glad you liked the content. I hope I can post a few more things here as appropriate.
Yup. I’m saying there’s a way to do it in one go with an elevated material and jig. I just did it yesterday. If I find time, I’ll post what I mean. I think you’d really like that process, it would speed this up and be much more accurate.
These turned out beautifully. Thanks for sharing and welcome to the community!
Welcome @bustedthumbs to the forum. What a way to make a splash!
Congratulations on your beautiful boxes and thank you for sharing your work system with the rest of us.
Beautiful work! I grew up with woodworkers around me, my grandfather would do the wood work and my grandmother would hand paint and letter them (this was in the 70s, before Etsy and Pinterest). I still have several of the things they made for me as a child. Great job showing the steps and helping everyone to see the skills needed, keep up the great work!
Please do more of this, and thank you for sharing with us. Welcome to the community, you will fit right in!
The Glowforge has a 0.499 range it can deal with. The top of the crumb tray is the zero height it measures from. If you remove the crumb tray it is still measuring from there. If you are engraving in a 0.51-deep hole the head will hit and mess everything up. There is 2" from the bottom to work with but if your working surface is below the zero point (1.5" above the bottom) then the set focus device will not be able to work as it would be “too far away”.
You can read the absolute location from the bottom right of the screen and repeat that but you have to have that measurement in the machine as well.
This can be useful for having a specific location…
Welcome to the forum! Your post was very inspiring! I’m in love with the third box with such beautiful epoxy.
Also, thank you for posting your video!!
I have two standard sizes and can apply them as needed. In that case I used the the 1/8 hinges in the 1/4 inch wood so they are modified some but now I can use those modified ones any time.
Even though the box is solid 1/4 butternut wood, the hinges are 1/8 Baltic birch for strength and the cross pin is bamboo. So the only metal is 1/8 dia magnets holding the lid shut. ![]()
A most definite welcome, for sure.
I think you will find this a great place for two way learning. Those boxes are great, but I would love to see all the beautiful colors in a lamp such as this…
Nice work!!
Those are all interesting designs. The ones I actually used were $5 brass hinges from Rockler.