DIY window exhaust vent

We got this setup at Lowes I think. There are lots of different styles available. Just look in the dryer hose section at any hardware store.

IMG_3362

Talked to hubs and he actually adapted that Quick Connect by screwing it into the vent flange in the acrylic panel and filling the gap with clear silicone caulk to create a seal…it wasn’t designed to fit tightly originally.

On the other hand, it’s a leak proof seal, so I’d recommend anyone having issues to give the caulk a try. (Oh, and we used a worm clamp up at the top, not the little spring ones that come with the unit.)

3 Likes

How is the hose retained in the pipe?

Oooh, that spring clamp! Sore fingers and a bloody knuckle when it popped on me once. The instructions still talk about adjusting a screw.

1 Like

I used a worm clamp and also wrapped some of that supposedly magic silicone tape around the exhaust before putting on the hose. It would really be nice if the exhaust bit extended about an inch further, but I can see all manner of reasons why that would be an expensive and stupid idea.

2 Likes

I appears to just screw onto the spring…I don’t think he used silicone in that part.

I cut a circle of non-PG plywood to the exact inside diameter (with my GF, of course), glued on a curved handle likewise cut from scrap, and use it to plug the hole when not in use.

2 Likes

Improvements! I went to Home Depot and found this dryer duct to wall connector. Also picked up some 2x4 1" birch plywood which I had them cut in half vertically so I could break it down easier, some #10x5/8" wood screws, and this pack of utility hinges.

Did some measuring, cut out the vent hole and pilot holes for the mounting screws and squared off the stock:
14 PM

The plywood cuts well at the common Proofgrade thick plywood setting of 150 speed at full power, with the focus adjusted to the measured thickness.

window vent svgs.zip (2.5 KB)

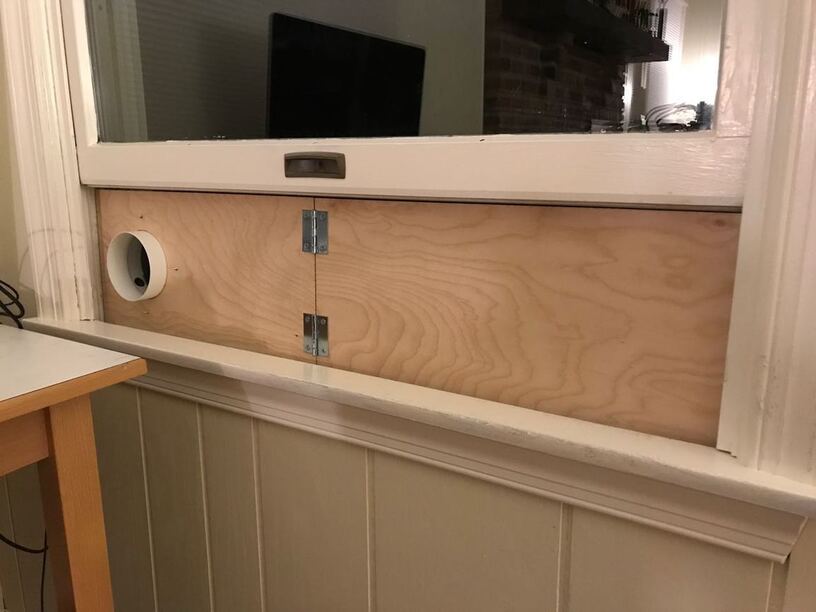
I mounted the hinges by hand with a drill. If I had remembered about them earlier, I would have cut their pilot holes with the Glowforge, too.

Exhaust side, showing the hinges:

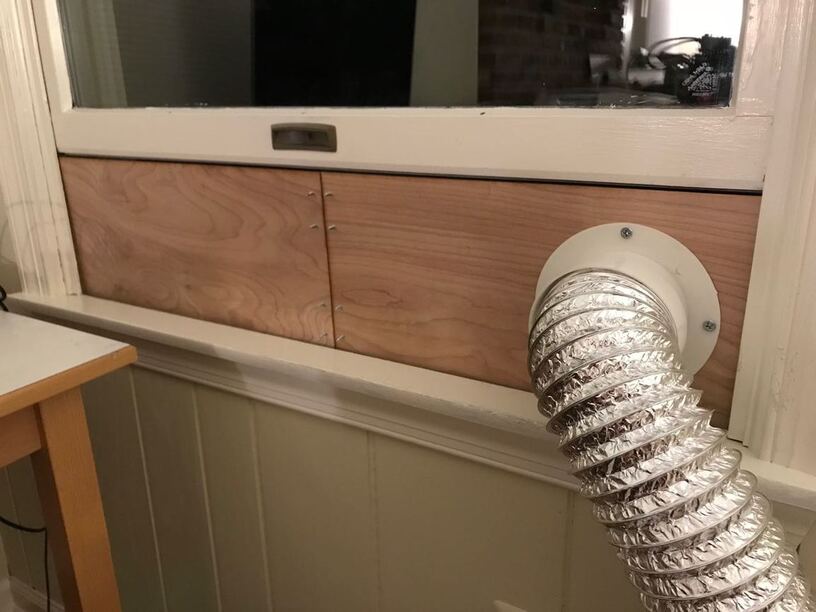
In correct orientation with duct mounted:

The hinges are for easy installation and compact storage, since I want to be able to close the window when not in use.

28 Likes

That looks very neat and trim. Nice job.

I keep looking at this and think: I have a 3D printer. Why have I not designed and printed a quick coupler? On the to do list. Well. My original tomato can and Glowforge print still works great, even if a bit rustic.

1 Like


Here’s what I did. Proofgrade acrylic, a louvered dryer vent, some acrylic cement, and 3 minutes on Inkscape. If anyone wants the SVG let me know.

8 Likes

@pam4arts have you seen this thread? Lots of great suggestions and free patterns here, tried and tested by the community!

I think that it might be hard for GF to supply something like this for us, due to the fact that each venting set up is fairly unique. Still, there are lots of illustrations in this thread for how to go about it, as well as files that you should be able to adapt to your own needs.

My solution will not work for everybody.
It isn’t a window exhaust vent; it’s a permanently installed exhaust vent.

I had a house, and my dad helped me install a vent. Then I sold that house while waiting for my Glowforge to arrive. The vent wasn’t even a consideration for the buyer… it didn’t reduce my selling capabilities. Basement office space. For pictures of that unused vent, you can see conversations I had last year:

I own my second house, and my studio has a wall that’s behind my fence. Even on the front of the house, I would do this; but I have no restrictions preventing my solution.

I admit it seems pretty intimidating to cut through the external wall; but with a few tools and a “what the heck” attitude, anybody who can lean, bend, pry, and cuss will be able to do this - provided they are allowed and wish to. I did this one by myself. And hey, there are more pictures!

My hose is capped with a quick-connect from Home Depot like others in this thread. When winter comes and temperatures drop, I will probably disconnect when not in use. At that time, I’ll make some kind of insulated plug.

2 Likes

Thank you

1 Like

Rather than reinvent the wheel with a whole new thread, I’m just going to add links from various forum posts, to illustrate how others have tackled this task:

@marmak3261 was the very first PRU user, and when he received his unit he put together this extremely detailed post to explain his venting set up. It even includes a free laser design to help you create your own vent. This link is already included in this thread, but I am choosing to post it again because it really is that informative.

Blast gates are probably a good idea (read the whole thread, lots of good info here)

7 Likes

Okay, I found a short post on my venting setup - just going to copy it here instead of trying to find the link again:

We got this setup at Lowes I think. There are lots of different styles available. Just look in the dryer hose section at any hardware store.

IMG_3362

Talked to hubs and he actually adapted that Quick Connect by screwing it into the vent flange in the acrylic panel and filling the gap with clear silicone caulk to create a seal…it wasn’t designed to fit tightly originally.

On the other hand, it’s a leak proof seal, so I’d recommend anyone having issues to give the caulk a try. (Oh, and we used a worm clamp up at the top, not the little spring ones that come with the unit.)

3 Likes

I think I may have shown my venting solution somewhere already but I’ll drop this here in hopes it helps someone. There recently was a thread where somebody was concerned with venting it the window in Sub-Zero temps.
As you can imagine we have the same issues in Minnesota. I haven’t tested this in those temps but I’m confident it’ll be mostly effective :roll_eyes:
Here’s a really crappy video that at least hopefully conveys the concept…
https://photos.app.goo.gl/OXhM90uiwFmAKv872

8 Likes

I just got one today. Best $1.50 upgrade for the Glowforge yet.

2 Likes

Adding this one - it’s a novel approach to venting.

1 Like

@jetzel was kind enough to outline their vent set up with a step by step guide and links to materials:

3 Likes

If your vent is anywhere near ground level, you need a cover and filter on the end of your vent to prevent small animals from getting in (just a cover won’t prevent bugs from getting in). Any filter will reduce the air flow meaning the length of your vent hose has to be shorter. Many filters will tell you how many feet of ventilation they are equivalent to. Note that corners also reduce your total vent length. And flexible hosing is less efficient than straight tubes. If you’re building a panel you’re venting through, I recommend plywood instead of cardboard. Mice, rats, squirrels, etc., can and will chew through cardboard, particularly in the winter if they think it’s warmer inside. There’s a lot to get right.

My own situation is that the only openable window anywhere near where the Glowforge will be is 2’x4’, large enough for a person to climb through. It would cost me $1000+ to replace it because it is part of a 4’x9’ window. It can’t practically be opened halfway — it’s all the way open or it’s not. And if I put a vent in and leave it open, it is a security issue, not even counting the risk of animals. So, to avoid having to put my Glowforge in my garage, I will have to build something 2’x4’ with a hose vent in it that I can put in place securely and remove quickly. Folding, as @jsc cleverly did, isn’t an option because it’s 2’ wide and 4’ tall. Plus I’ll have to operating with my blinds open instead of closed.

I’m not happy my filter is coming 5 months after my Glowforge.

1 Like

Adding a link to @blairondrla 's “DIY Window Flange Insert” build, which includes step by step instructions, clear photos and a shopping list :slight_smile:

2 Likes

Hi I am new to the GF community and was trying to figure out how I would set up my window ventilation system and this particular product seems to be the best out of everything ive seen (without having to make my own).

Moreover, it’s now wide enough for my 45 inch window. Any suggestions? Hopefully I am not 2/3 years too late :sweat_smile: